9 Digital Technology 2
Section outline
-
Kia ora...
Welcome back to school and to a new academic year. I hope you have had a great holiday.
My name is Mr Taha and I am going to be your digital technology teacher throughout the year.
In this course we are going to explore and use wide variety of electronic components in circuits. We will start this week by learning about simple circuit and how to use the bread board in building the circuit.


Big Idea:
Building a Mood light.
Learning Intentions: We are learning to (WALT)...
Understand how bread board works
Build a simple electric circuit using bread board and components
Success Criteria: I can/have...
- confidently use the bread board to build a simple circuit using bread board and components
Activities:
Begin by finding website – Technology Student – bookmark this page.
Download Programming Editor software (google, Picaxe Home, software, latest version of programming editor
- Work with bread board and components to build a simple circuit
Homework:
Explore and practice the use of https://www.tinkercad.com/circuits -
This week we are going to draw and build our simple circuit using Tinkercad circuit software. We are also going to use the multimeter to test the voltage of the battery and circuit.
Big Idea: Learning about simple circuits
Learning Intentions: We are learning to (WALT)...
Understand how bread board works
Build a simple electric circuit using bread board and components
Success Criteria: I can/have...
- confidently use the bread board to build a simple circuit using bread board and components
Activities:
Work on Tinkercad circuits
- Work with bread board and components to build a simple circuit
-
Kia ora..
This week we will build a transistor circuit. We are also going to use the multimeter to test the voltage of the battery and circuit.


To Simulate the circuit click on the link below
Big Idea:
Building a timer using 555 timer
Learning Intentions: We are learning to (WALT)...
Understand how bread board works
Build a simple electric circuit using bread board, transistor and components
Success Criteria: I can/have...
- confidently use the bread board to build a simple circuit using bread board, transistor and components
Activities:
Click on the link below to explore transistors and their functions:
http://www.technologystudent.com/elec1/transis1.htm- Work with actual bread board and components to build a simple circuit
- Download and save the attached transistor circuit practical exercise with instruction and then follow the instructions to apply.
Homework:
Explore and practice the use of bread board using Tinkercad software. -
Kia ora..
This week we will build a transistor circuit. We are also going to use the multimeter to test the voltage of the battery and circuit.
To Simulate the circuit click on the link below
Big Idea:
Building a timer using 555 timer
Learning Intentions: We are learning to (WALT)...
Understand how bread board works
Build a simple electric circuit using bread board, transistor and components
Success Criteria: I can/have...
- confidently use the bread board to build a simple circuit using bread board, transistor and components
Activities:
Click on the link below to explore transistors and their functions:
http://www.technologystudent.com/elec1/transis1.htm- Work with actual bread board and components to build a simple circuit
- Download and save the attached transistor circuit practical exercise with instruction and then follow the instructions to apply.
Homework:
Explore and practice the use of bread board using Tinkercad software. -
Kia ora...
This week we will start learning about the 555 timer integrated circuits.


Big Idea:
Continue with week 7 sessions
Learning Intentions:
use a 555 timer integrated circuit (IC) to operate an output for a specific amount of time
Achievement Objectives: Enter AO's here
Success Criteria: I can/have...
construct a working prototype circuit using a 555 IC
Activities:
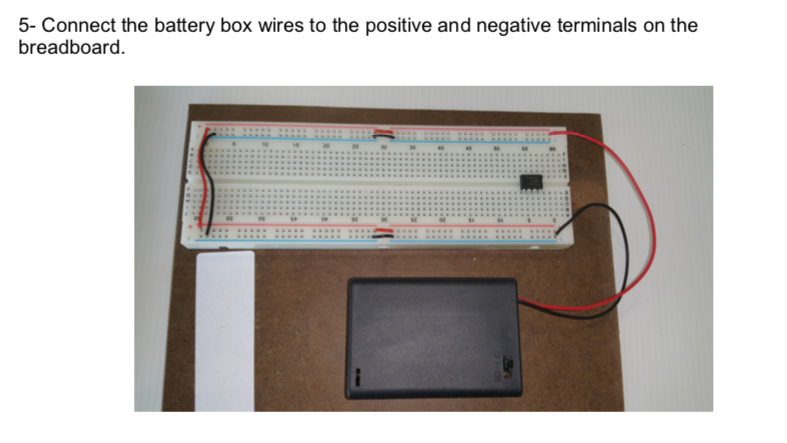
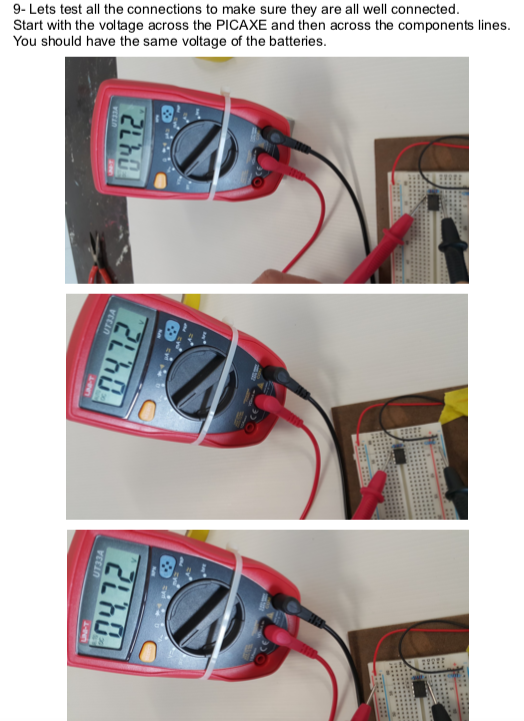
- insert the 555 into the breadboard, connect the power supply connections
- test for a voltage between the power pins, pin 1 = negative and pin 8 = positive
- when a voltage has been established, disconnect the 9V battery
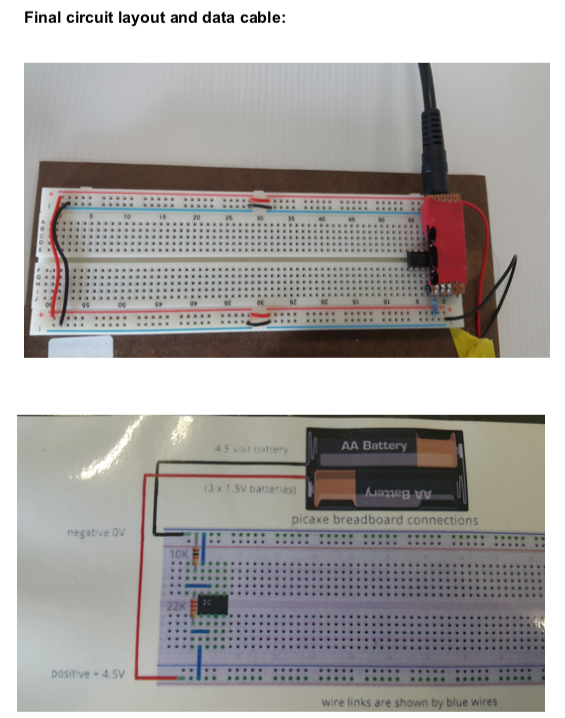
- look at the Tinkercad circuit diagram, learn the component symbols and where the components are connected to
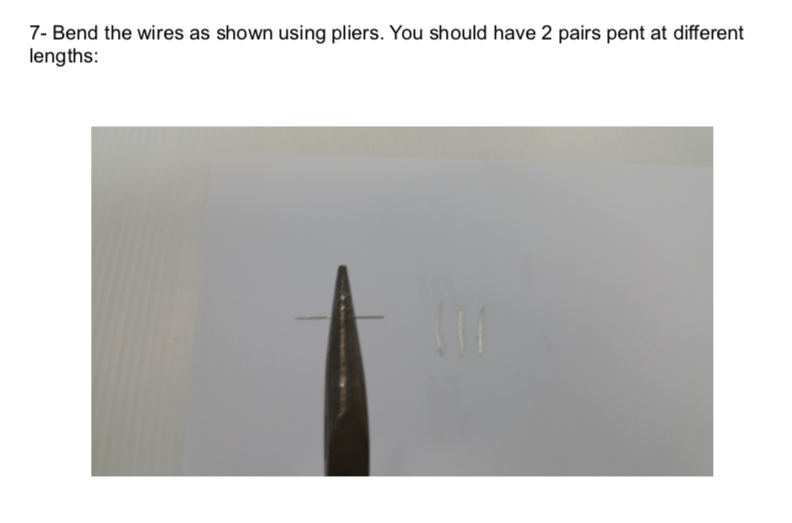
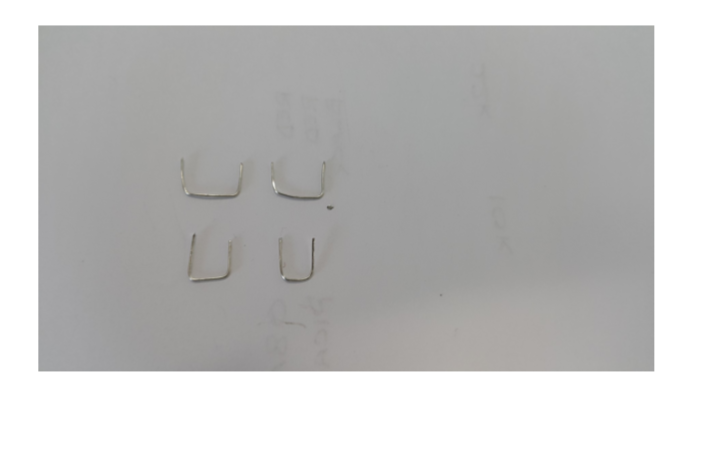
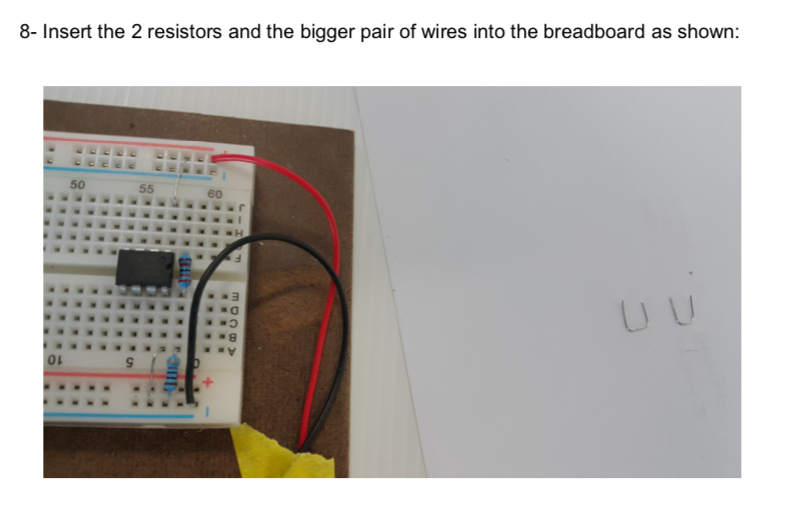
- insert the components as per the bread board diagram - connection wires must be straight and flat on the board - NO SPAGHETTI WIRES
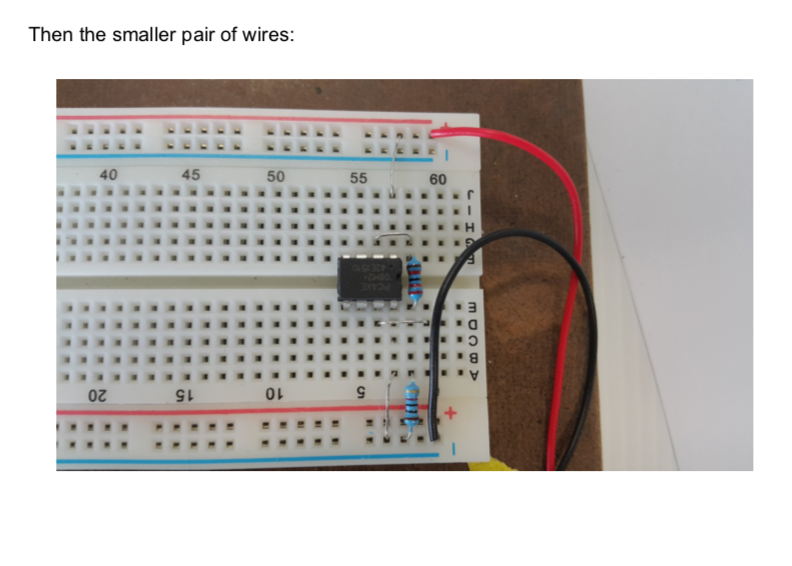
- the switch will be made from two pieces of hook-up wire
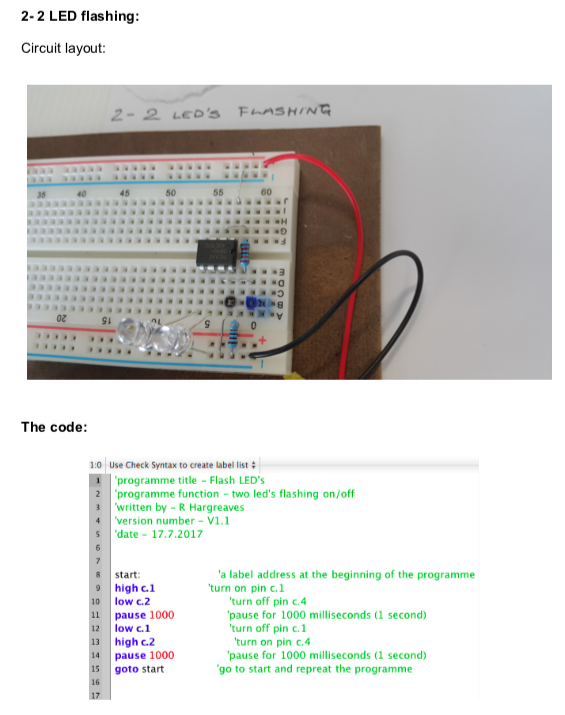
- test it, LED should be on and then off for about 1 second

You may find this website useful: http://www.555-timer-circuits.com/
diagrams and pictures are loaded on your weekly course page
-
Kia ora...
This week we will continue learning about the 555 timer integrated circuits.
Big Idea:
Continue with week 7 sessions
Learning Intentions:
use a 555 timer integrated circuit (IC) to operate an output for a specific amount of time
Achievement Objectives: Enter AO's here
Success Criteria: I can/have...
construct a working prototype circuit using a 555 IC
Activities:
- insert the 555 into the breadboard, connect the power supply connections
- test for a voltage between the power pins, pin 1 = negative and pin 8 = positive
- when a voltage has been established, disconnect the 9V battery
- look at the Tinkercad circuit diagram, learn the component symbols and where the components are connected to
- insert the components as per the bread board diagram - connection wires must be straight and flat on the board - NO SPAGHETTI WIRES
- the switch will be made from two pieces of hook-up wire
- test it, LED should be on and then off for about 1 second
You may find this website useful: http://www.555-timer-circuits.com/
diagrams and pictures are loaded on your weekly course page
-
Kia ora
I hope you are all doing well and following the lockdown procedure and advise.
Your task for the rest of the week is to visit Google Classroom and then click on the provided links about circuits and computational thinking.
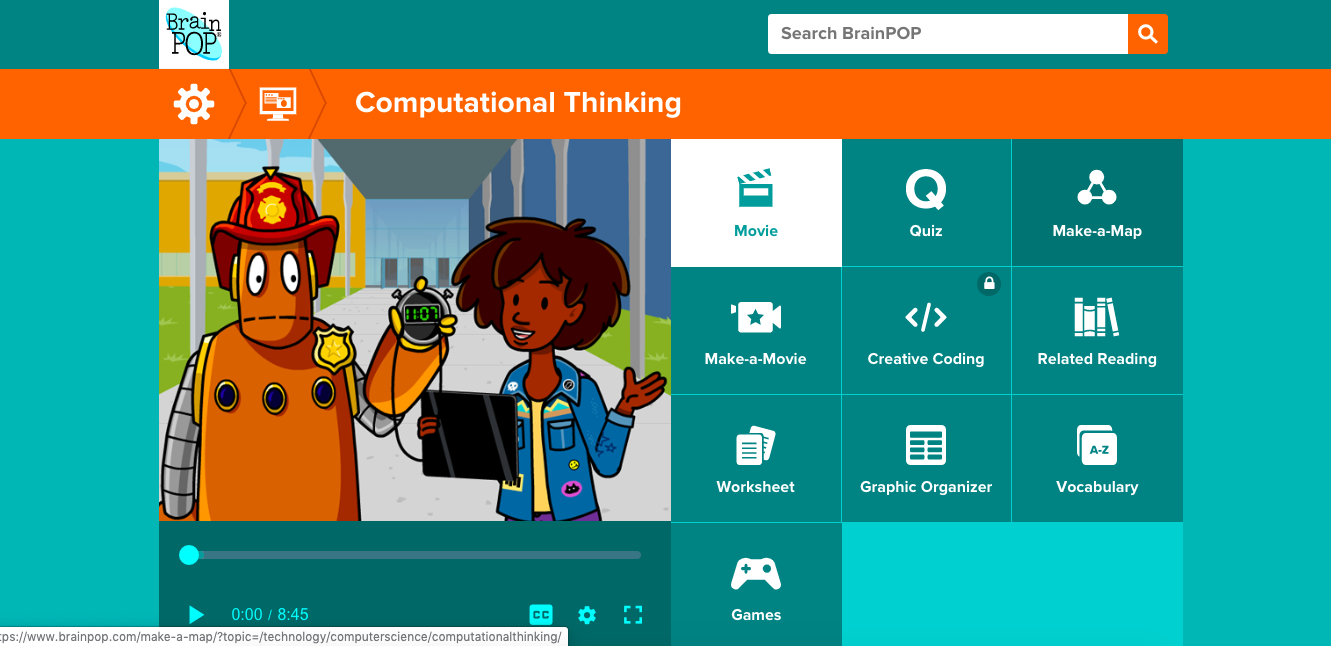
You need to watch the videos and then attempt the quizes. You can then enjoy the related games in there. BrainPop site will provide you with the useful information about many topics and subjects.
Remember:
Your google Classroom code is vmz7fpf
Your brainPop user name is MHJC and the password is: 1student
https://www.brainpop.com/science/energy/ electriccircuits/
https://www.brainpop.com/technology/scienceandindustry/ computationalthinking/ 
-
I hope you are all safe and doing well and following the lockdown procedure and advise.
Your task for the rest of this week is to visit Google Classroom and then click on the provided links about circuits and computational thinking.
You need to watch the videos and then attempt the quizes. You can then enjoy the related games in there. BrainPop site will provide you with the useful information about many topics and subjects.
Remember:
Your google Classroom code is vmz7fpf
Your brainPop user name is MHJC and the password is: 1student
https://www.brainpop.com/science/energy/ electriccircuits/
https://www.brainpop.com/technology/scienceandindustry/ computationalthinking/ 

-
Kia ora..
Your task for this week is to visit Google Classroom and then click on the provided links about electronic components. You then need to complete the sheet with the relevant information.
Link1 http://www.technologystudent.com/elec1/compn1.htm
Link2 http://www.technologystudent.com/elec1/compn2.htm
Link3: http://www.technologystudent.com/elec1/compn3.htm
emember:
Your google Classroom code is vmz7fpf
Click on the questions sheet below and submit on google classroom. -
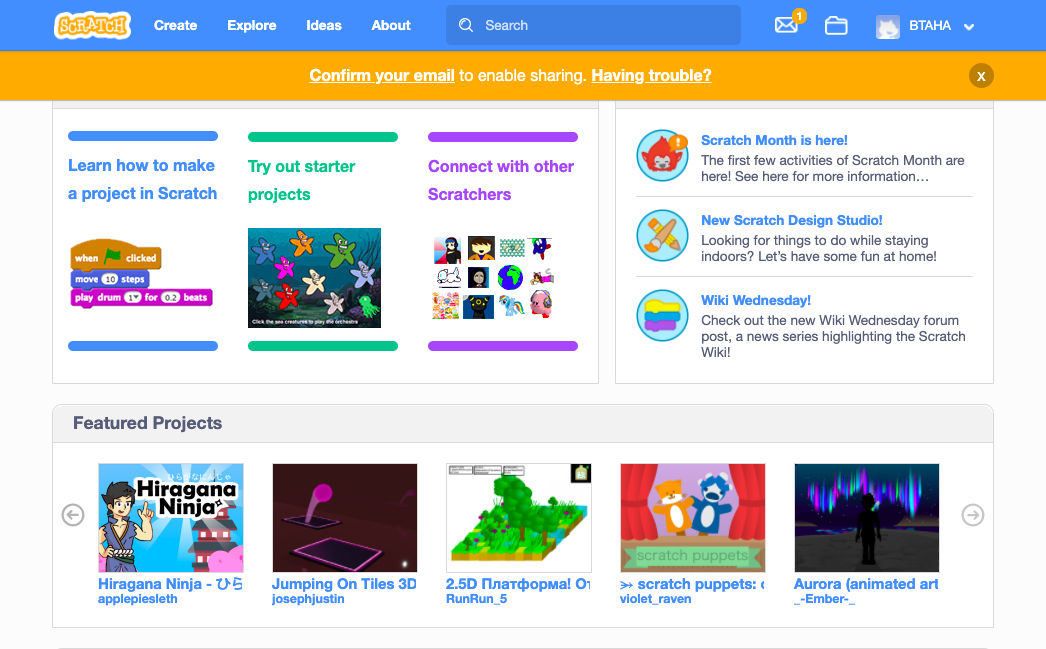
Kia ora
This week we will start learning about Scratch Coding software. With Scratch, you can program your own interactive stories, games, and animations — and share your creations with others in the online community.
We will first explore Scratch and start learning about simple xoding and then will use what we learn to produce an outcome. Scratch is free and can be accessed from your devise at home. It is a great opportunity to learn new codes or refresh your knowledge and add more if you have played with Scratch before.
Scratch work and tutorial link will be on Google Classroom. Please access and lets have fun.
Remember:
Your google Classroom code is vmz7fpf -
Kia ora
This week we will continue working with Scratch Coding software. With Scratch, you can program your own interactive stories, games, and animations — and share your creations with others in the online community.
We will first explore Scratch and start learning about simple xoding and then will use what we learn to produce an outcome. Scratch is free and can be accessed from your devise at home. It is a great opportunity to learn new codes or refresh your knowledge and add more if you have played with Scratch before.
Scratch work and tutorial link will be on Google Classroom. Please access and lets have fun.

Remember:
Your google Classroom code is vmz7fpf -
Kia ora...
This week we will continue learning about the 555 timer integrated circuits.
Big Idea:
555 timer model
Learning Intentions:
use a 555 timer integrated circuit (IC) to operate an output for a specific amount of time
Achievement Objectives: Enter AO's here
Success Criteria: I can/have...
construct a working prototype circuit using a 555 IC
Activities:
- insert the 555 into the breadboard, connect the power supply connections
- test for a voltage between the power pins, pin 1 = negative and pin 8 = positive
- when a voltage has been established, disconnect the 9V battery
- look at the Tinkercad circuit diagram, learn the component symbols and where the components are connected to
- insert the components as per the bread board diagram - connection wires must be straight and flat on the board - NO SPAGHETTI WIRES
- the switch will be made from two pieces of hook-up wire
- test it, LED should be on and then off for about 1 second
You may find this website useful: http://www.555-timer-circuits.com/
diagrams and pictures are loaded on your weekly course page
-
-
Year9DGT assessment
Assessing student's understanding and application of modelling 555 timer circuit.
-
-
Kia ora...

Software download:
● For Windows, Mac and Linux operating systems visit: http://www.picaxe.com/Software
● For Chromebooks and Tablet users:
Install the following programs on your Google account :-1. PICAXE Blockly (this allows you to write code for the PICAXE)
https://chrome.google.com/webstore/detail/picaxe-blockly/hhdlapnjifkkcpghcapopejopnbpapnb
2. PICAXE programmer (this allow you to program your PICAXE)
https://chrome.google.com/webstore/detail/picaxe-programmer/mcakegabnfookegpcpdmhgpdajgkjncp?hl=en-GB
To code on Chromebook click on the following link:
https://drive.google.com/a/mhjc.school.nz/file/d/0B9hRsiioOJuaM2hzVlFMLVZqZ1E/view? usp=sharing
Big Idea:
Moodlight using Picaxe
Learning Intentions:
begin programming a picaxe microcontroller
Achievement Objectives:
use a digital device to create an outcome
Success Criteria: I can/have...
- constructed a bread board with picaxe
- downloaded a programme
- worked through the programme examples
Activities:
we are beginning to learn programming of a microcontroller
- go to the website - picaxe
- go to the downloads section
- download the software, for windows it is 'programming editor 6, for Mac it is Axepad, for chromebook you need to access the app 'Boxy
next stage is to set up your breadboard, this will be covered in class, test the setup, download and begin programming examples
-

Big Idea:
Designing and making moodlight using picaxe micro controller
Learning Intentions:
begin programming a picaxe microcontroller
Achievement Objectives:
use a digital device to create an outcome
Success Criteria: I can/have...
- constructed a bread board with picaxe
- downloaded a programme
- worked through the programme examples
Activities:
we are beginning to learn programming of a microcontroller
- go to the website - picaxe
- go to the downloads section
- download the software, for windows it is 'programming editor 6, for Mac it is Axepad, for chromebook you need to access the app 'Boxy
next stage is to set up your breadboard, this will be covered in class, test the setup, download and begin programming examples
-
Kia ora...
This week we will continue working to prepare our Picaxe breadboard circuit.


Big Idea:
Moodlight using Picaxe
Learning Intentions:
begin programming a picaxe microcontroller
Achievement Objectives:
use a digital device to create an outcome
Success Criteria: I can/have...
- constructed a bread board with picaxe
- downloaded a programme
- worked through the programme examples
Activities:
we are beginning to learn programming of a microcontroller
- go to the website - picaxe
- go to the downloads section
- download the software, for windows it is 'programming editor 6, for Mac it is Axepad, for chromebook you need to access the app 'Boxy
next stage is to set up your breadboard, this will be covered in class, test the setup, download and begin programming examples
-
Kia ora
This week we will start coding the picaxe microcontroller.
Big Idea:
Moodlight using Picaxe
Learning Intentions:
begin programming a picaxe microcontroller
Achievement Objectives:
use a digital device to create an outcome
Success Criteria: I can/have...
- constructed a bread board with picaxe
- downloaded a programme
- worked through the programme examples
Activities:
we are beginning to learn programming of a microcontroller
- go to the website - picaxe
- go to the downloads section
- download the software, for windows it is 'programming editor 6, for Mac it is Axepad, for chromebook you need to access the app 'Boxy
next stage is to set up your breadboard, this will be covered in class, test the setup, download and begin programming examples

-
Kia ora
This week we will continue coding the picaxe microcontroller.
Big Idea:
Moodlight using Picaxe
Learning Intentions:
begin programming a picaxe microcontroller
Achievement Objectives:
use a digital device to create an outcome
Success Criteria: I can/have...
- constructed a bread board with picaxe
- downloaded a programme
- worked through the programme examples
Activities:
we are beginning to learn programming of a microcontroller
- go to the website - picaxe
- go to the downloads section
- download the software, for windows it is 'programming editor 6, for Mac it is Axepad, for chromebook you need to access the app 'Boxy
next stage is to set up your breadboard, this will be covered in class, test the setup, download and begin programming examples

-
Kiora
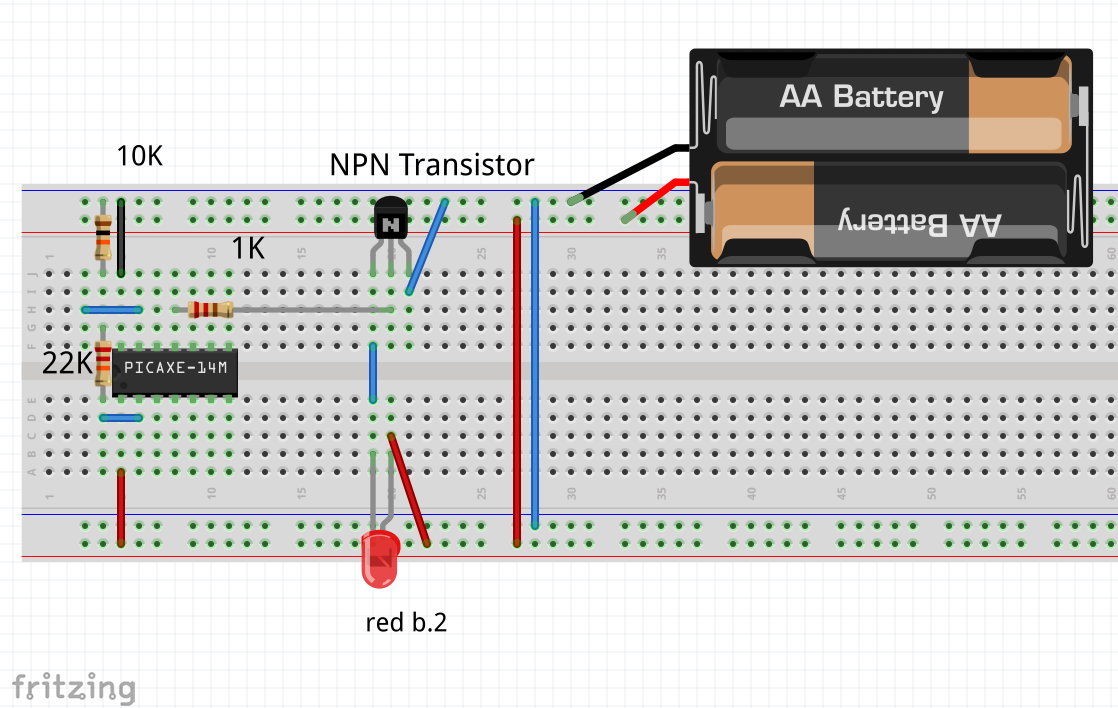
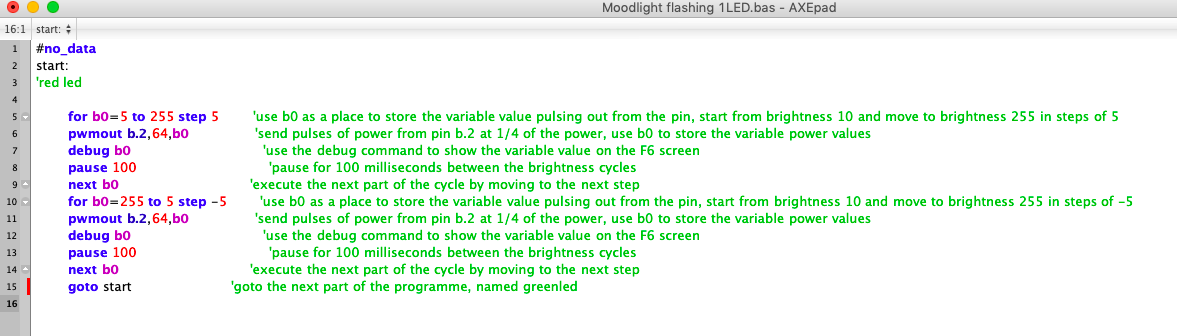
This week we are going to learn about the PWM Pulse Width Modulator. You are going to build a PICAXE circuit with a transistor, LED. The outcome is to make an LED dimmer.
Below are the circuit layout and the code:
-
Next stage:
- You must have programmed your 14M2 with one LED to pulse up and down
- insert the components as shown on the screenshot of the board below
- programme the 14M2 with a pulse width modulation programme to test each set of leds


-
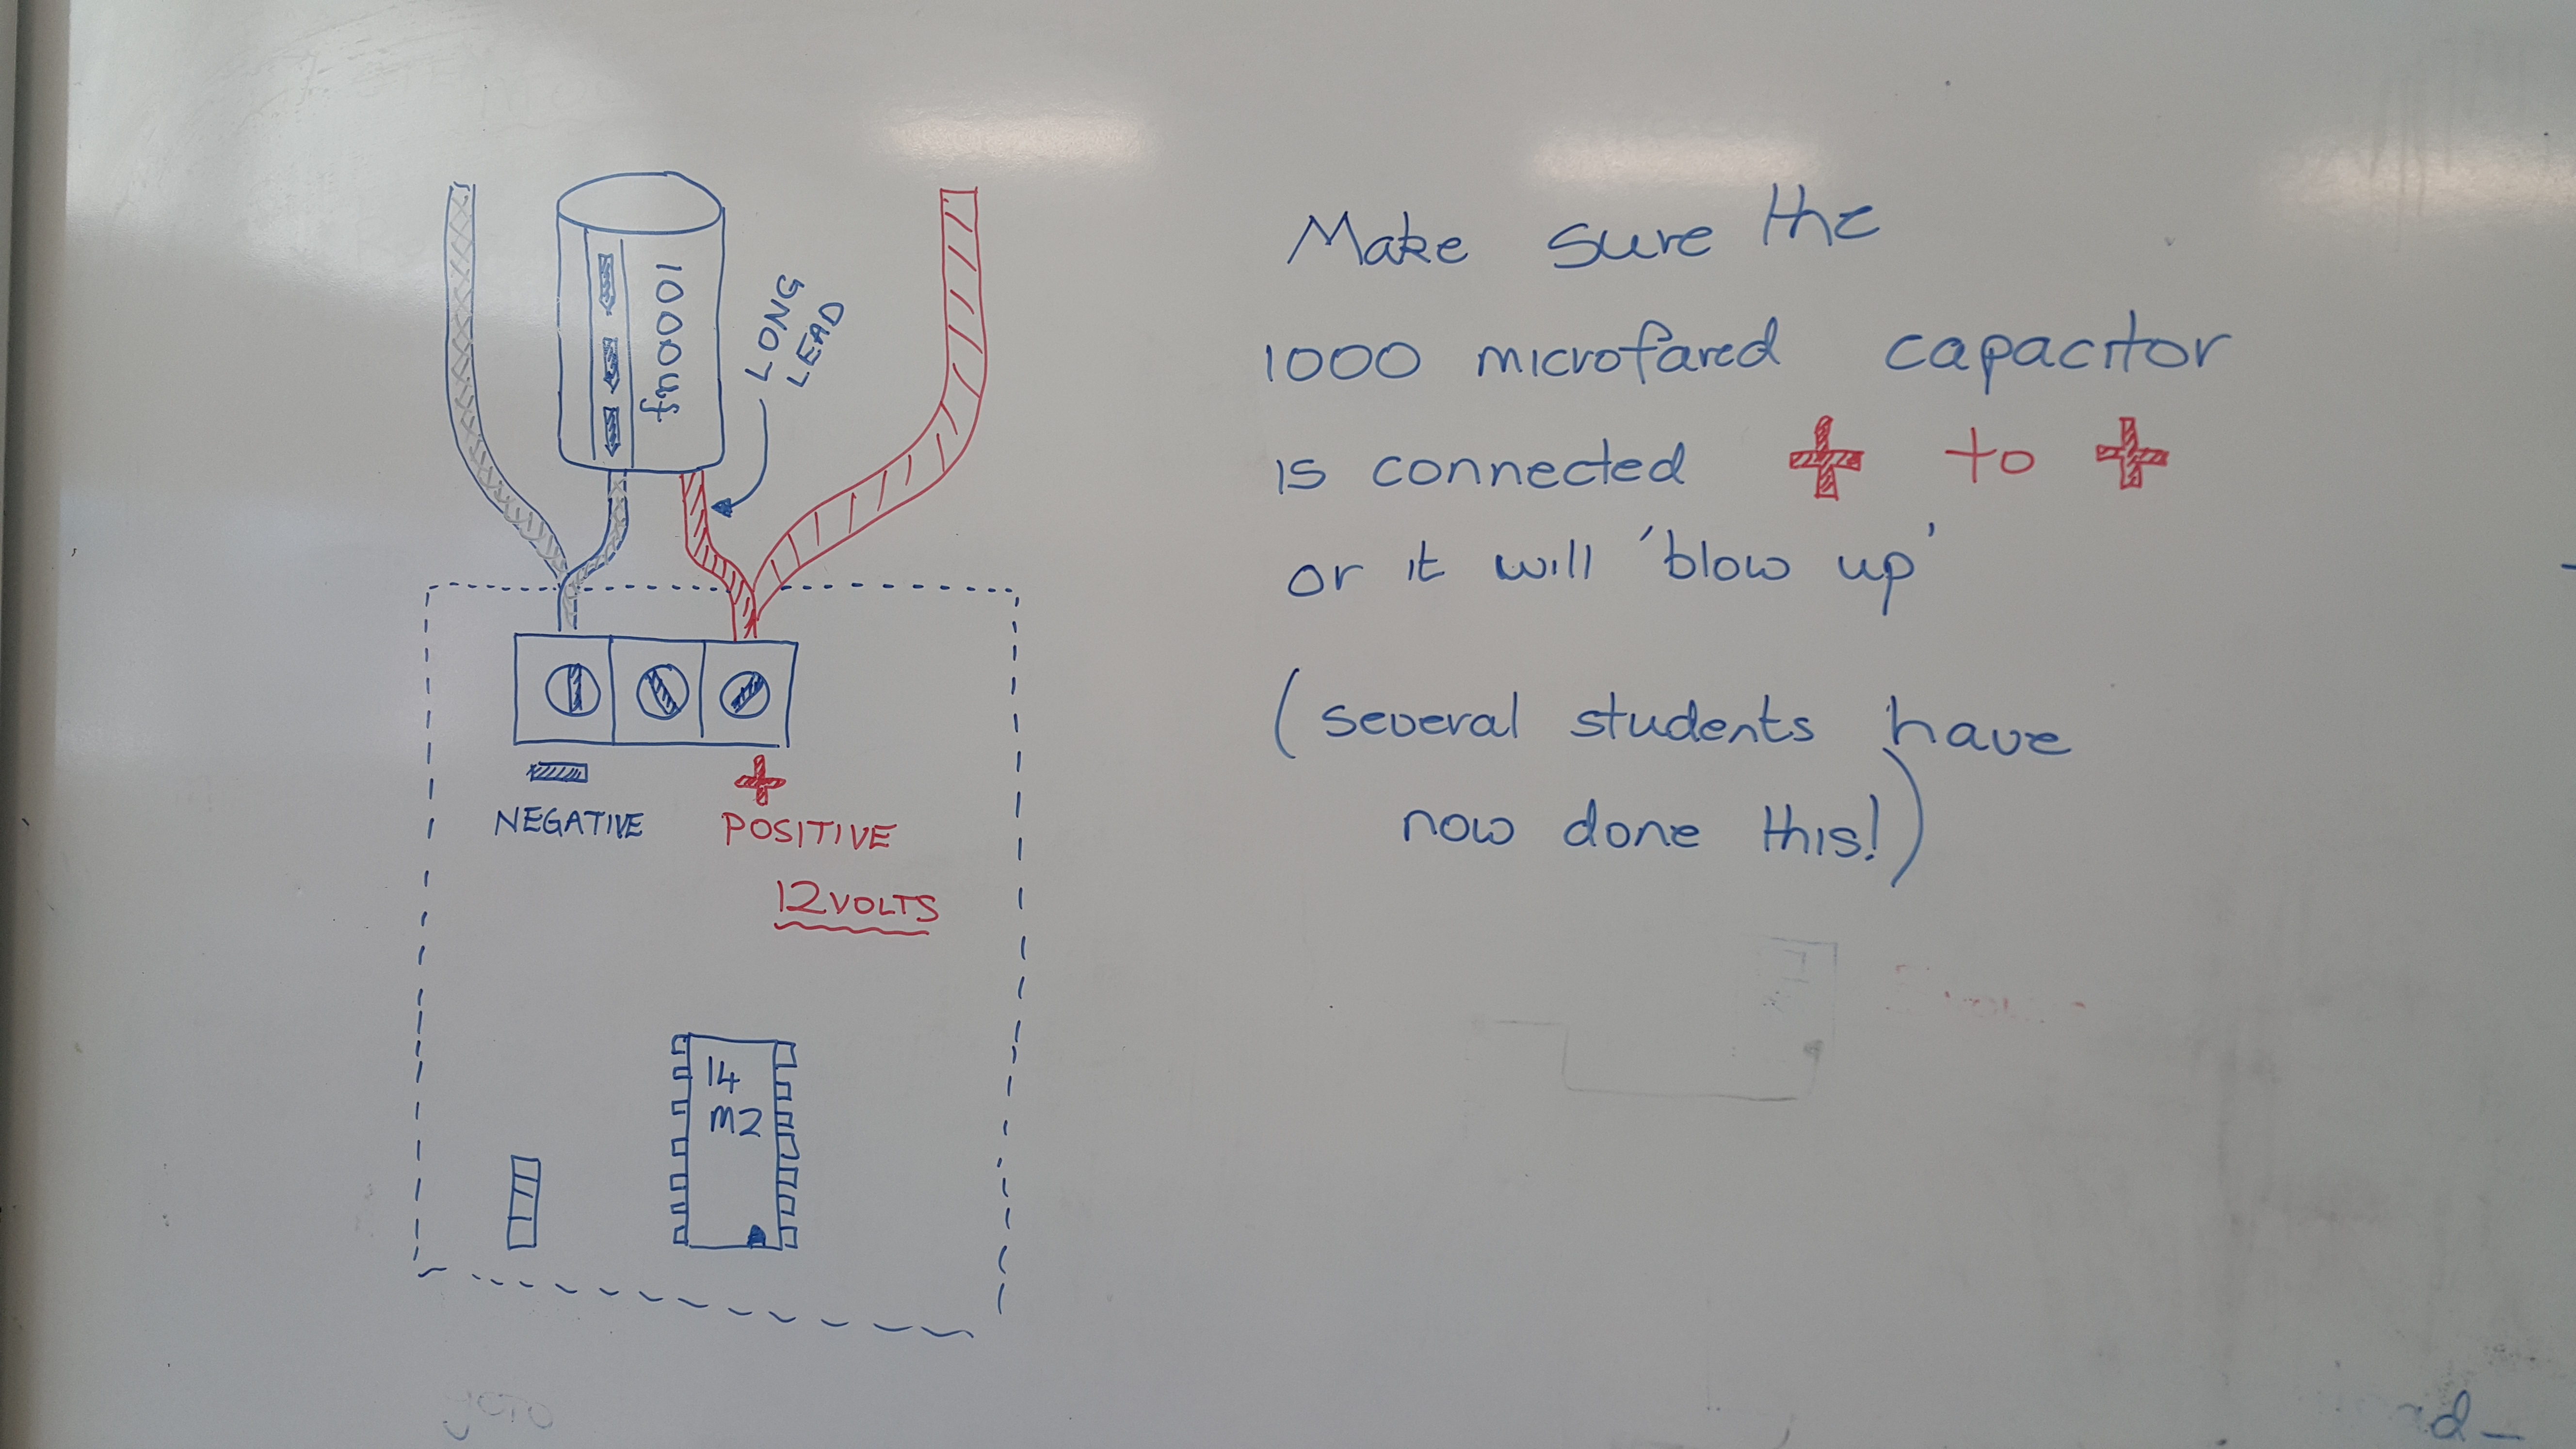
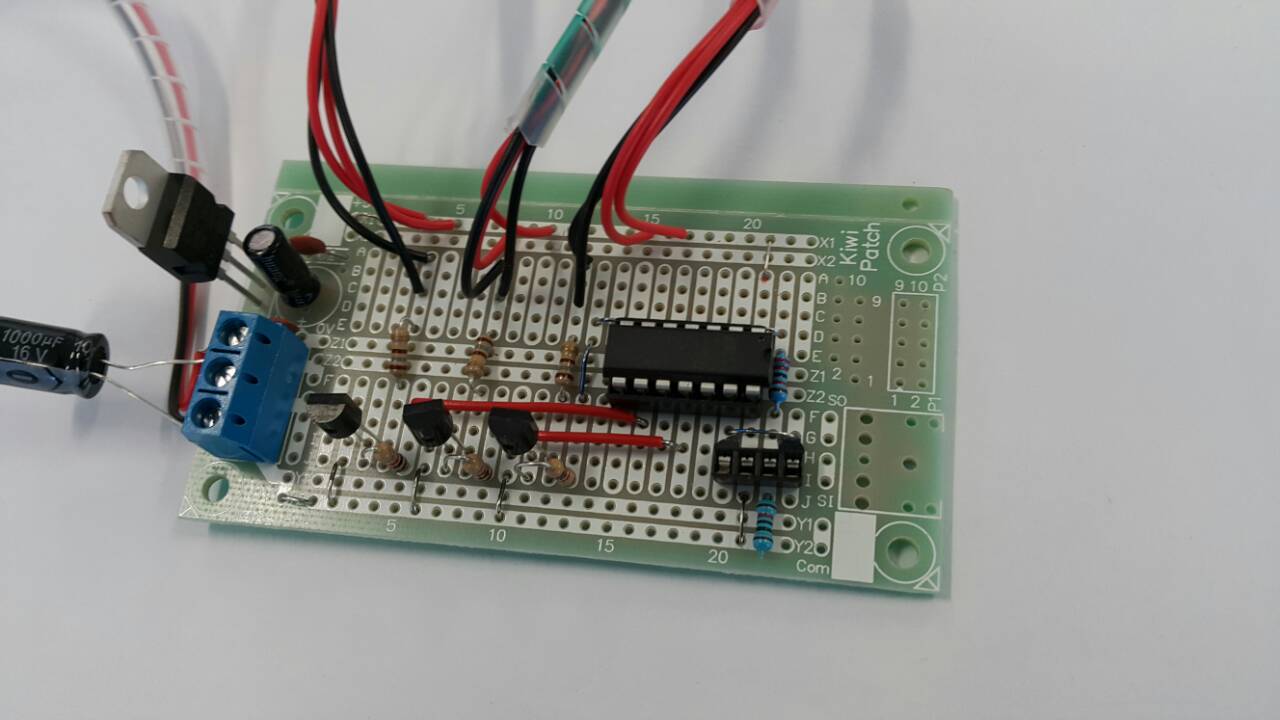
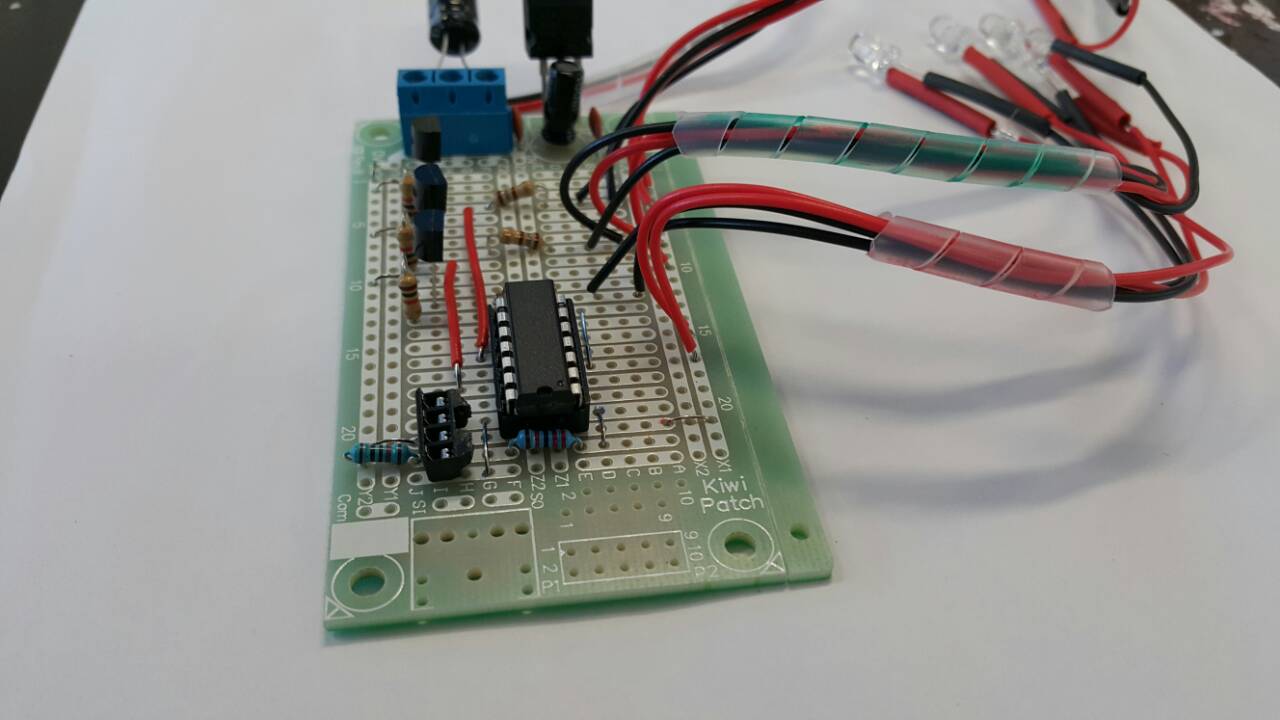
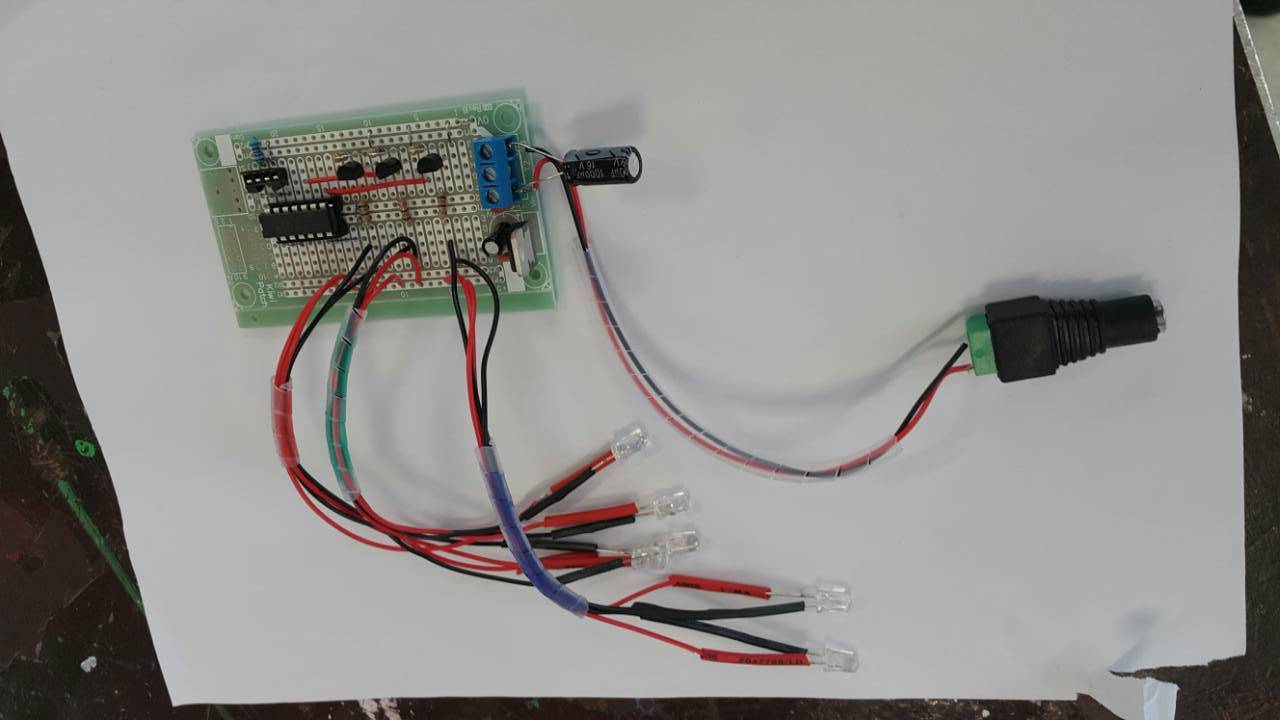
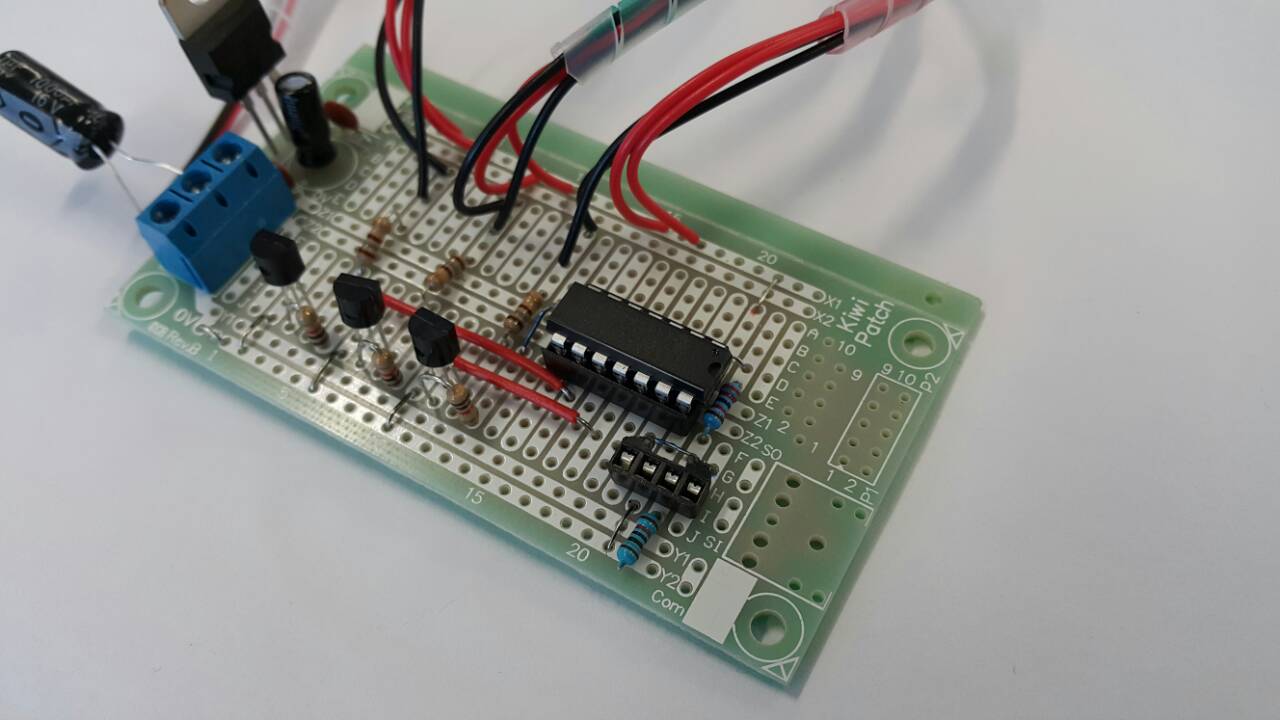
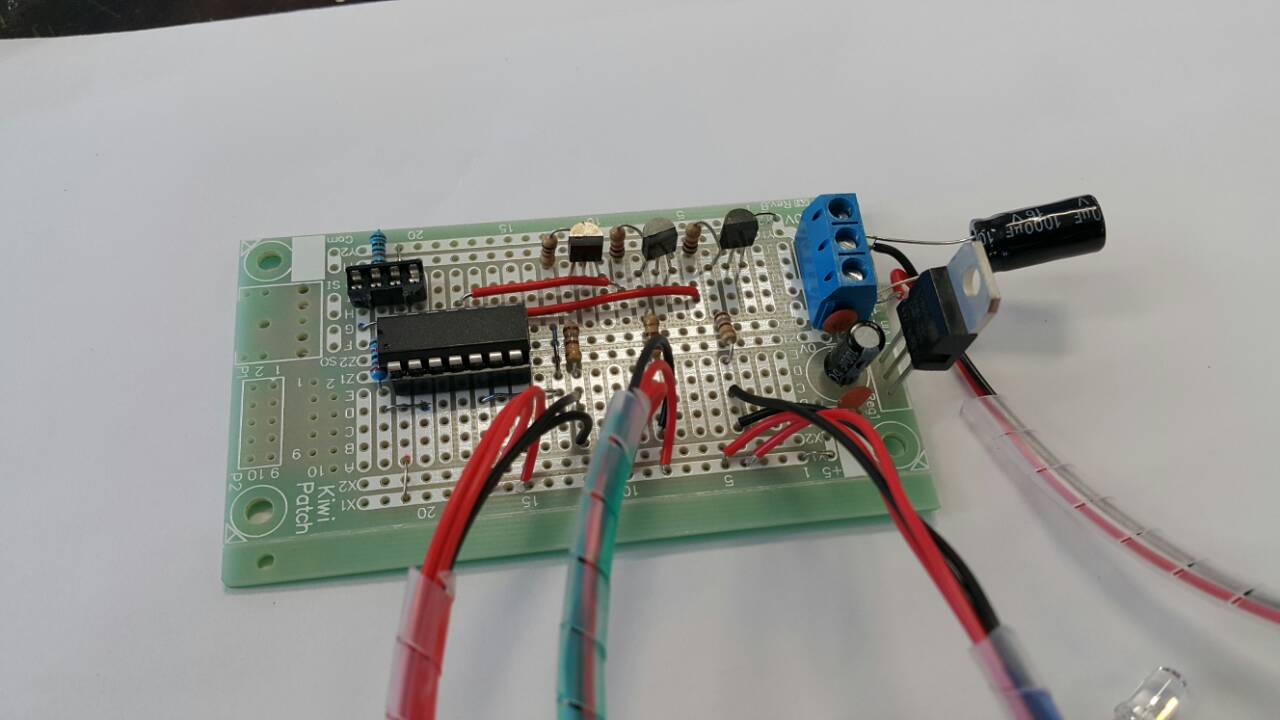
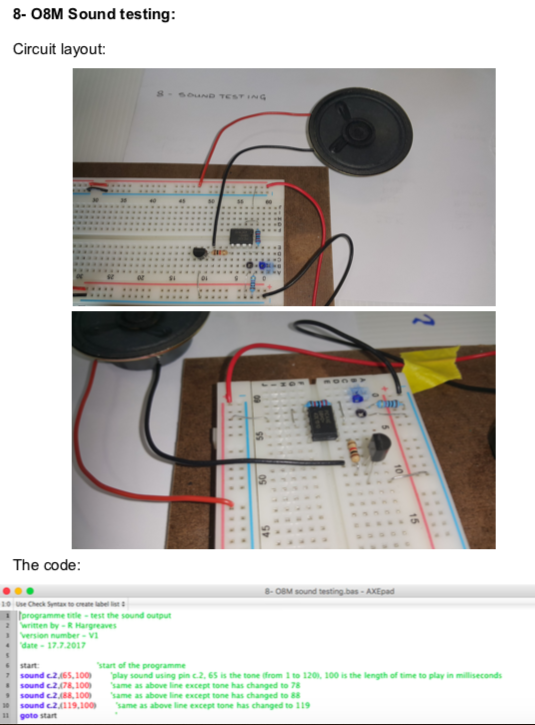
Kia Ora..
Now it is time to make the actual moodlight using the Kiwipatch circuit boards.
You need to practice soldering first and once you become confident you can start preparing your actual circuit board.
When soldering practice is done then start preparing your actual and perminant board by inserting the components and links as below: