7 Technology
Section outline
-
Welcome to Technology with Mr Chen and Mrs Hewlett.
This term you will work on Designing and Developing a material/s outcome.
Please bring your device to class each lesson.
We will be using MHO and Google Classroom.
All your Learning Intentions and Success Criteria and weekly tasks will be here on MHO and you will also find some of the activities on Google Classroom.
-
Technology Assessment 1 - Outcome Evaluation Assignment
-
Assessment 1 Outcome Evaluation - Coast Assignment
-
-
COAST TECHNOLOGY
Welcome to Technology for Term 4.
Your teachers are Mr Chen & Mrs Hewlett & Mrs Priest.
We will be working with your Whanau to develop an outcome (make something) that links to your other studies.
Firstly we will be looking at What Tech Education is about and learning some of the words and terms that you will come see and hear when working in the Technology rooms.
Google Classroom Code: 8bb1wfy
* What is Technology and Technology Education ?* Technology Language
* Codes of Practice - Safe use of the Tech rooms and tools and equipment.
Learning Intentions:
We are EXPLORING what Technology is and what Technology Education is about at MHJC.
We are EXPLORING the terminology used in Technology Education
We are EXPLORING the Codes of Practice that we must follow when working in the Tech Workshop.
Success Criteria:
I have participated in a discussion about Technology and Tech Education
I can recognised the difference between a product from nature and a technological outcome
I can identify a range of different technologies
I understand the terms used in Technology Education
I can identify safe codes of practice to follow in the Tech workshop
Activities:
1. Slide show - view this in class with your teacher.
2. Language of Technology /Terminology - complete the crossword - see Google Classroom
3. Nature v's Technological Outcome- see Google Classroom
-
This week we are continuing on the work we started in Week 1.
* Technology Language
* Codes of Practice - Safe use of the Tech rooms and tools and equipment.
* Writing a Design Brief and Specifications
* Research - Mood boards
Learning Intentions:
We are EXPLORING the terminology used in Technology Education
We are EXPLORING the Codes of Practice that we must follow when working in the Tech Workshop.
We are EXPLORING the difference between Nature/Natural and a Technological product
We are learning how to write a Design Brief and Specifications
We are learning how to investigate our Design Brief
Success Criteria:
I can recognised the difference between a product from nature and a technological outcome
I can identify a range of different technologies
I understand the terms used in Technology Education
I can identify safe codes of practice to follow in the Tech workshop
I can write a Design Brief and specifications
I can find pictures of key rings that i like - labelling them. Different colours/shapes/ materials/ messages.
Activities:
1. Language of Technology /Terminology - complete the crossword - see Google Classroom
2. Nature v's Technological Outcome- see Google Classroom finish this from last week.
3. Fill in the Journal - My Design Brief and Specifications- complete this from Friday.
4. Research - Identify your Y10 stakeholder - write up what you know about them so far. Name/Girl-Boy/Anything you know about them.
5. Create a mood board of pictures of key rings that you like - label them why you like them. Make sure you have different colours/shapes/materials/messages. See Google Classroom.
-
* Writing a Design Brief and Specifications
* Research - Mood boards
* Sketching 2 Design Ideas
* Choose 1 - develop a final design on Inkscape
* Identify Code of Practice we will need to follow to create our outcome
Learning Intentions:
We are learning how to write a Design Brief and Specifications
We are learning how to investigate our Design Brief by creating a mood board
We are learning how to communicate our Design ideas through sketching
We are learning how to use Inkscape to produce our Final Design
We are EXPLORING the Codes of Practice that we must follow when working in the Tech Workshop.
Success Criteria:
I can write a Design Brief and specifications
I can find pictures of key rings that i like - labelling them. Showing different colours/shapes/ materials/ messages.
I can communicate my Design ideas by sketching 2 Design Ideas - labelling the design features
I can use Inkscape to produce my Final Design
I can identify safe codes of practice to follow in the Tech workshopActivities:
1. Fill in the Journal - My Design Brief and Specifications.
2. Research - Identify your Y10 stakeholder - write up what you know about them so far. Name/Girl-Boy/Anything you know about them.
3. Create a mood board of pictures of key rings that you like - label them why you like them. Make sure you have different colours/shapes/materials/messages. See Google Classroom.
4. Sketch 2 Design Ideas - labelling the design features.
5. Choose one and develop this further by drawing your final design up on Inkscape.
6. Complete activities on GC on Codes of Practice to follow when using equipment.
-
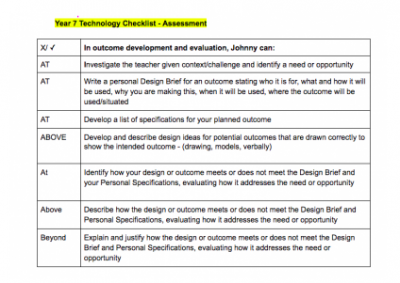
This week is Assessment week.
You must evaluate how your Final Design meets your Design Brief or not.
We are learning how to Modge Podge onto wood to make a Key Ring for our Y10.
If you have managed to complete your Final Design on Inkscape - show Ms Taif to check it is correct. You can have this cut out in Wood or Acrylic.
If you haven't started trying to use Inkscape - please see the Teachers and create your design onto the wood given to you by the teacher. Modge Podge it onto wood and varnish afterwards.
Activities:
Complete your Final Design - Inkcape or hand drawn
Complete your Assessment see doc on GC.
Watch and listen to teacher demonstration of how to use Modge Podge.
-
Kia ora...
Weeks 6,7,8,
At this stage of the term we should have all finished our Assessment and focussing on getting our Y10 Key ring gift completed then have some fun and make one for yourself or as a gift to give to others.
Learning Intentions: We are learning to (WALT)...
- Use Modge Podge to transfer images onto wood
- Present our gift key ring for giving
Success Criteria: I can/have...
- Sanded my wood first to smooth all edges
- Used Modge Podge to transfer images onto my wooden key ring
- Varnished or painted the back of my wood.
- Inserted the ring
- Presented my gift - it is packaged and has a gift card.
Activities:
- Modge Podge your image onto your wood
- Paint or varnish the back
- Insert ring
- Package - fabric bag or plastic bag - create a tag card
Follow Up Tasks:
Create your own design for a key ring for yourself that uses the laser. Work with Ms Taif to get it cut out.EXTENSION IDEAS see below.
-
Extension suggestions:
Create a key ring for your Learning Advisor & a thank you card.
Create a key ring to give as a gift to some one special at your place. Create a thank you card.
Think of something at your place that has a key and create a key ring that shows without words what it is for. e.g. garden shed shaped house for the shed or a bike shape with details etched for the bike rack lock.
Have some fun !!!!


