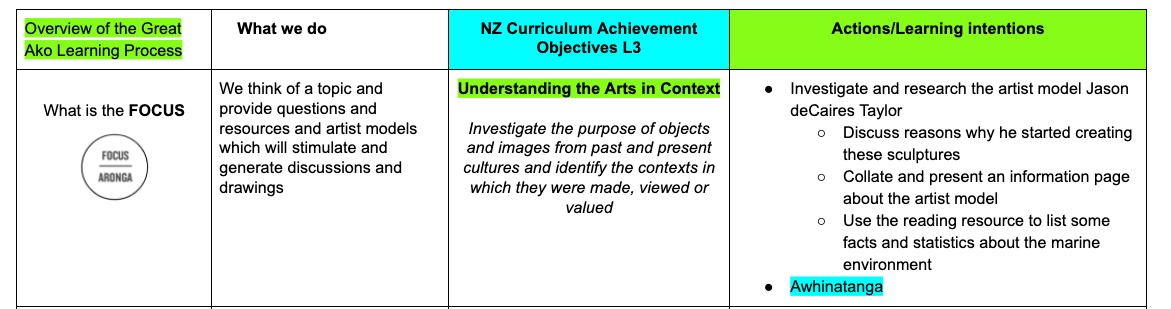
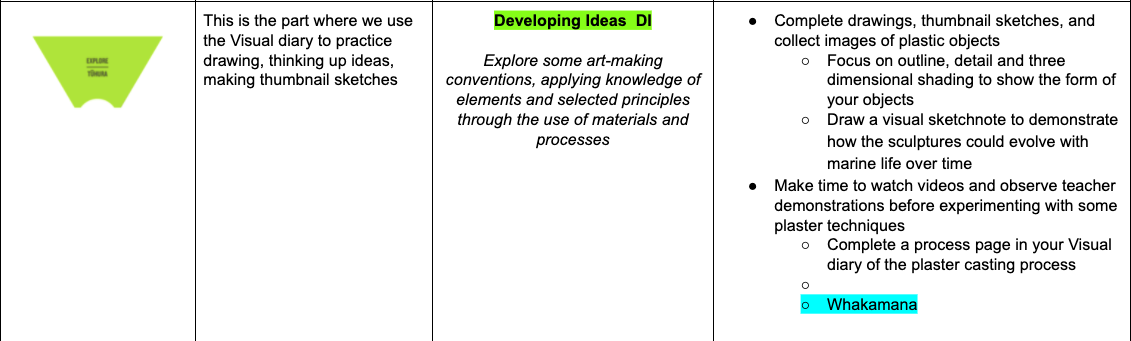
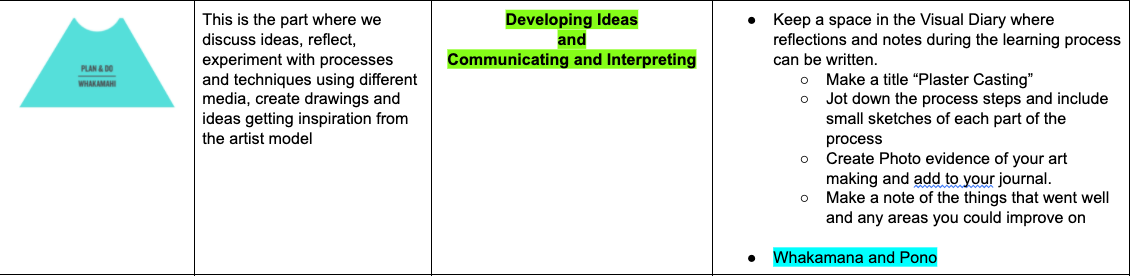
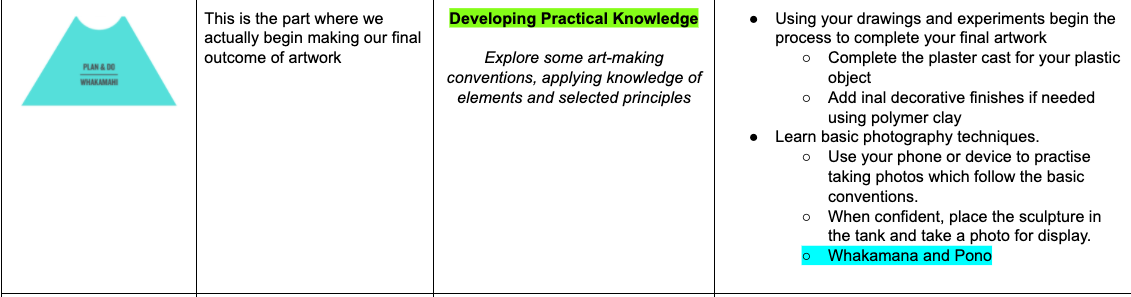
8 Visual Art 2
Section outline
-
Welcome to Year 8 Visual Art. You will have an 8 week block on Visual Art. The artwork you make will be part of your research on the whanau emblem.-
Term 1 Assessment Assignment
-
Term 2 Assessment Assignment
-
-
Kia ora
I am Mr Symons and I will be your Art Teacher this Term.
Welcome to 8 Art. We are going to a fun and interesting term observing objects, freehand sketching, painting, sculpting and learning digital photography skills in Art.
We will follow the Art Curriculum to Plan and control our learning in ART. Our class code for google classroom is
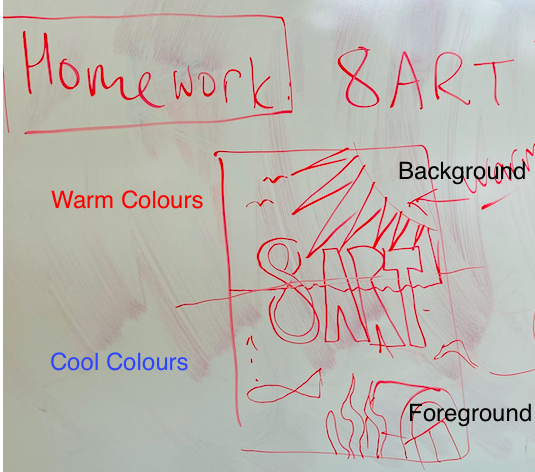
 'Learning Intentions: We are learning to (WALT)...
Understand the basics of Contour Sketching and Using Tone to create shadow
understand Colour theory in terms of warm and cool colours
Success Criteria: I can/have...
- explain difference between line and tone and when it is appropriate to use each technique
- use colour effectively
Activities:
Draw two freehand sketches
Design an eye-catching title page
Homework:
Complete two snorkel sketches in your visual diary/sketchbookComplete the title page for homework.
-
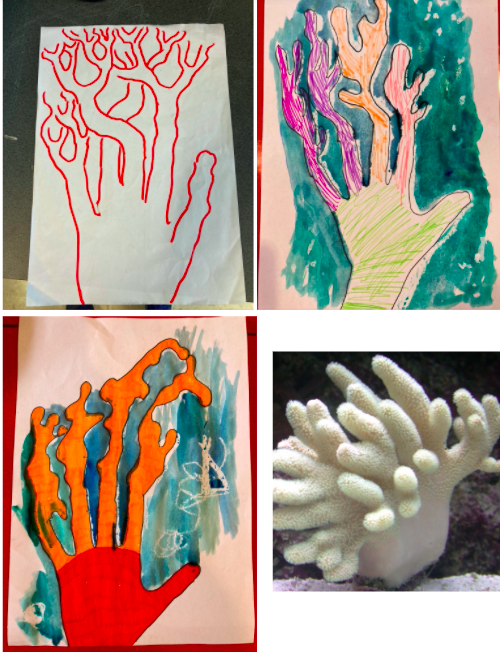
Kia Ora
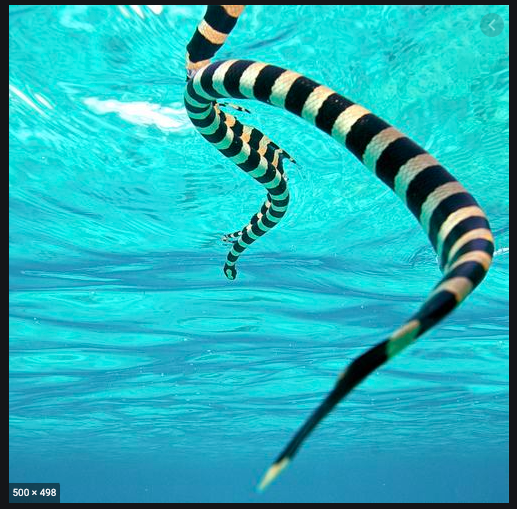
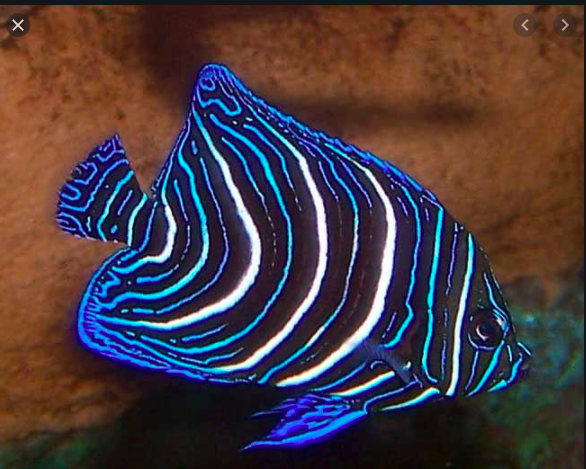
Welcome, this week we will be exploring coral and seaweed forms using crayon and water colour paint. We will use an outline of our hands as the foundation of our first painting.
WALT: Using resisting materials to convey a theme or emotion.
We know that water and oil don't mix. Using this we can create areas of our painting which highlight mark making and suggest flow, watery textures and subtle movement.
Task:
1. Use a tracing of your hand as an outline in pencil, stop at the tips.
2. FIll the area of your hand print with wax crayon
3. Extend the fingers and twist them together into branch like forms. Please see example below.
4. Add holes or cavities on the palm of the hand
5. Wash a quick drying dye across the surface of your drawing.
-
T1 Maori Art Design Assignment
-
-
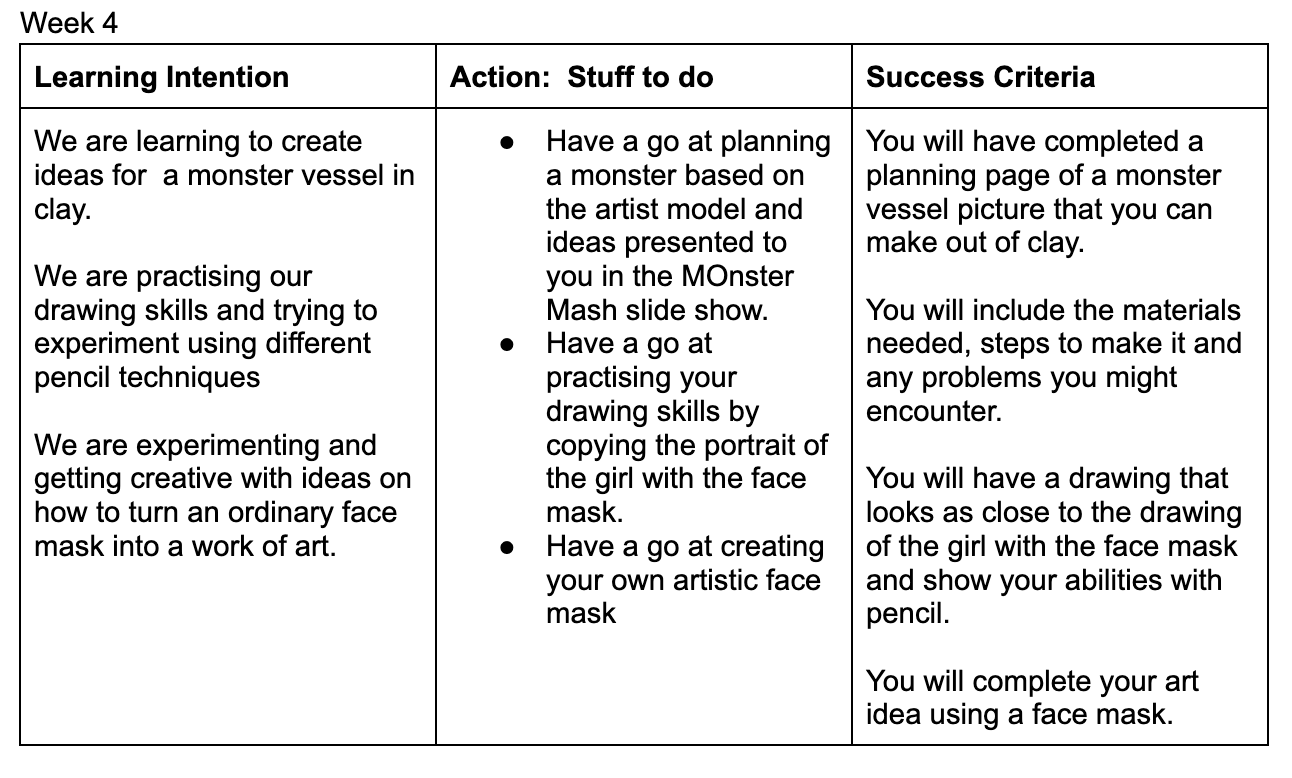
Kia Ora Welcome to Week 4
Today we are introducing a new topic. Plaster Sculpture
WALT:
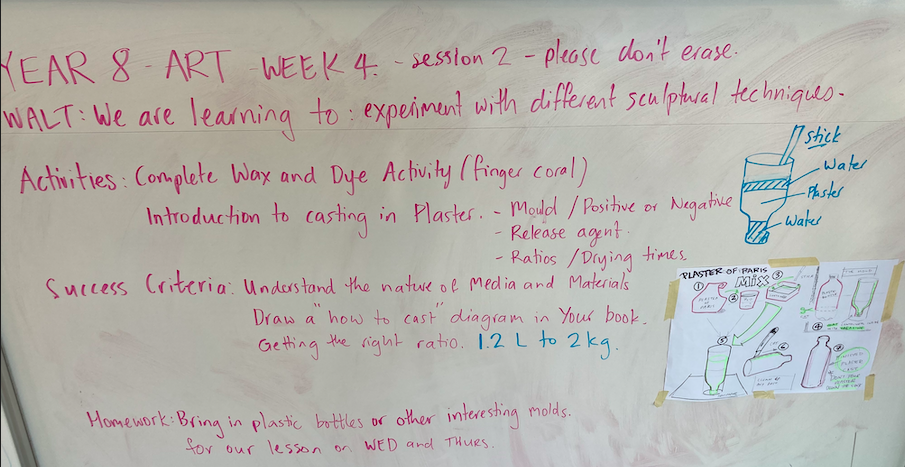
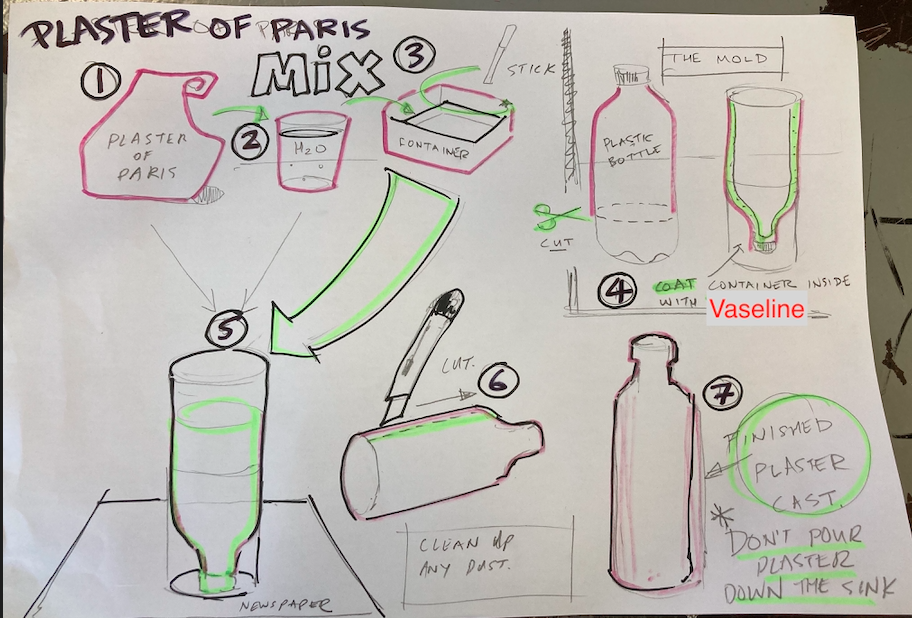
-
LOCKDOWN LEGO ACTIVITY on Google classroom
Topic: Local Lockdown Lego Photos
Teacher: Mr Symons
TASK
Create a lego figure scene for friends and whanau. Incorporate their interests and hobbies and use an old photo or make/draw a backdrop( I used a set of NZ scenic coasters). Try to use photos or images of your local area or neighbourhood. You can also include small objects you have collected locally to include in your photo. Take a close up picture and don’t forget to focus the camera!!This can be tricky at such a small size. Use photo editing software to crop out any distracting background. See the examples below for inspiration.
-
Kia Ora
WALT: What we are Learning to Do
This week we are continuing our exploration with paster casting and preparing our casts for painting.
Success Criteria: Three clean sculptures in Plaster of Paris
Tasks
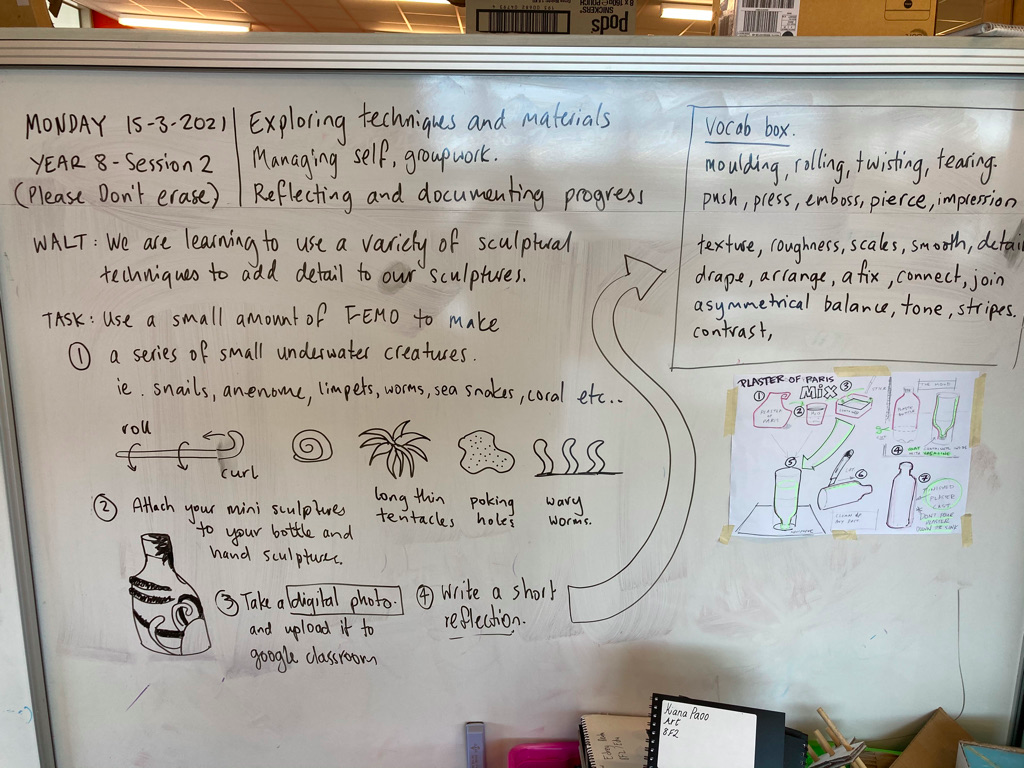
Kia Ora
WALT: What we are Learning to Do
This week we are continuing our exploration with paster casting and preparing our casts for painting.
We will allow prepare or scenery for underwater photography.
Requirements:
Each group needs to make at least three striped and painted bottles
1 other object. For example. Rubber gloves or freeform balloon sculptures
Tasks
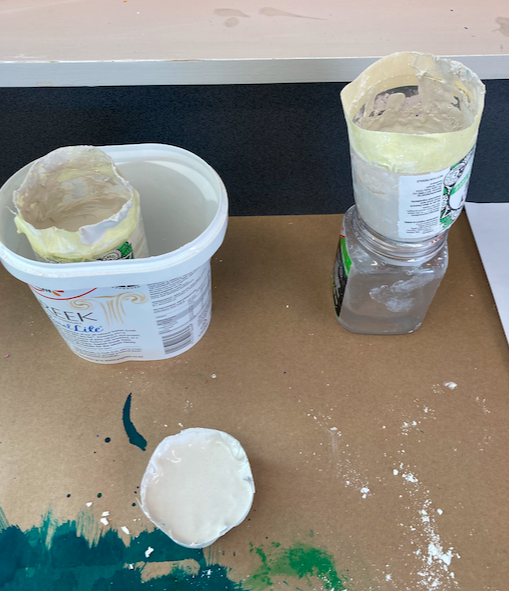
Prime the plaster of Paris by applying acrylic gesso to the exterior using a paintbrush. Priming with gesso seals the plaster so it no longer absorbs moisture. Allow the gesso to dry completely, and apply a second coat if necessary.
Masking tape can then be applied to the surface to create stripes.Another layer of paint can be applied and allowed to dry.
Then another layer of tape and paint can be applied. Allow the paint to dry completely between coats.
Make sure you cast a unique object at well as you bottle.
Inspirational images
-
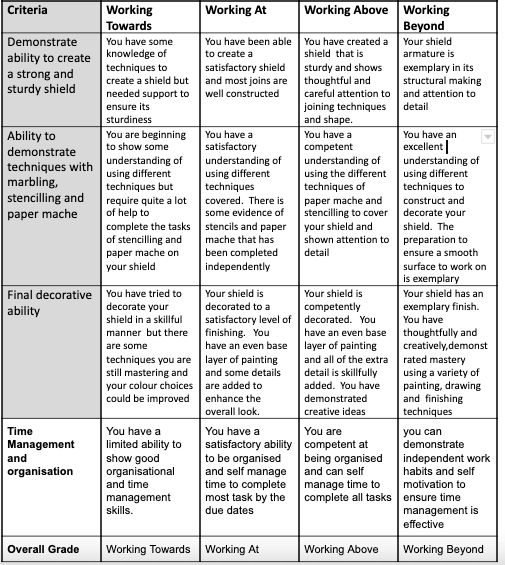
Kia Ora
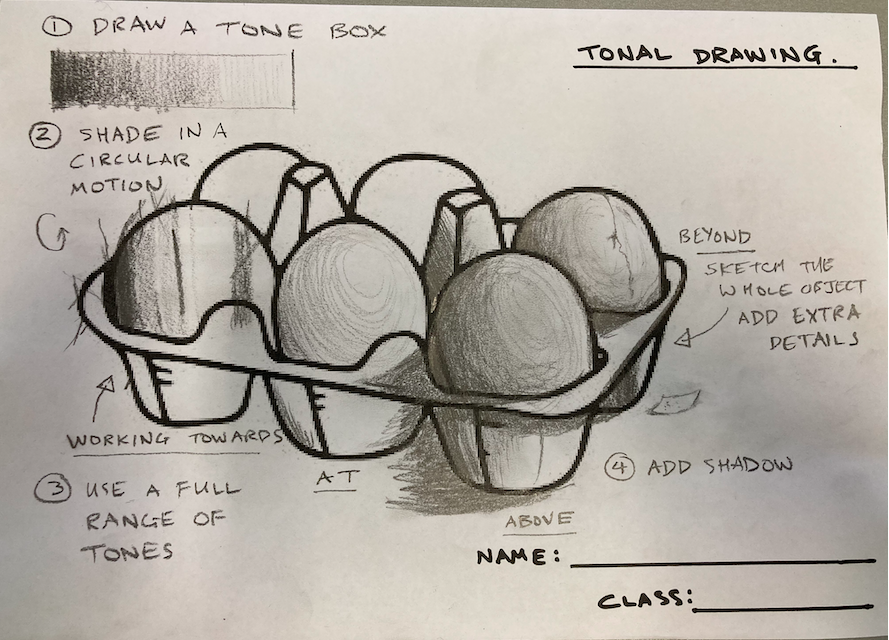
This is the modified assessment task for your tonal shading activity. Please see the exemplar provided. Please note that for beyond you will need to sketch the whole picture including the egg crate and apply tonal shading showing attention to detail, tonal change and good proportions.
Criteria
Working Towards
Working At
Working Above
Working Beyond
Observational drawing skills to show accuracy and proportion
You are showing some practical ability to draw objects demonstrating some accuracy in form and proportion
You are showing a satisfactory skill level to draw most of the objects demonstrating accuracy in form and proportion
You are showing a competent skill level to consistently draw objects which demonstrate accuracy in form and proportion
You are showing an exemplary skill level to accurately draw objects that are detailed and highly accurate in proportion and form
Observational drawing using a range of pencil and pen techniques
Observational drawing and shading skills to show depth of form
You are beginning to demonstrate some techniques with pen and pencil
You are beginning to show depth of form and detail in your drawings
You are beginning to demonstrate some techniques with pen and pencil
You are completing some drawings to show accurate shading and can demonstrate some depth of form
You are beginning to demonstrate some techniques with pen and pencil
You are completing a range of drawings with accuracy, using shading to demonstrate depth of form
You are beginning to demonstrate some techniques with pen and pencil
You are completing sophisticated drawings which demonstrate an excellent standard of shading to show depth of form
Creativity with sculpture design
You have completed some planning information about how you intend to create your underwater sculpture but there are gaps in your process knowledge
You have completed planning information about how you intend to create your underwater sculpture and your process knowledge is satisfactory
You have completed detailed planning information about how you intend to create your underwater sculpture and your process knowledge is competent
You have completed thoughtful and detailed planning information about how you intend to create your underwater sculpture and your process knowledge is excellent
Techniques and tidiness to create a sturdy SCULPTURE
You have demonstrated some knowledge of techniques to create a sculpture but tidy finishing could be improved
You have demonstrated adequate knowledge of finishing techniques to create a tidy and sturdy sculpture
You have demonstrated clear knowledge and understanding of finishing techniques to create a tidy and sturdy sculpture
You have demonstrate thorough knowledge of process and finishing techniques to create a tidy and sturdy sculpture
Overall grade
Working Towards
Working At
Working Above
Working Beyond
-
Task description: ‘Auckland City –My Community Cloak’
You are to design and produce a mixed media artwork which includes the processes of collage, drawing and printmaking. It should show a connection to the local and wider Auckland community with the overall design being a cloaked self-portrait.
Photograph your completed artwork and upload it as a PDF file by Wednesday April 11.
-
-
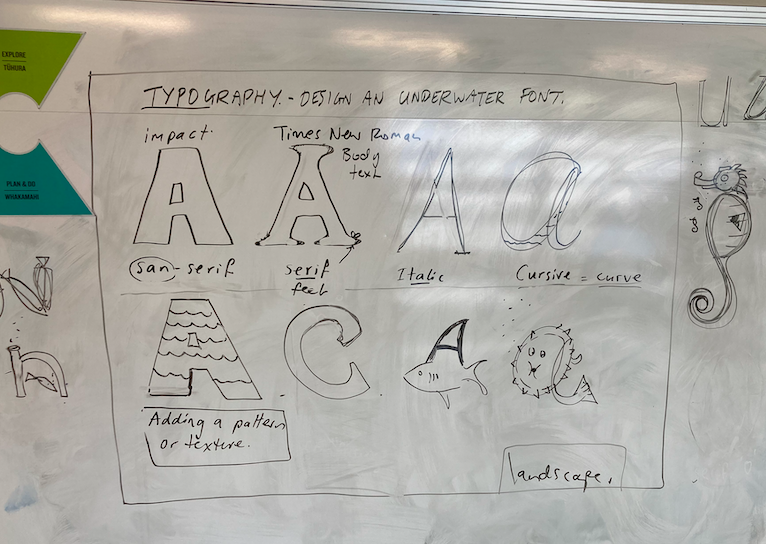
Kia Ora
This week we will begin a new project.
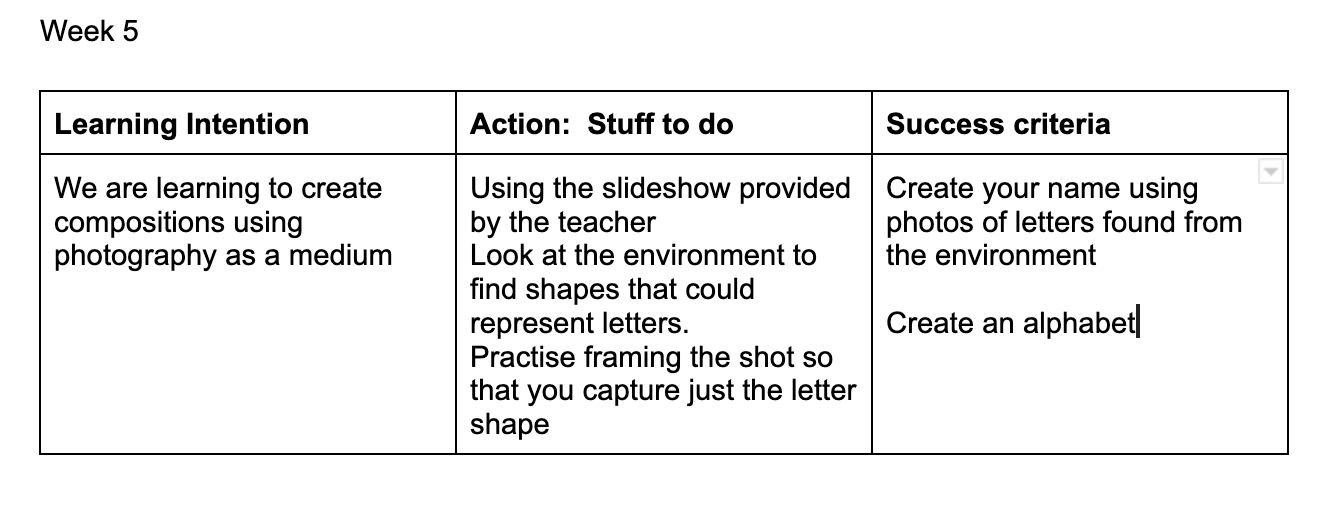
Task: You must design a new Typographic font based on the underwater theme we have been exploring this term.
Example
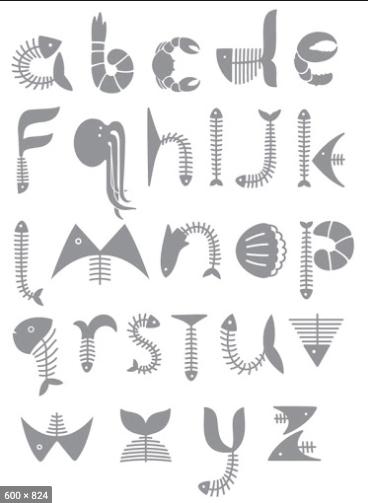
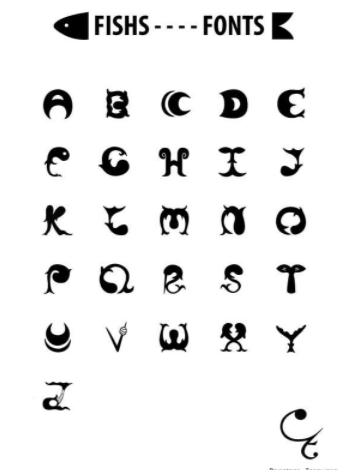
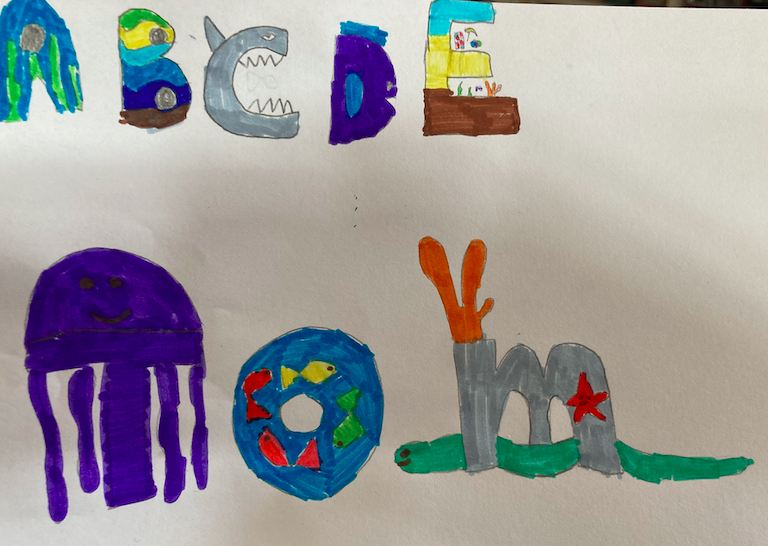
By E. Symons
Success Criteria
You must Design a full Alphabet based on image as text and Text as image. Including numbers 0-9
Use association to match the shape of with underwater environments and creatures.
Be imaginative
-
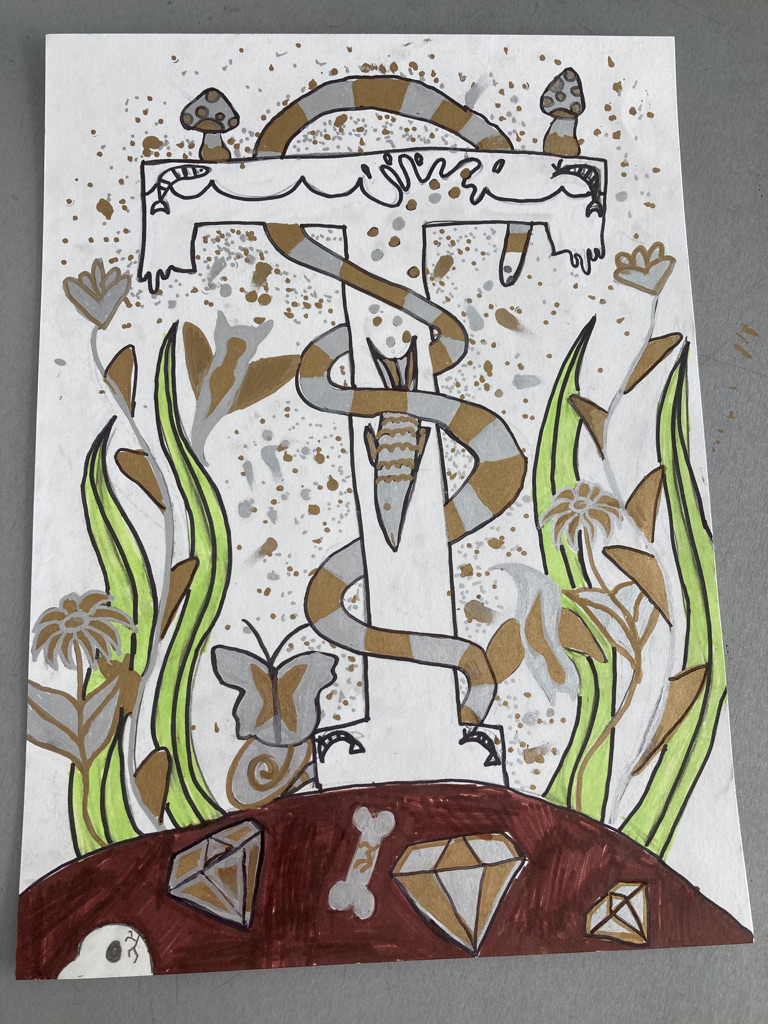
WALT: We will learning how to sketch and paint our Illuminated letters.
Success Criteria:
You will either use the grid method to transfer your illuminated letter design or photocopying and scrubbing the back of your drawing.
You will finish your A3 page in pencil and then begin the painting with the paints supplied.
https://www.google.com/search?q=illuminated+letters+how+ro&oq=il&aqs=chrome.1.69i57j69i59l2j0j46i199i291i433j69i60l3.3607j0j7&sourceid=chrome&ie=UTF-8&safe=active&ssui=on#kpvalbx=_84ZyYOuQIurCz7sPkIKx0As14


-
Scroll through the different examples to find the animal you want. Take notice of the anatomical features to help with placing the limbs correctly.
-
Task description: ‘More than skin deep’
You are to design a creature using at least three different animal groups and have views to the internal anatomy. Your design is to be a mixed media artwork which includes the processes of collage, drawing and painting.
-
-
School Holidays
-
How is this myth similar to the Maori myth of the beginning? A short animation on the creation.
-
Use this website for how to make the hieroglyphics for your cartouche. It will also lead you to the site on how to shape your cartouche.
-
Task description: ‘Not so Ancient Egyptian’
You are to design and produce a mixed media artwork which includes the processes of painting, collage, drawing and printmaking. It should show a connection to the style (conventions) of Ancient Egyptian art with the overall design depicting a person you consider to be significant.
-
School Holidays
-
Task description: ‘Out of This World’
You are to design and construct a low bas-relief artwork depicting a futuristic human figure as your focal image, suitable for use as a character in a game or a movie. Scan your final design drawn in your visual diary and photograph your construction. Download both images as pdf files before you upload them on Mission Heights Online by Monday November 12.
-
-
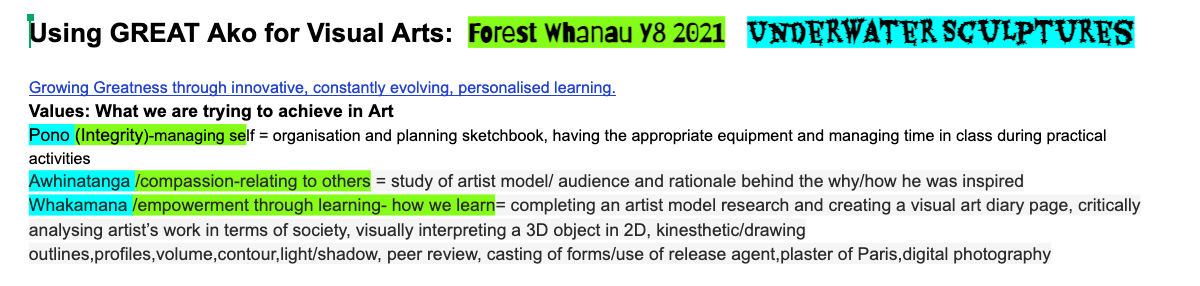
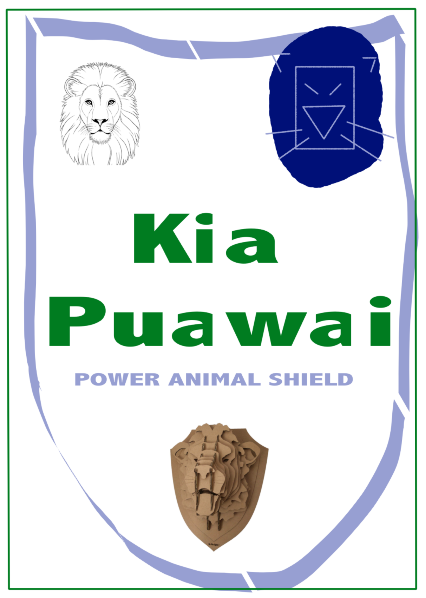
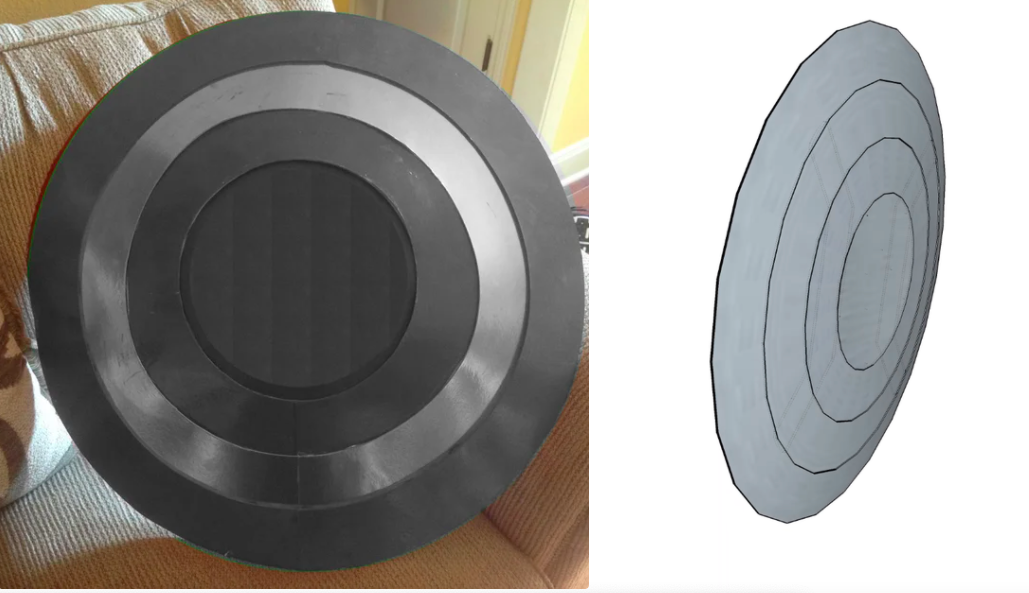
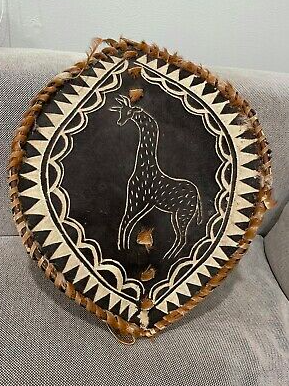
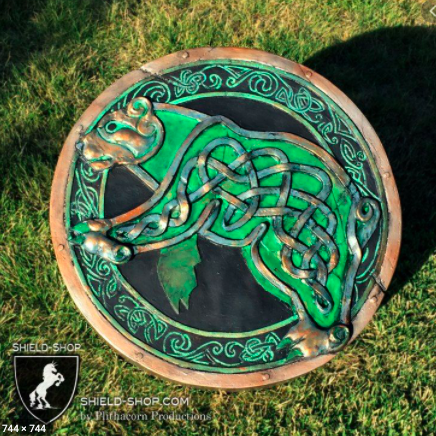
Kia Ora
Welcome to 8 Art with Mr Symons. This term we will be exploring the context of "Kia Puawai". Based on themes from the BLACK PANTHER movie.
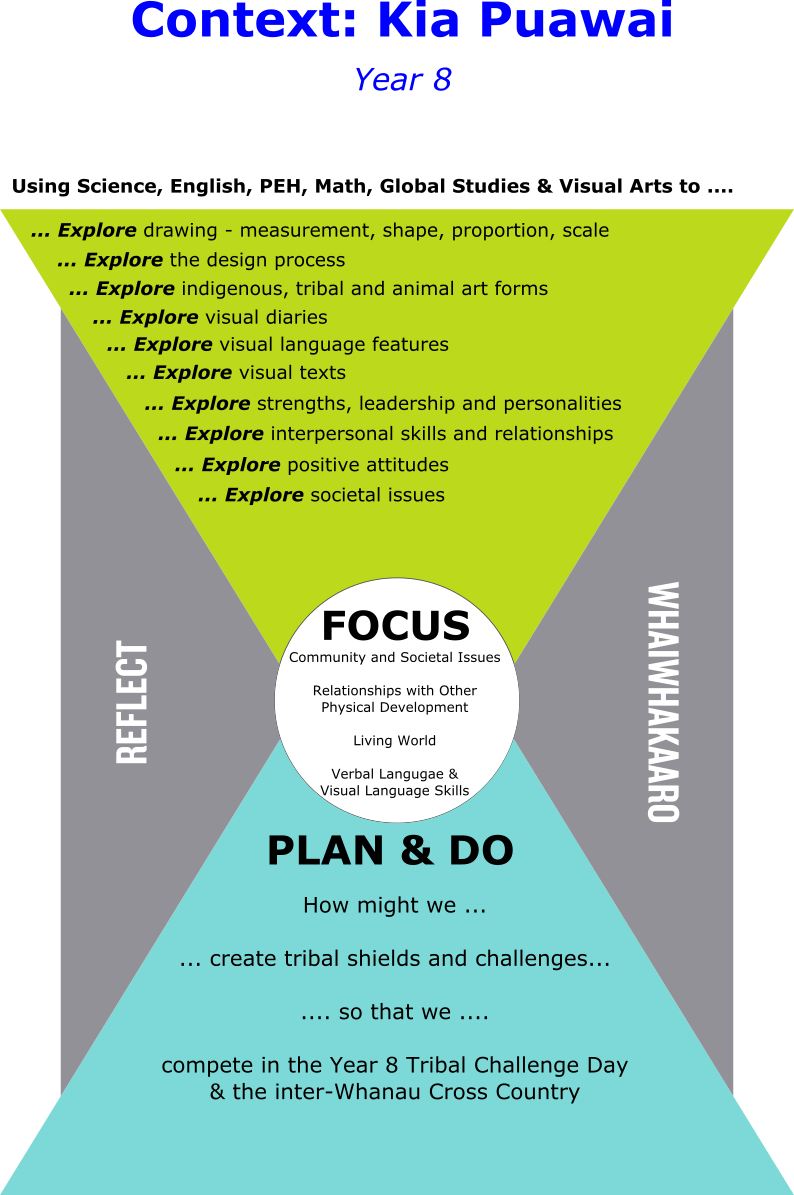
You will be creating a shield to display your chosen power animal.
Activities include
Sketching
Stencilling
Marbling paper to create textures
Paper mache
Sculpture and construction
Emblems and logos
Texture and tone
First activity: freehand Sketching
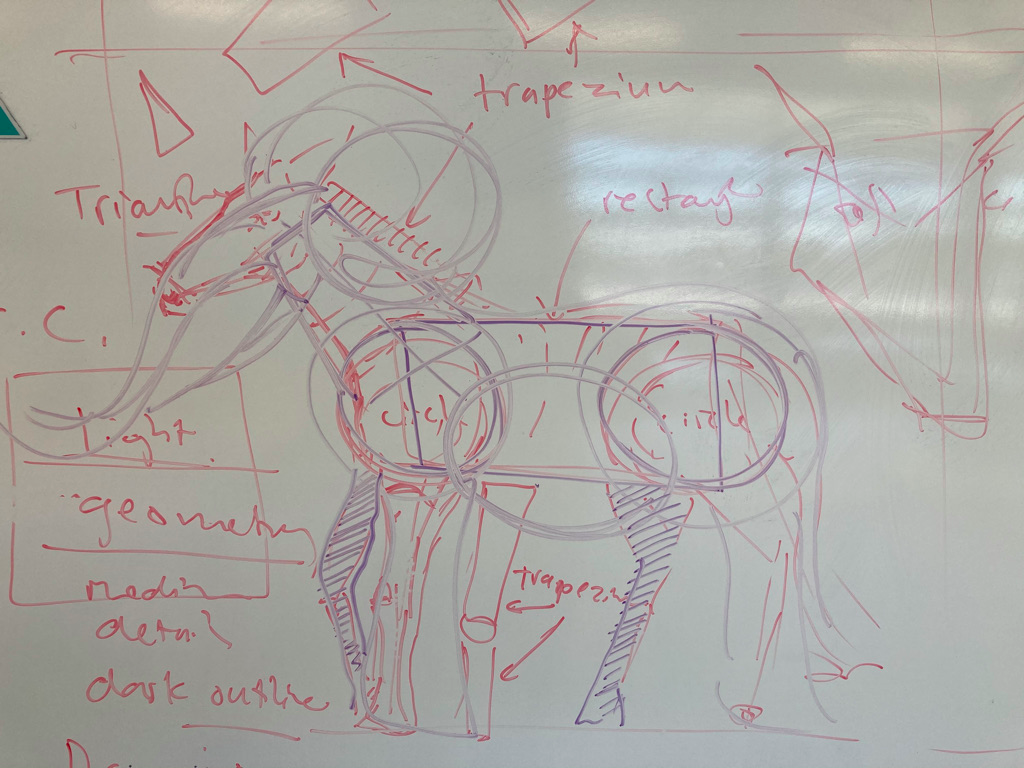
Use basic geometric shapes to sketch from the resource materials provided.
Please see the powerpoint in google classroom for further instructions
-
Kowhaiwhai Art piece Assignment
-
-
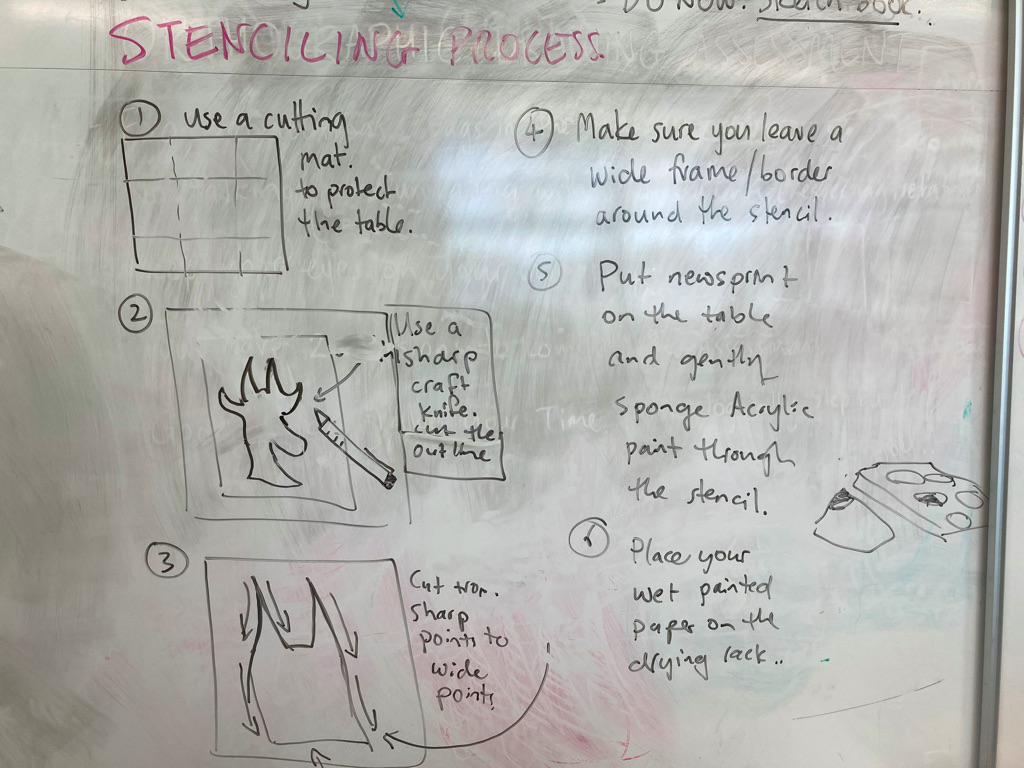
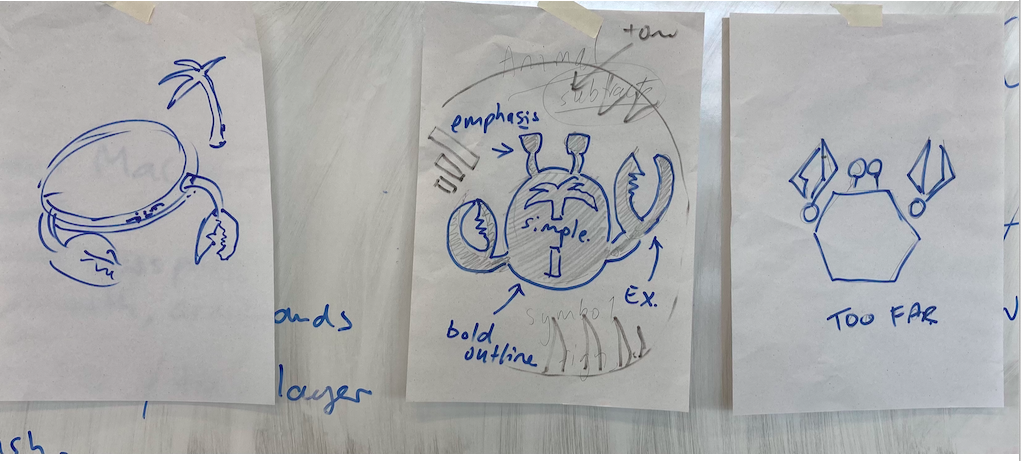
Kia Ora
Welcome to Week 2, Term 2. 2021
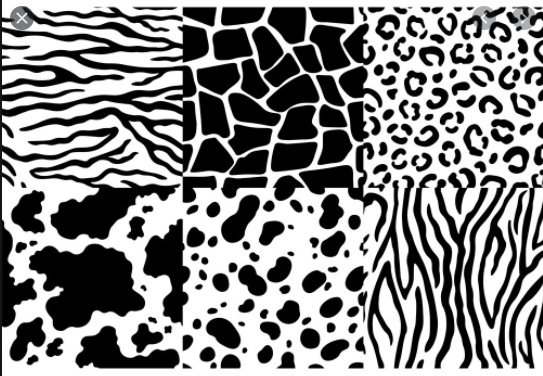
This week we will be sketching our animals and developing our stencilling skills.
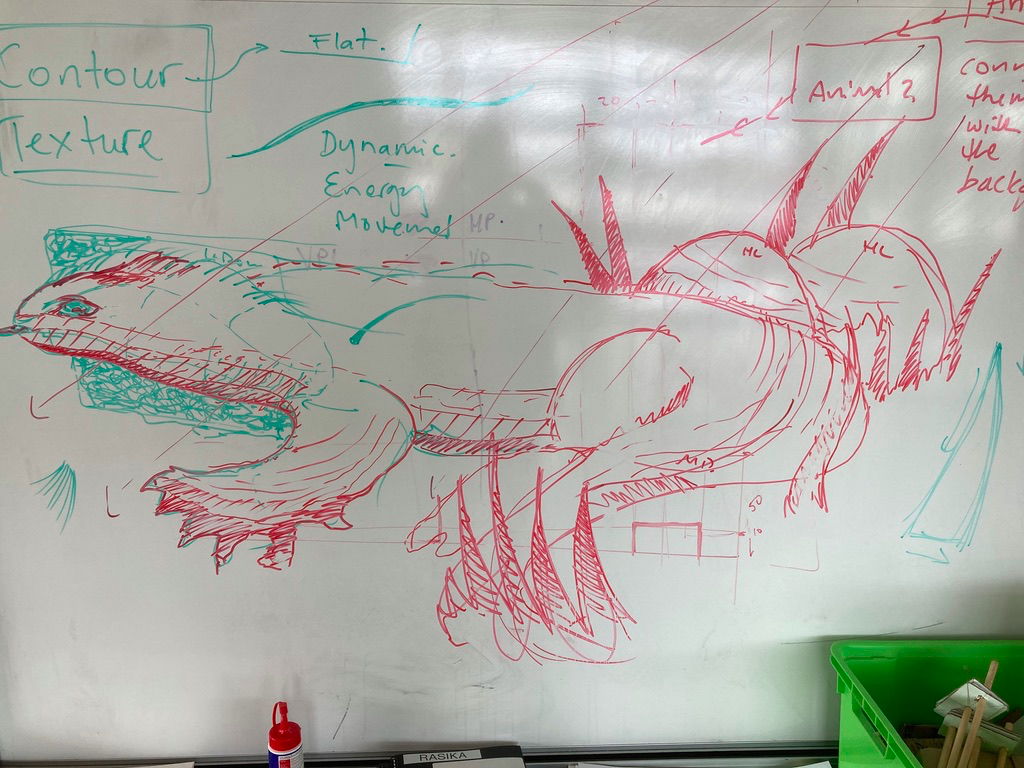
WALT: We are learning to use a dynamic line to express the texture and materials. We will use repetitive mark making to simulate, hair, scales, wrinkles and other parts of our animals. We will use contour lines to suggest volume and how our animal is constructed from underlying muscles and bones.
We will also use a craft knife to carefully cut out an animal skin stencil.
Success Criteria:
Your line work should be dynamic and full of energy.
Don't use an eraser instead embrace your mistakes and camouflage them with background and foreground elements. See the example.
Extension: You will be cutting out your stripes or spotted stencil in preparation for working towards making an animal art mural.
-
Whanau Emblem design Assignment
-
-
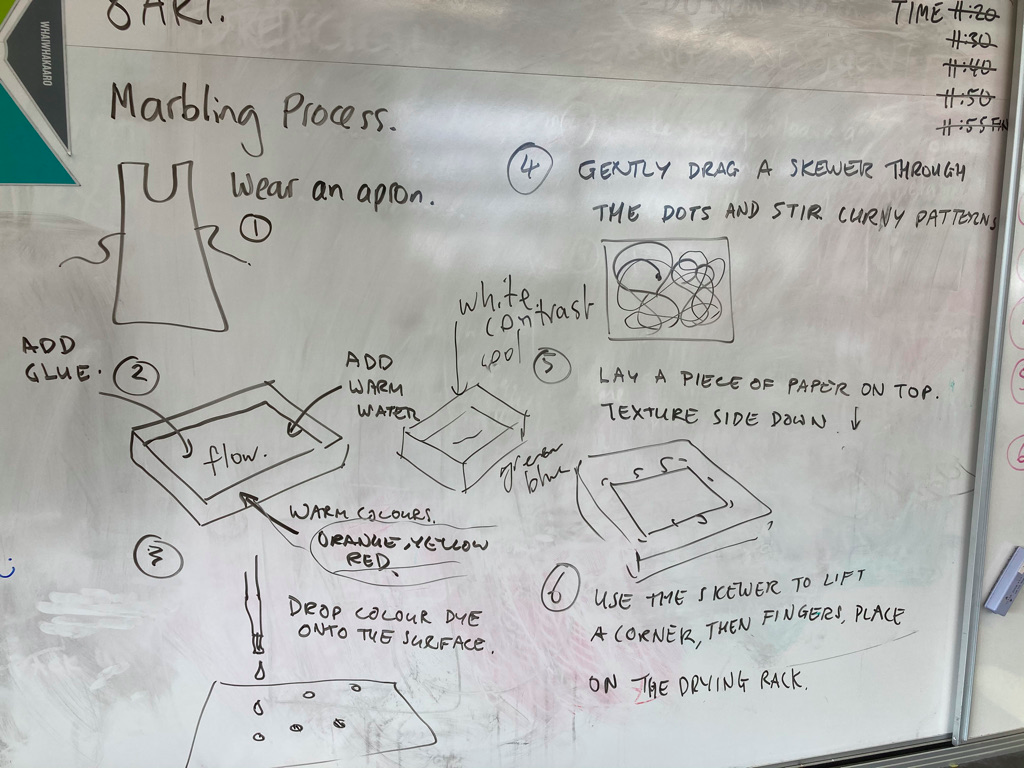
Kia Ora
Welcome to Week 3
WALT: We a going to be learning how to use our Visual Diary or Sketchbooks. We will also be exploring the process of Marbling to create textures this week.
Benefits of a Sketchbook or Visual Journal Practice
Keeping a daily sketchbook helps you to see and be present in the world. This artistic practice can also help you:
- Grow and develop new ideas
- Make connections and foster creativity
- Improve your drawing ability and observational skills
- Maintain and ignite inspiration
- Experiment with new techniques and materials
- Encourage happy accidents or those unforeseen and unplanned creative discoveries
Tips for Keeping a Sketchbook or Visual Journal
Don’t worry about making perfect pictures in your sketchbook—focus on practicing your skills, recording fleeting thoughts, and capturing moments of life. It's more about the process than the product. If you happen to create an exceptional composition, that's great, but that is not the goal. Keep your visual journal projects fun and fresh with the following ideas.
- Mark up your pages ahead of time, so that you’re not facing completely blank white pages. Paint layers of color, draw lines, use a hole punch—anything to make them less precious, and enable you to be free with what you draw and create.
- Notice everything around you. Nothing is too mundane to draw—your cup of coffee, the materials you’re using to draw with, squirrels at the park, a bike in a rack, or even a trash can.This is how you make your observational skills stronger.
- Don’t edit yourself. Spend no more than 10 minutes on a drawing and don't go back and erase. Instead, restate any lines that you'd like to change.
- Try new materials. Don’t be stuck using the same old pencil. By all means, use it if that is all you have, but don’t be limited by it. Try different supplies, including forgotten markers and pens you may have lying around the house.
- Try using an iPad, iPhone, or tablet. This is an interesting way of testing your sketching abilities in a fresh format. See David Hockney’s iPad Paintings. See how Jorge Colombo drew a New Yorker cover using the Brushes app in Cover Story: Finger Painting.
- Use color. Don’t just stick to black and white. Alternatively, it can sometimes be helpful to give yourself specific parameters, like only using brown, red, and gold, to see what you can do within those limits.
- Draw abstractly as well as representationally. Draw the same thing multiple times, becoming increasingly abstract with each drawing. Draw things up close so that they appear abstract, or draw small objects at a large-scale so that they go off the page and lose their context.
- Take a line for a walk. Do one continuous line drawing of ten different objects. Keep your pencil on the paper as you draw and connect one item to the next.
- Try a blind contour drawing. Look only at the subject and not down at your paper. It doesn't matter if the result looks like chicken scratch—this exercise will help you sharpen your observational skills.
- Keep your sketchbooks and date your drawings to record your progress and artistic development.
Please watch the Marbling process video and document the process in your sketch book
https://www.youtube.com/watch?v=ekrgY6RdYww
-
Kia Ora
Welcome to Week 3
WALT: We are learning to: Design our Title page and sketch our animals for our Kia Puawai (Black Panther/ Power Animal)context. Kia Puawai means blossom, growth, personal improvement
Task 1. Design a title page for your Visual Diary/Sketchbook
Your title page must contain the Tile "Kia Puawai" a drawing of an animal, an animal emblem and a shield shape. It needs to be bright, colourful and eye catching.
Task 2: Please see week 2 May 17th for the sketch of the monkey or the lion. Please continue with this assessment after you have finished your title page.
Task 3: Update all of your previous process pages. Stencilling and Marbling.
No painting or stencil cutting can occur in this lesson.
-
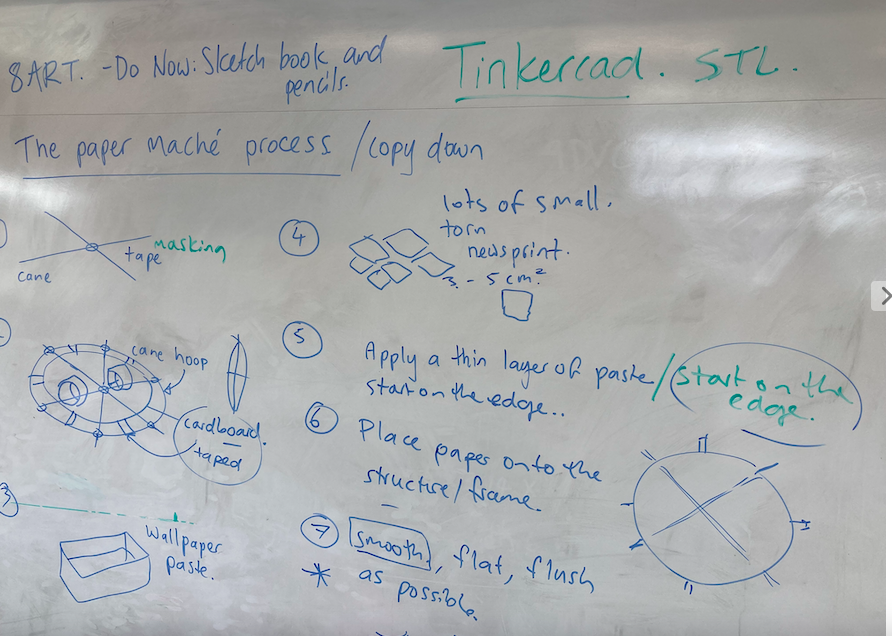
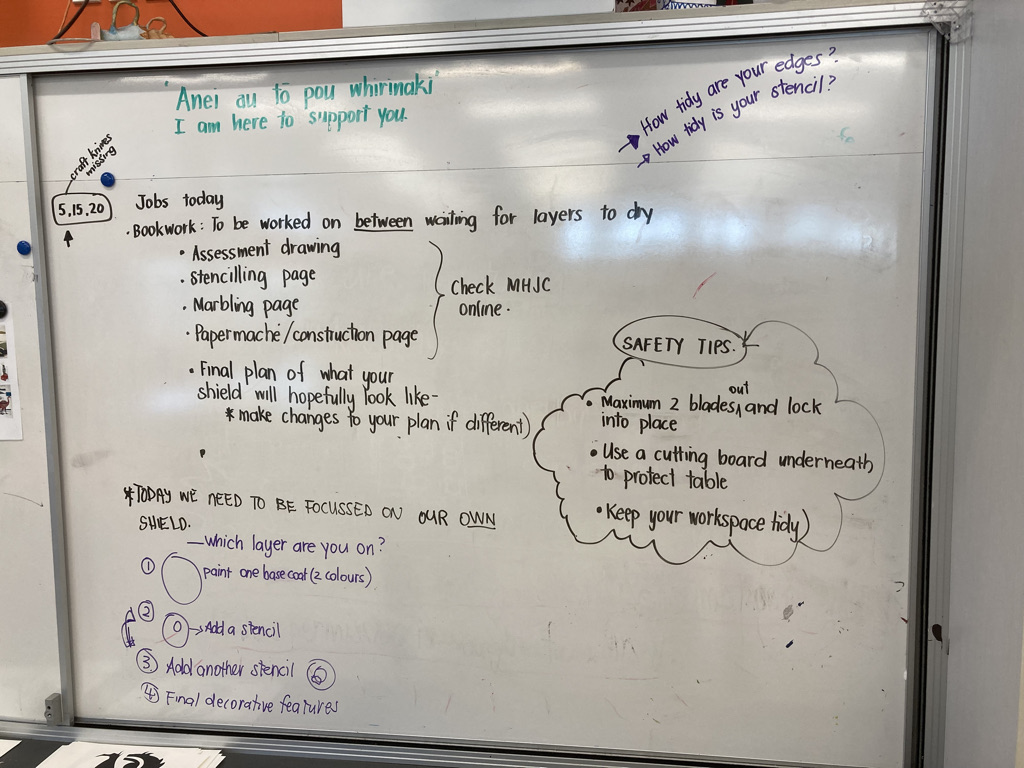
Kia Ora
Welcome to week 5
This week we will start on construction of our shields using cane and tape.
https://www.larp.com/hoplite/BAarmor.html#shields
https://www.instructables.com/Make-Links-Hylian-Shield-from-Foamboard/
https://www.instructables.com/Round-Viking-Shield/
TASK.
First you must decide if you would like to make a round or long oval shield.
-
Kia Ora
Welcome to week 6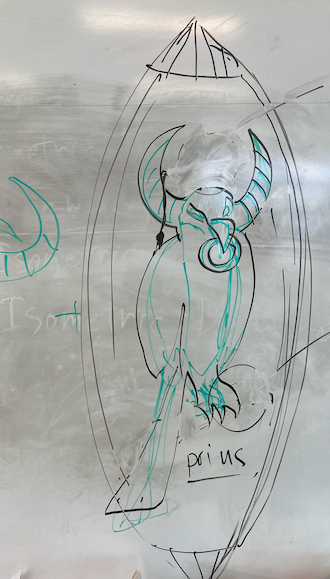
-
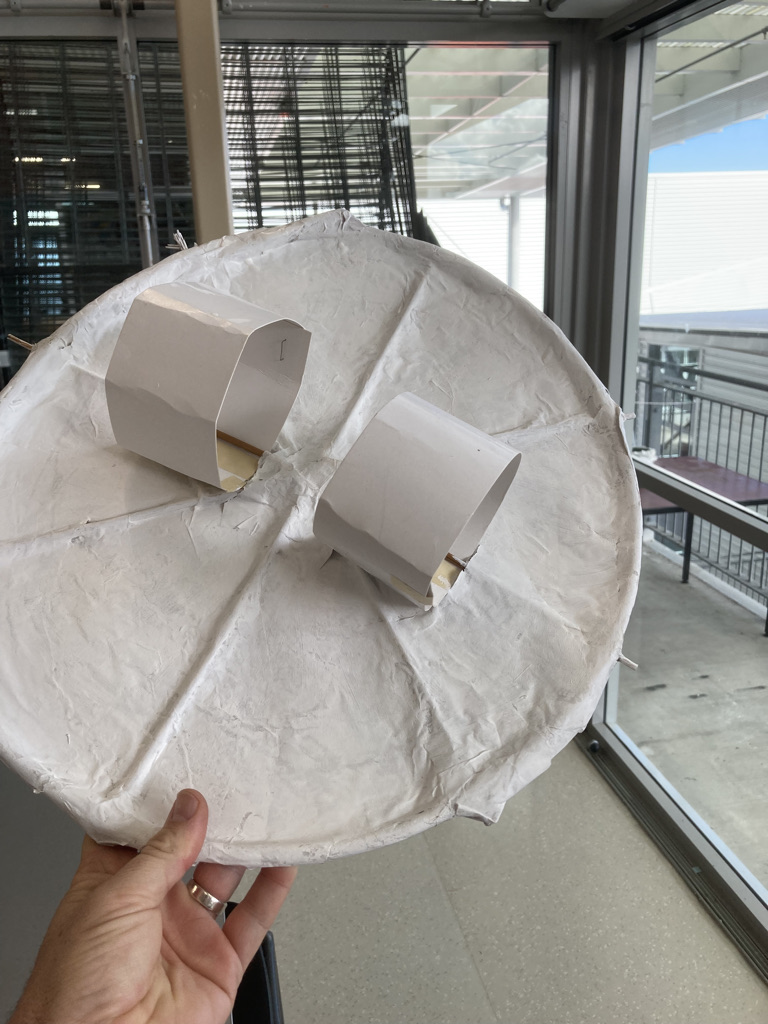
Kia Ora
Welcome to Week 7
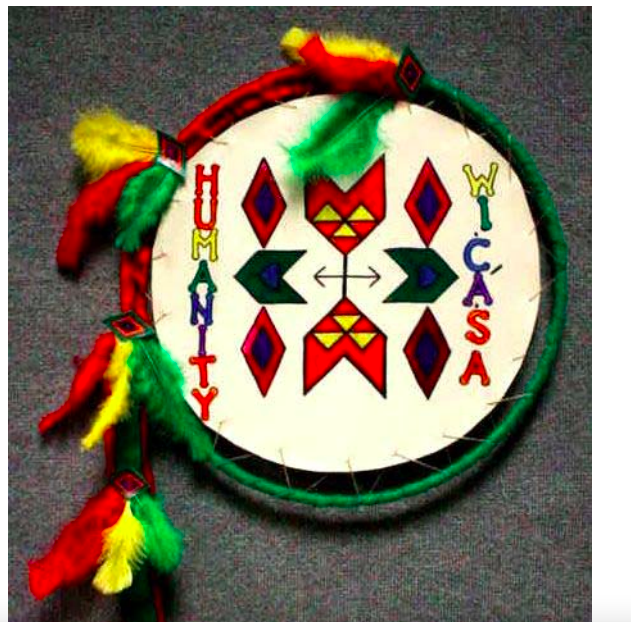
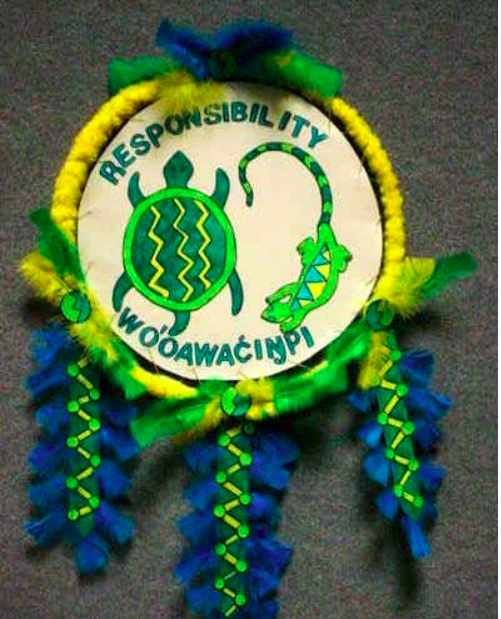
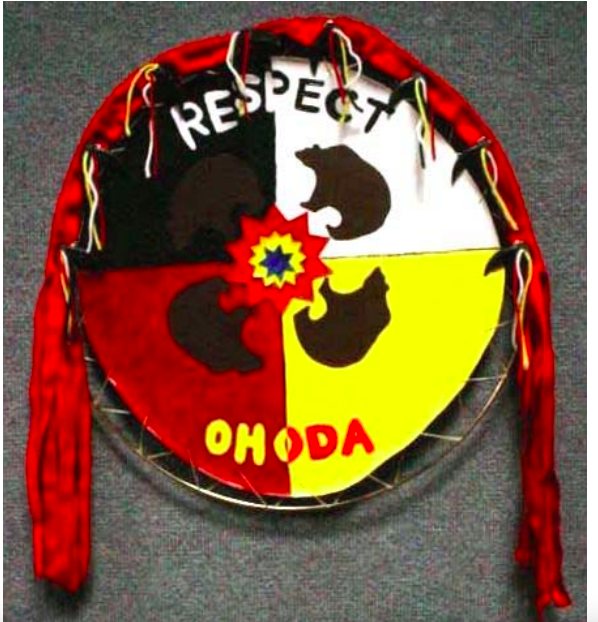
WALT: We are learning to make abstracted animal emblems.
TASK 1 Complete paper mache
TASK 2: Paint a thin layer of gesso to seal the paper mache
TASK 3: Create a gradient using a light medium and dark colour on top of the gesso.
Task 4: Paint a circle of your tribes colour onto the shield. USe a template (Seee mR Symons)
TASK 5: Cut out an animal stencil for your shield. Sponge black paint through the stencil onto the coloured dot.
-
Kia Ora
Welcome to Week 8
-
Kia Ora
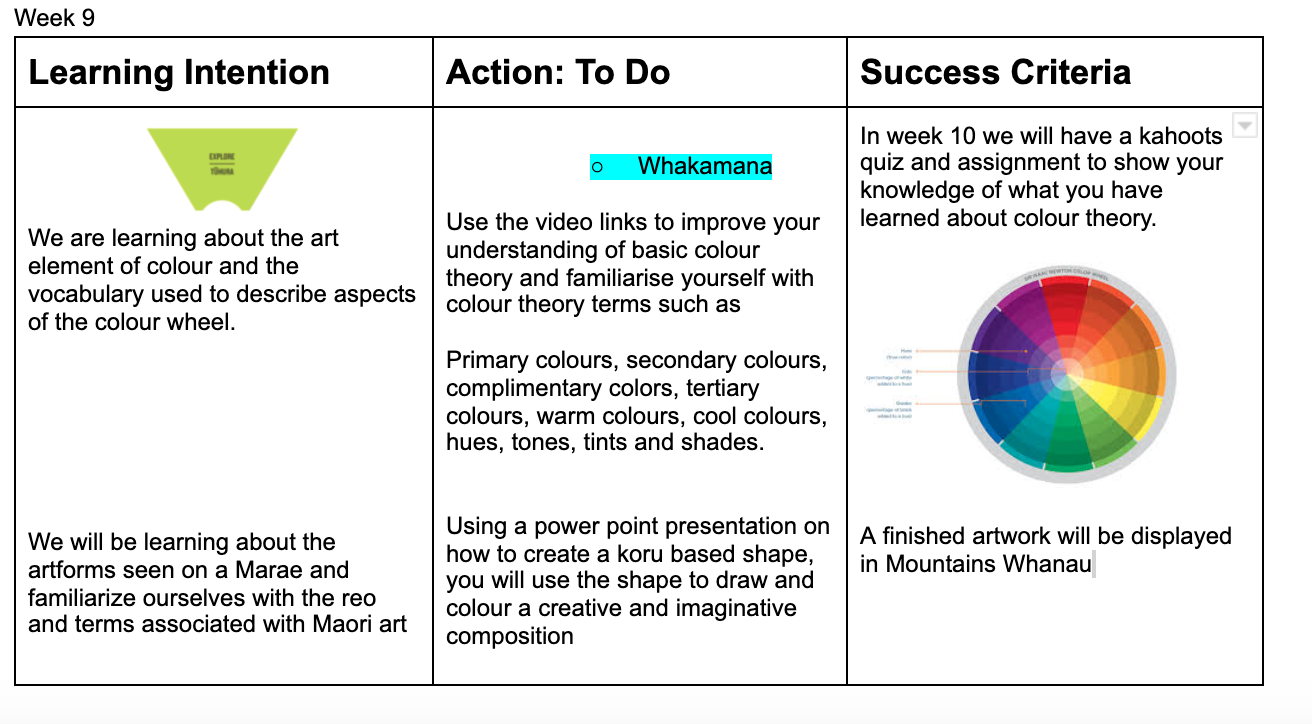
Welcome to Week 9
https://www.nytimes.com/2018/02/23/movies/black-panther-afrofuturism-costumes-ruth-carter.html
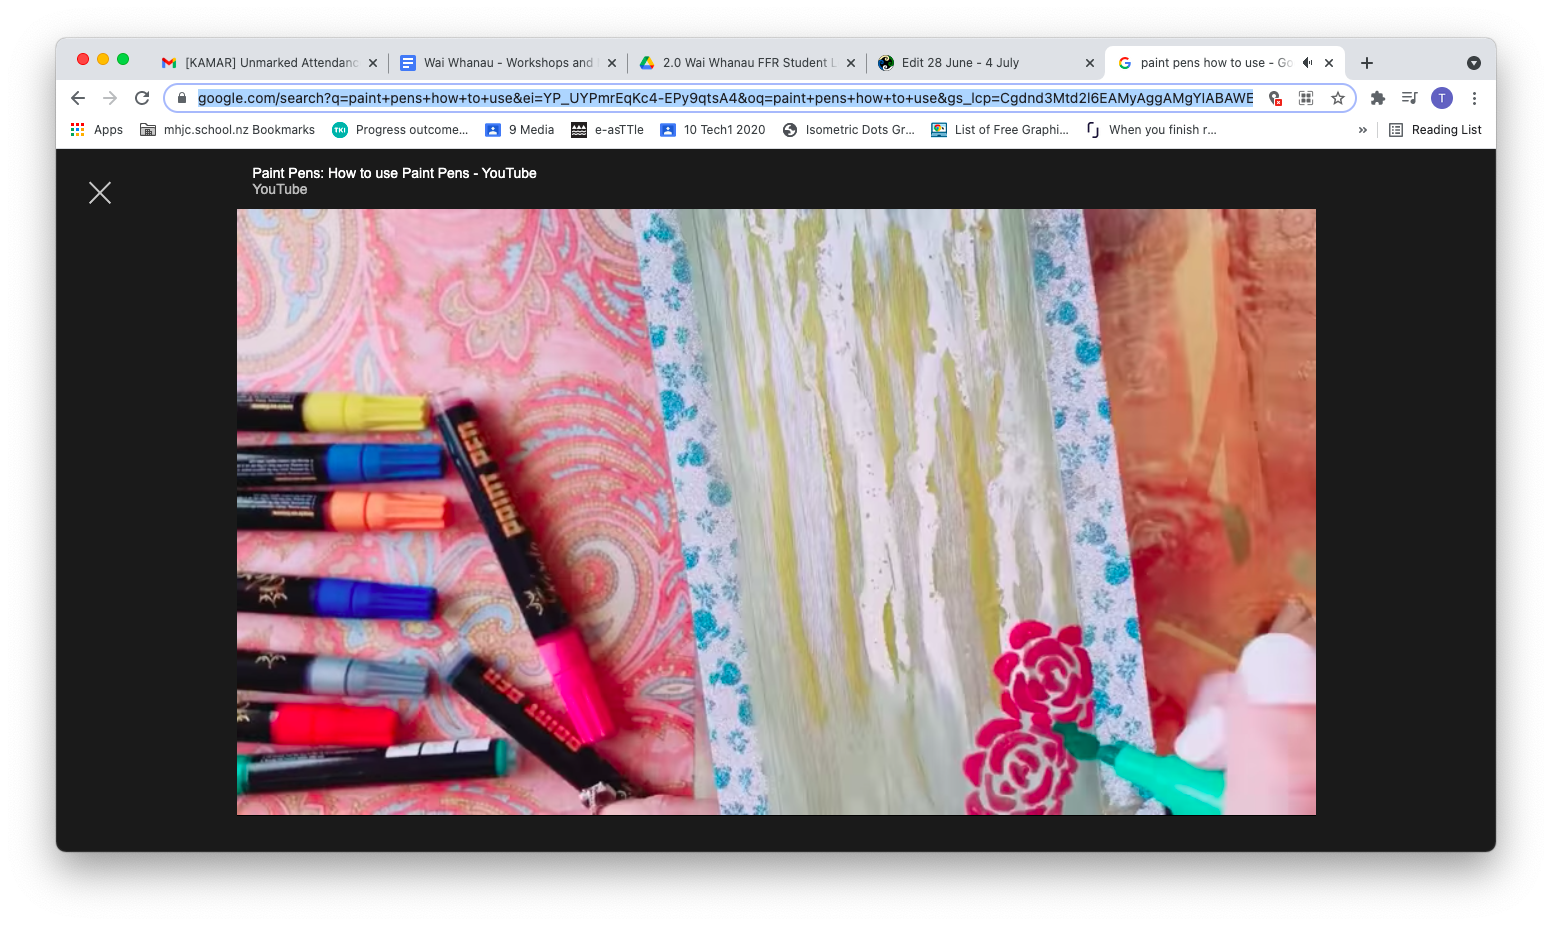
WALT: We are learning to use paint pens to add fine details and tidy up the painted edges.
https://www.youtube.com/watch?v=ZmGjIECPHi0
Materials
Success Criteria
Clean edges.
Strong lines.
Lots of dots,details and cultural artifacts/motifs.

No running paint.
TASK: Please polyurethane your finished shield ready for Stitching next week.
Next WEEK WALT:We are learning to stitch of shields using string and yarn to create a strong durable and attractive structure.
-
Kia Ora
Welcome to Week 10
This week is Assessment week. Please see the rubric below for what will be assessed this term in Art.
-
Kia Ora
Welcome to Week 1, Term 3.
WALT:This week we will be learning about Op Art (optical Art)
Activity: We will be creating our first visual design for our Title page and exploring our new context.
Example: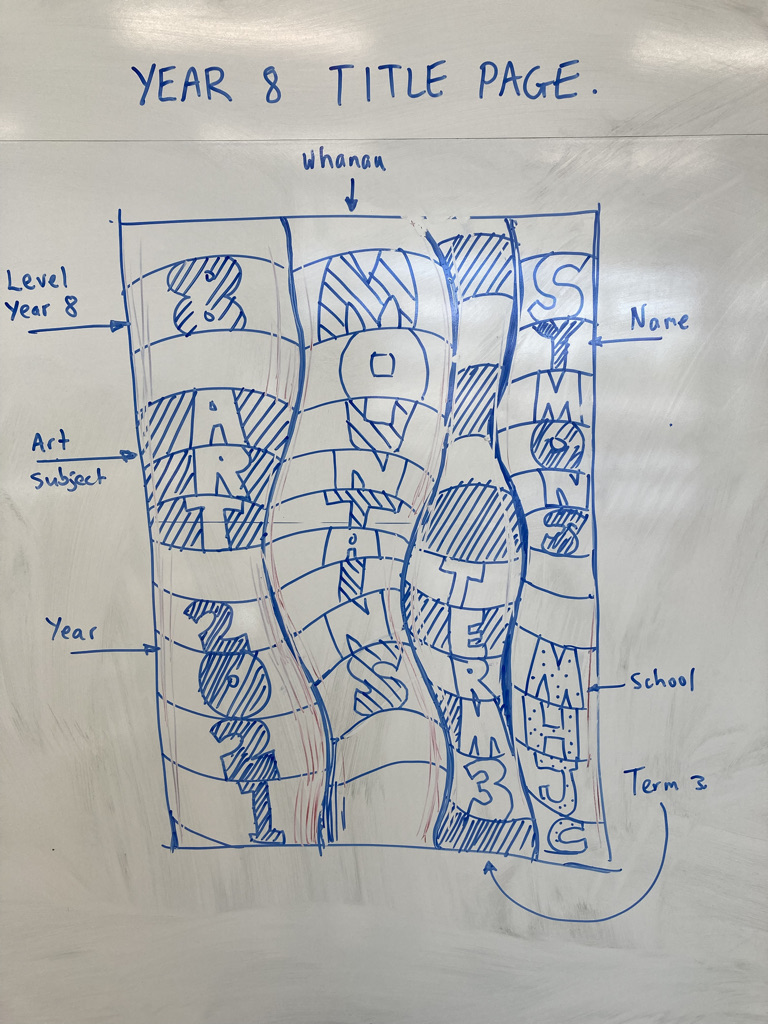
Success Criteria: A well designed title page in your visual diary
Use dynamic, curing lines and shading.
Including your name, class, subject, year and term information.
Extension: Add colour to increase the visual impact of your design.
Please use the task we started on Monday to complete your title page. -
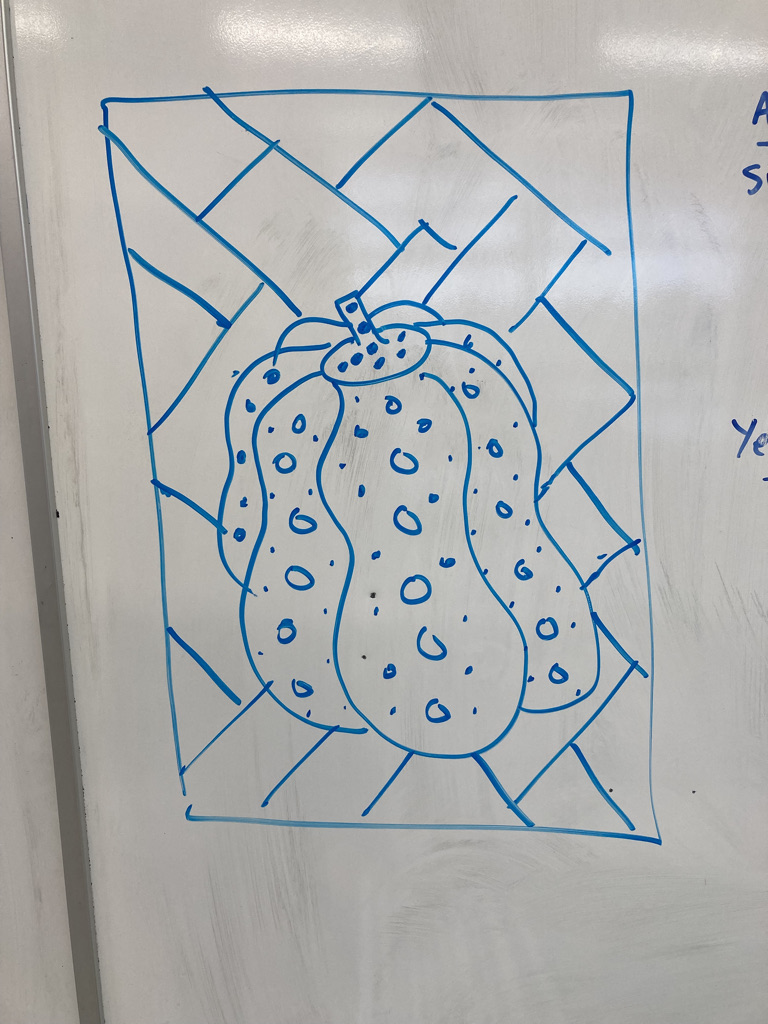
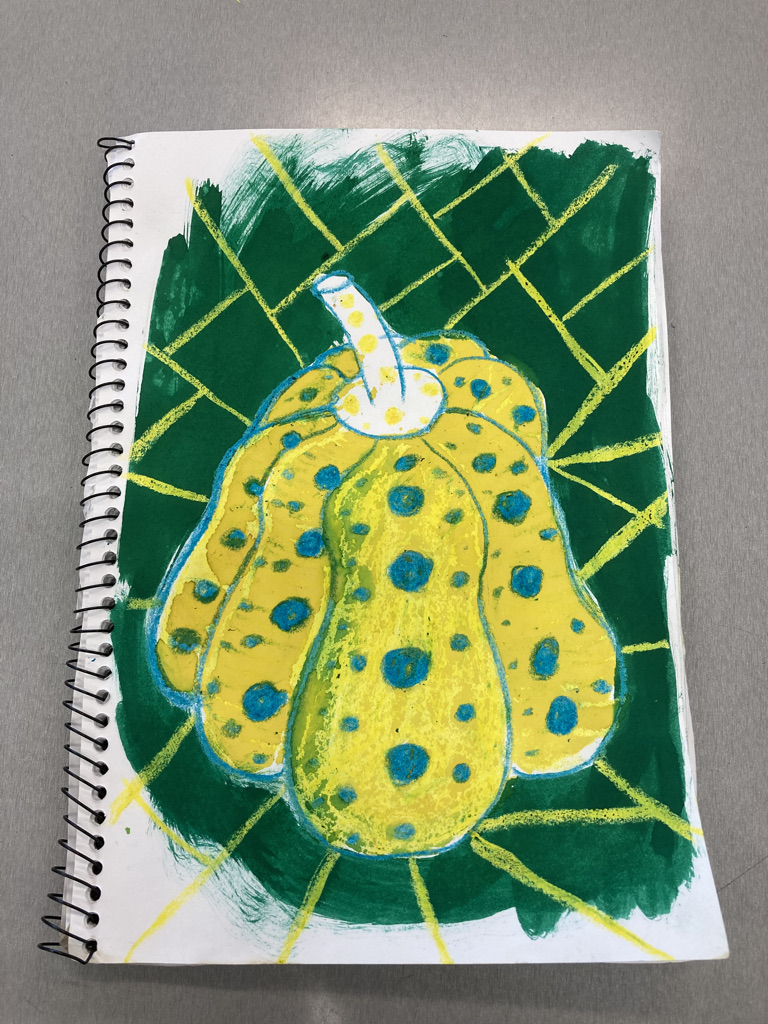
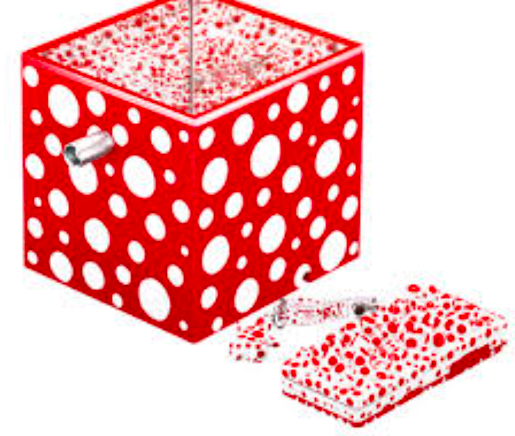
Kia ora
Welcome to week 2
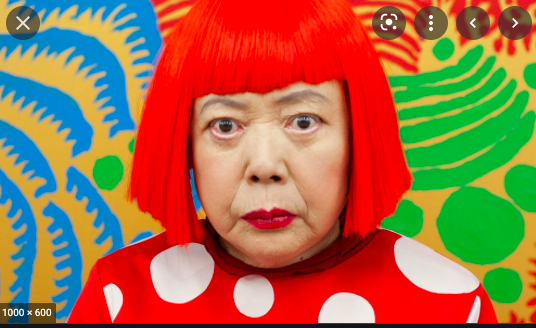
WALT: This week we will be learning to research our chosen Artist Model, Yayoi Kusama.

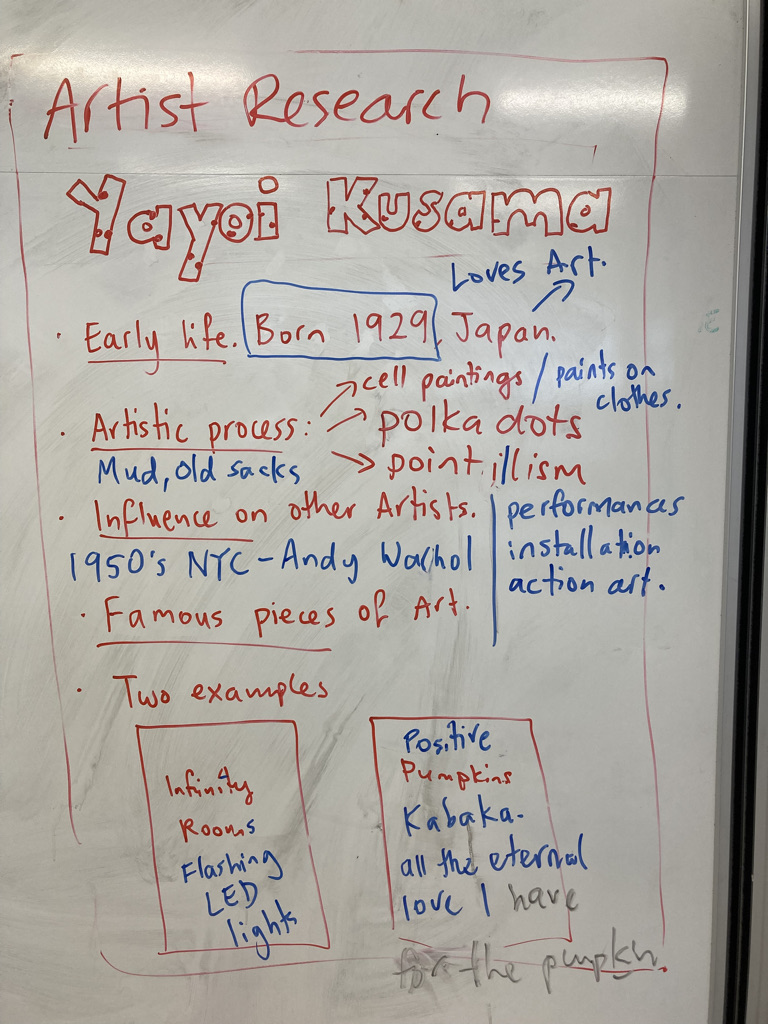
Success Criteria:
1 page with information regarding our chosen artist. A4
1 pumpkin sketch in wax crayon and resist dye. A4
two colours and two dye colours.
Strong bold crayon line
Symmetrical composition
Geometric background
Bright,pop art composition
-
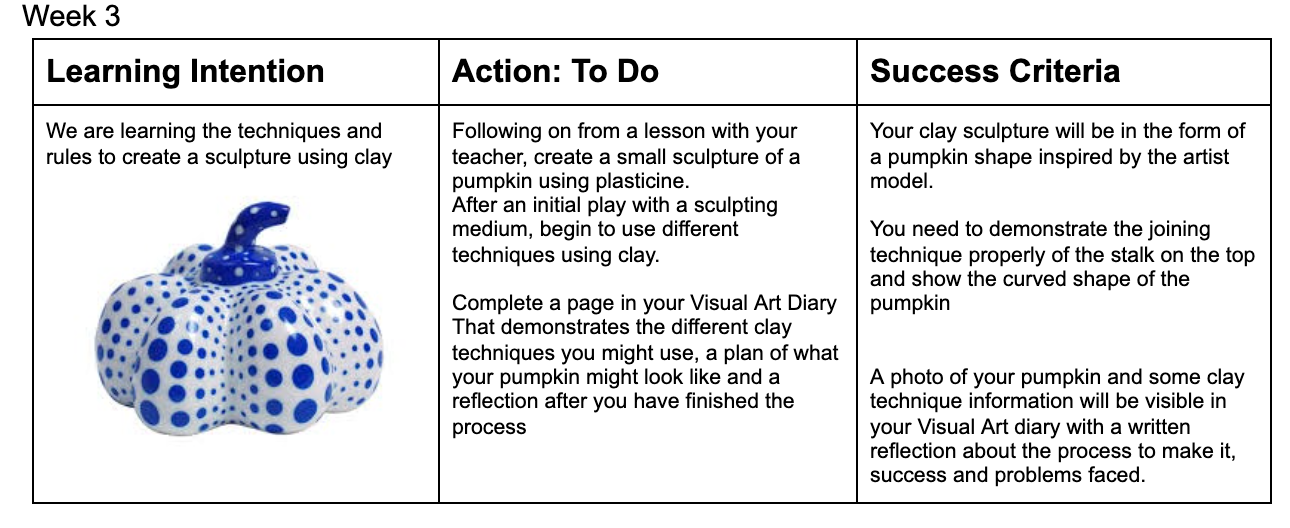
Kia Ora
Welcome to Week 3
WALT: We will be learning to plan and create a background tile for our installation in the style of our chosen artist model. Yayoi Kusama.
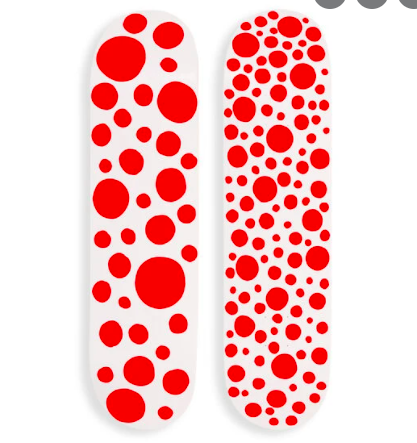
Success Criteria
1 30 cm x 30 cm square tile in White and Red
Dots, and circles of different sizes.
Cutting paper cups to create tubes, cylinders
Using spheres and other geometries to create enticing visual illusions.
Homework: Watch the video below in preparation for sculpting your pumpkins.
https://www.youtube.com/watch?v=sS59bVWTgIM
-
Kia ora
Welcome to Week 4
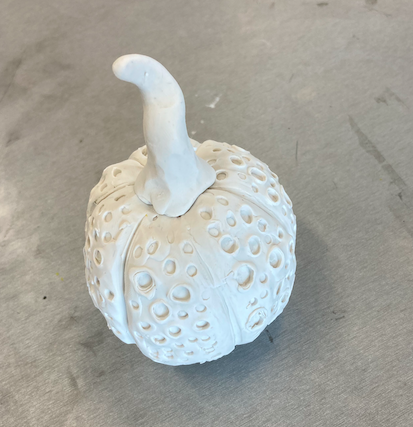
Success Criteria: I have sculpted a pumpkin out of clay that can be suspended by string as part of an installation.
-
-
-
-
A slide show on op art and lots of activities to do and try
-
-
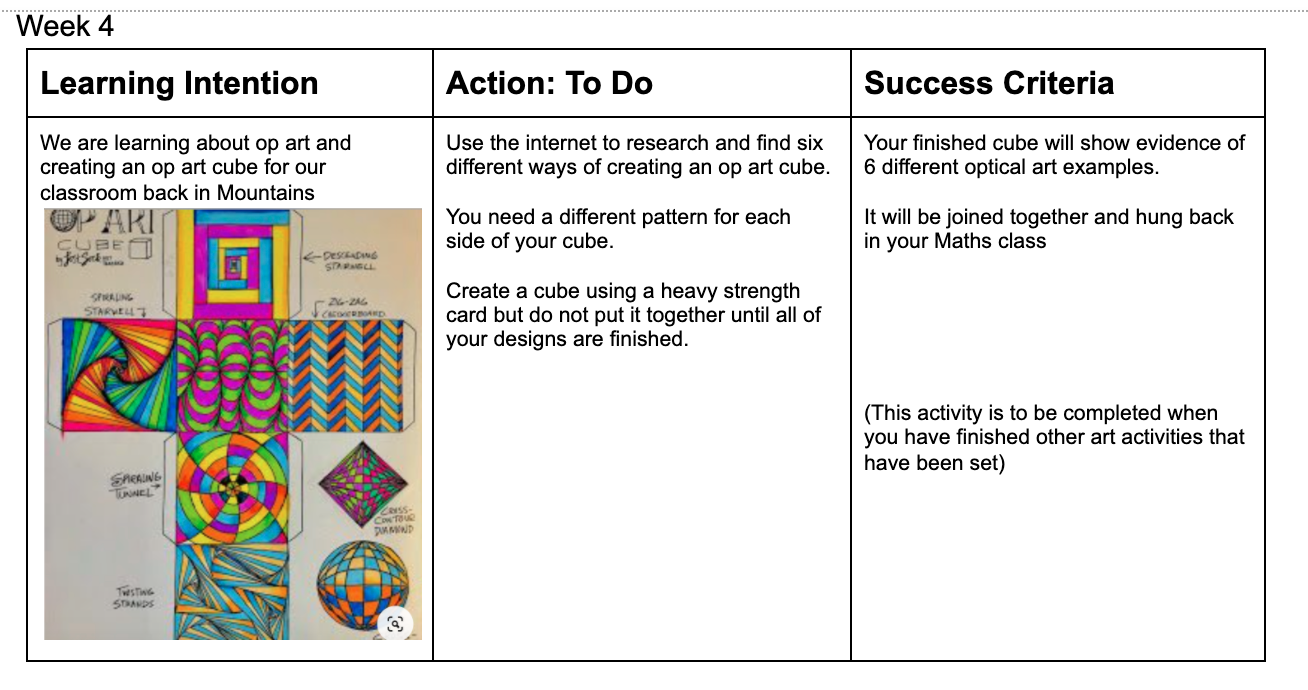
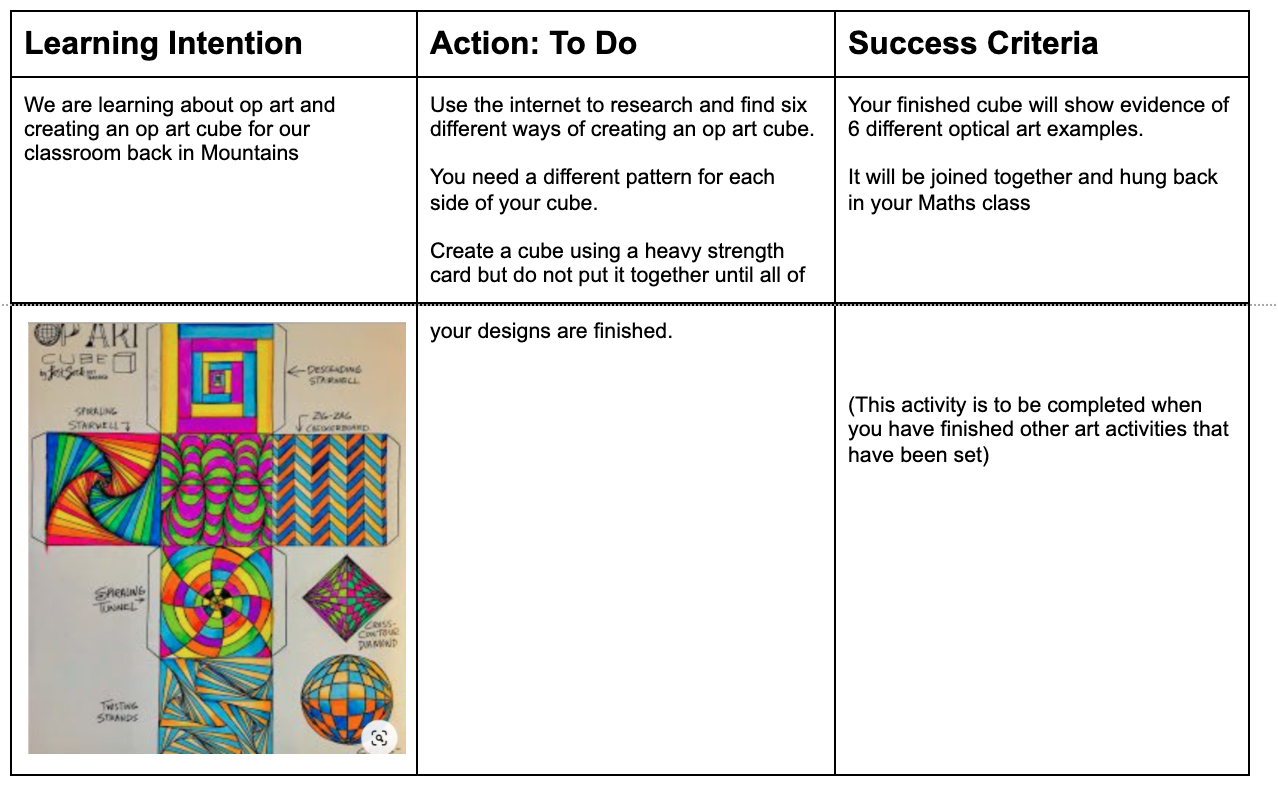
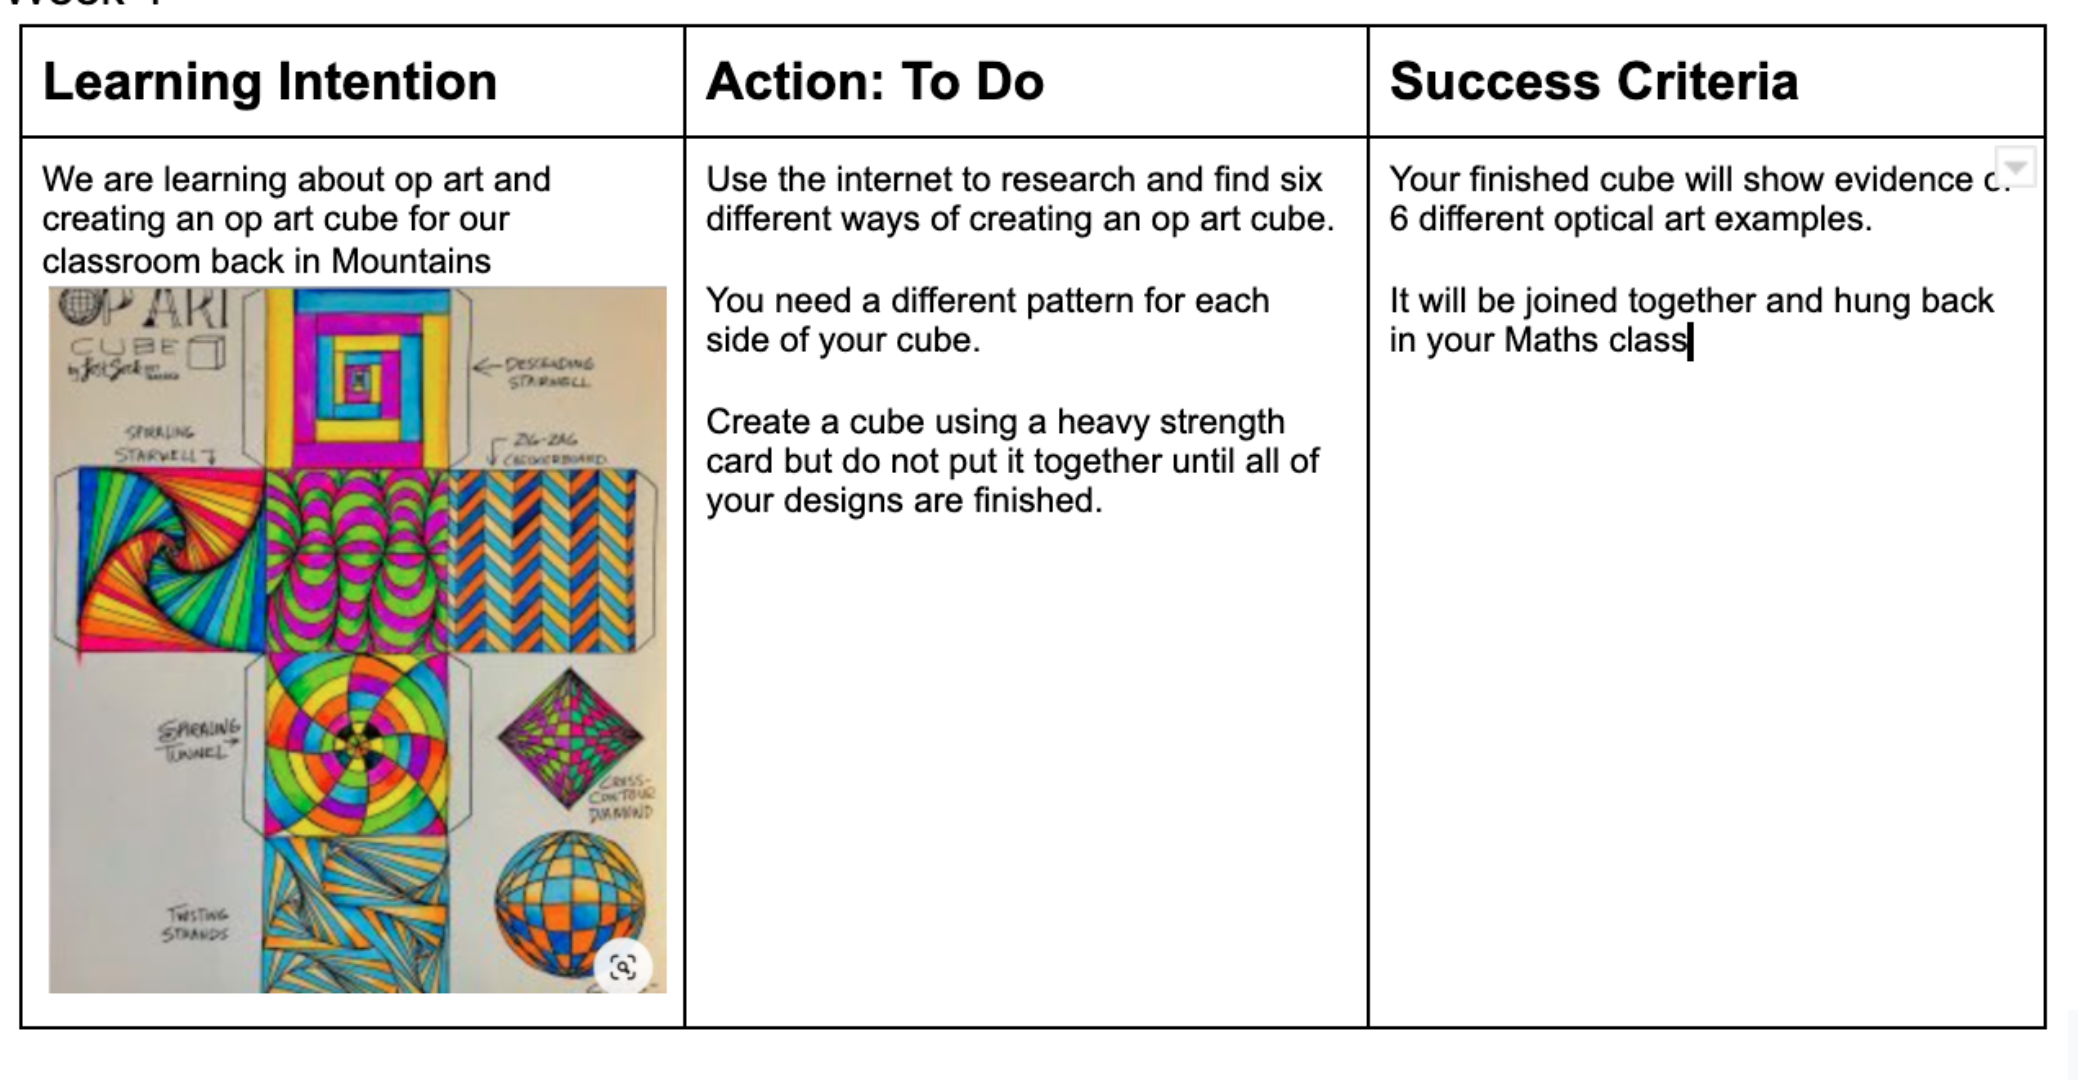
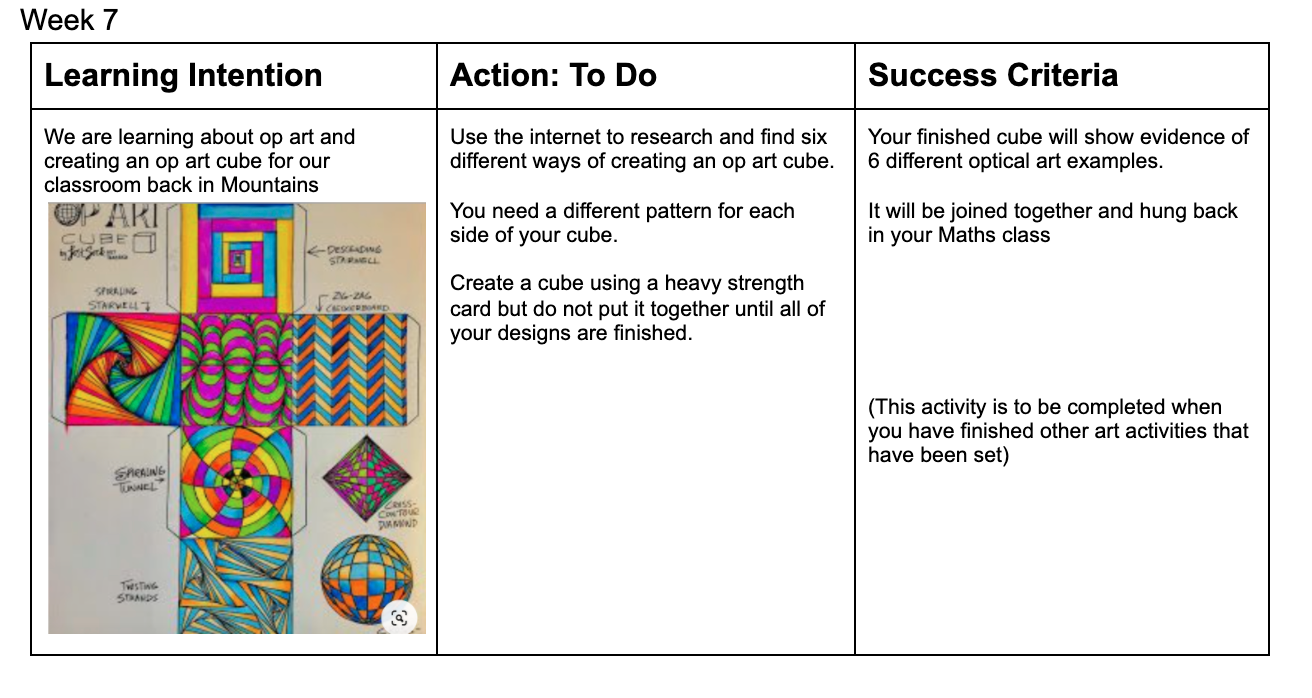
Learning Intention
Action: To Do
Success Criteria
We are learning about op art and creating an op art cube for our classroom back in Mountains
Use the internet to research and find six different ways of creating an op art cube.
You need a different pattern for each side of your cube.
Create a cube using a heavy strength card but do not put it together until all of your designs are finished.
Your finished cube will show evidence of 6 different optical art examples.
It will be joined together and hung back in your Maths class
(This activity is to be completed when you have finished other art activities that have been set)