9 Digital Technology 1
Section outline
-
Kia ora...
My name is Mr Taha and I am going to be your digital technology teacher throughout the year.
In this course we are going to explore and use wide variety of digital platforms and electronic components in circuits. We will start this week by learning about computational thinking.

Learning Intentions: We are learning to (WALT)...
Understand the basics of computational thinking
understand the binary numbers with a link to how computers work
Success Criteria: I can/have...
- use computational thinking to write a simple program on a computer using logical steps
Activities:
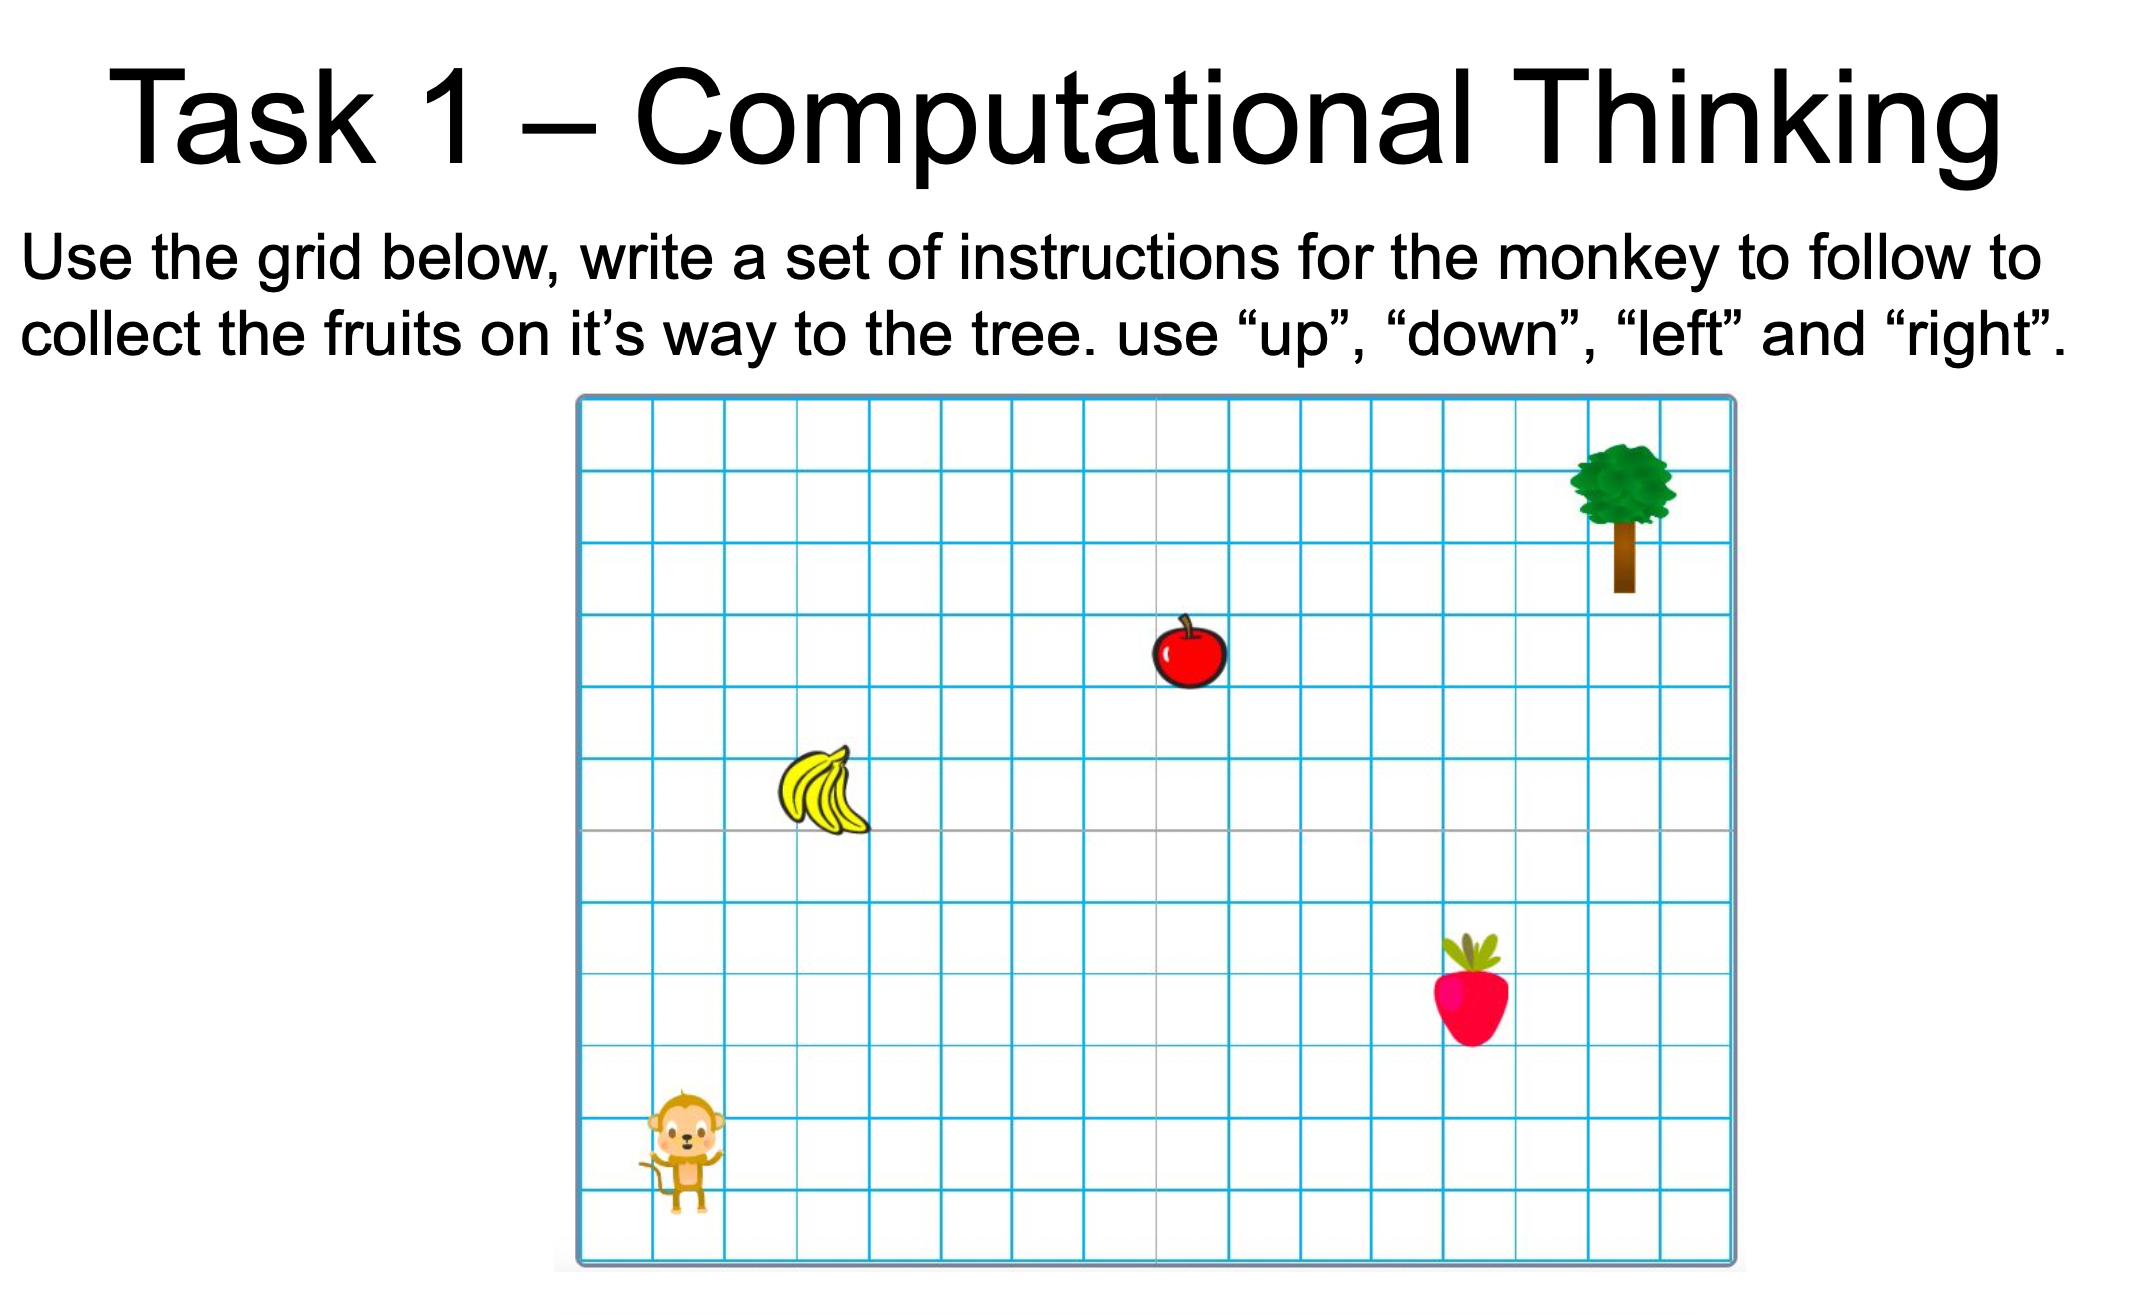
Computational thinking - task1
Binary numbers - task2 on Google Classroom
Homework:
use Scratch app to extend your code to a more complex one.Google Classroom Link:
https://classroom.google.com/c/NjU4MDE3MjY0NTIz?cjc=enzycr6
Google Classroom Code: enzycr6 -
Kia ora
We will continue learning about computational thinking. This week we will go over binary numbers and introduce Hour of Code website.
Learning Intentions: We are learning to (WALT)...
Understand the basics of computational thinking
understand the binary numbers with a link to how computers work
understand basic coding using Hour of code website.
Success Criteria: I can/have...
- use computational thinking to write a simple program on a computer using logical steps
- use hour of code platform to code my educational game
Activities:
Computational thinking - task1
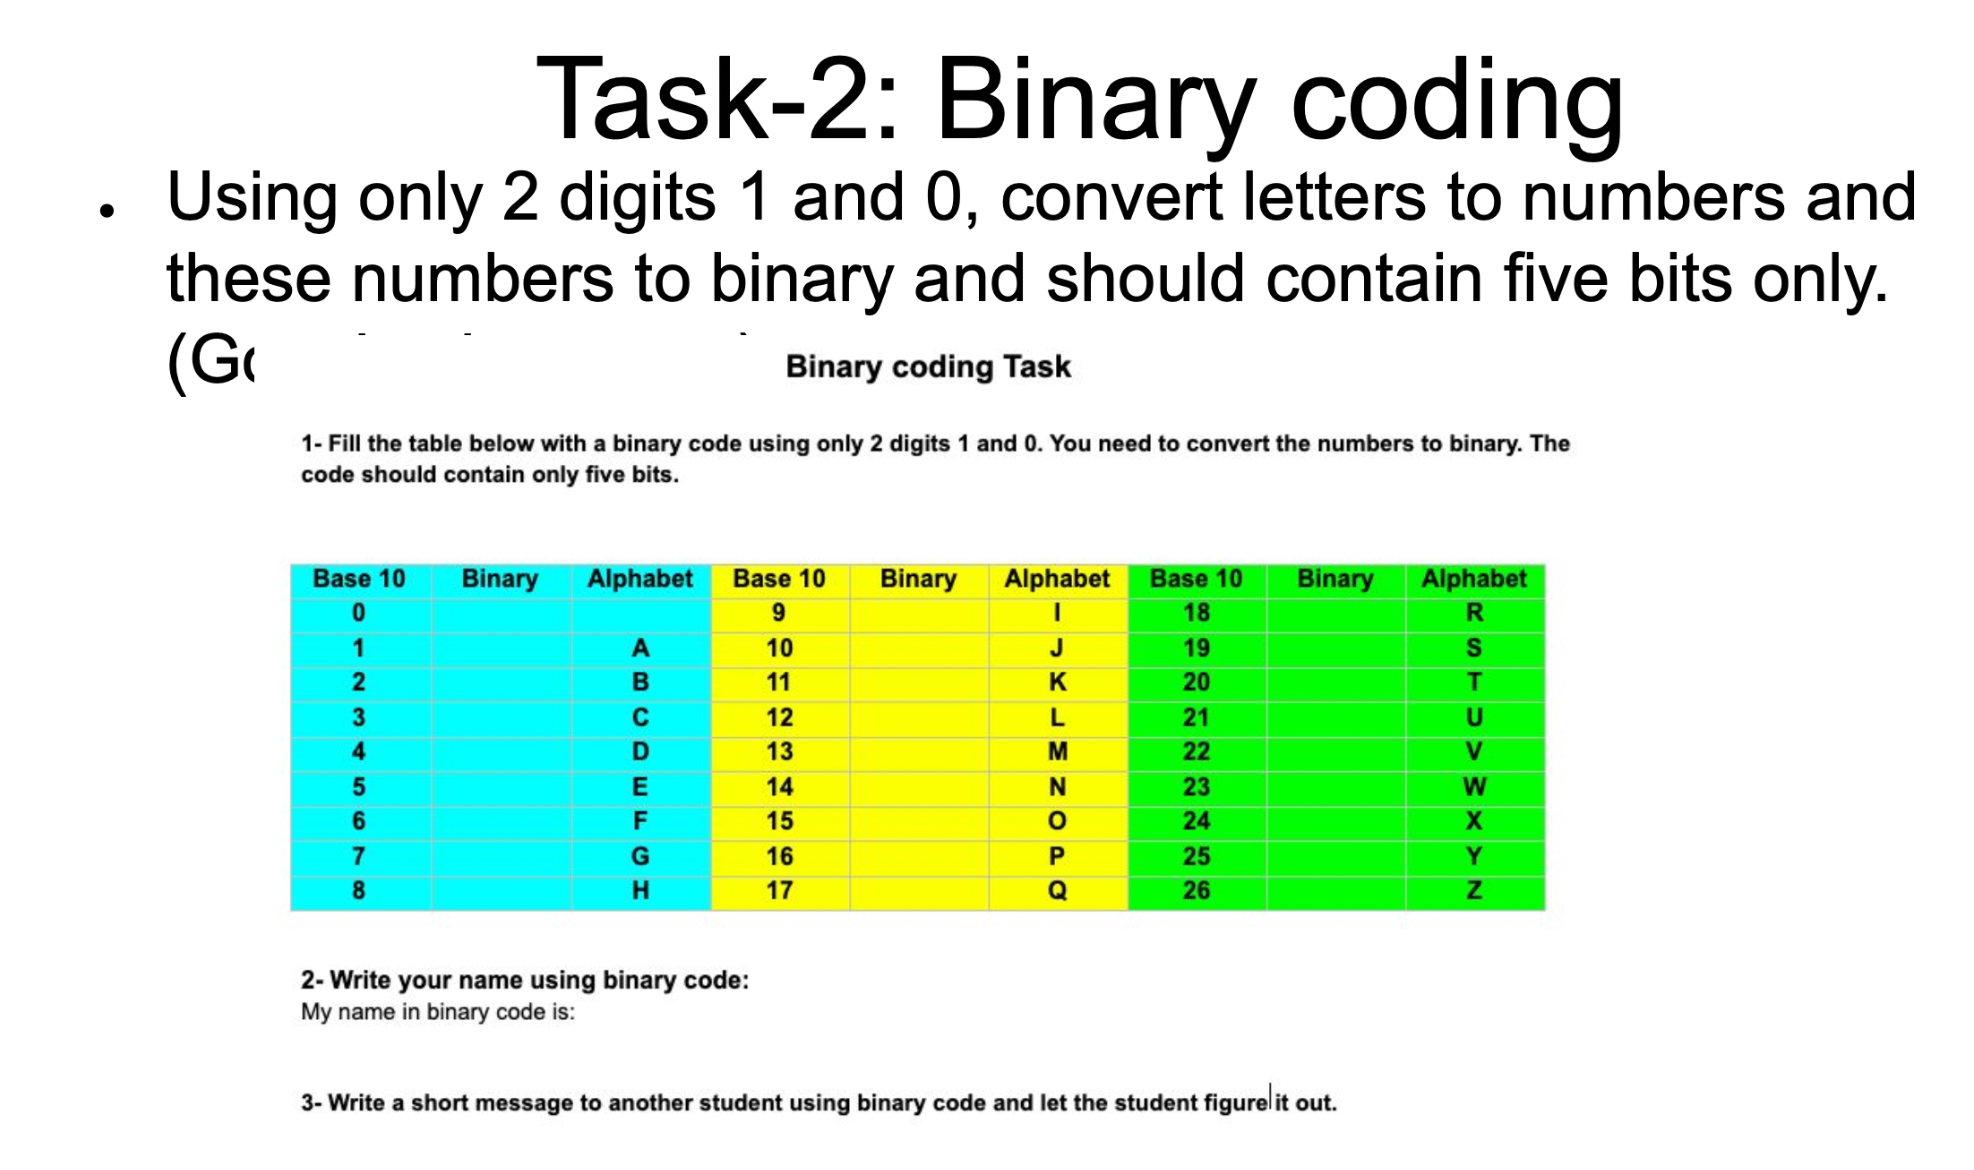
Binary numbers - task2 on Google Classroom
Introduction to Hour of code - Google classroom
-
Kia ora
We will continue learning about computational thinking. This week we will go over binary numbers and introduce Hour of Code website.
Learning Intentions: We are learning to (WALT)...
Understand the basics of computational thinking
understand the binary numbers with a link to how computers work
understand basic coding using Hour of code website.
Success Criteria: I can/have...
- use computational thinking to write a simple program on a computer using logical steps
- use hour of code platform to code my educational game
Activities:
Computational thinking -
Introduction to Hour of code - Google classroom

-
Kia ora
We will continue learning about computational thinking. This week we will go over binary numbers and introduce Hour of Code website.
Learning Intentions: We are learning to (WALT)...
Understand the basics of computational thinking
understand the binary numbers with a link to how computers work
understand basic coding using Hour of code website.
Success Criteria: I can/have...
- use computational thinking to write a simple program on a computer using logical steps
- use hour of code platform to code my educational game
Activities:
Computational thinking -
Introduction to Hour of code - Google classroom
-
Kia ora
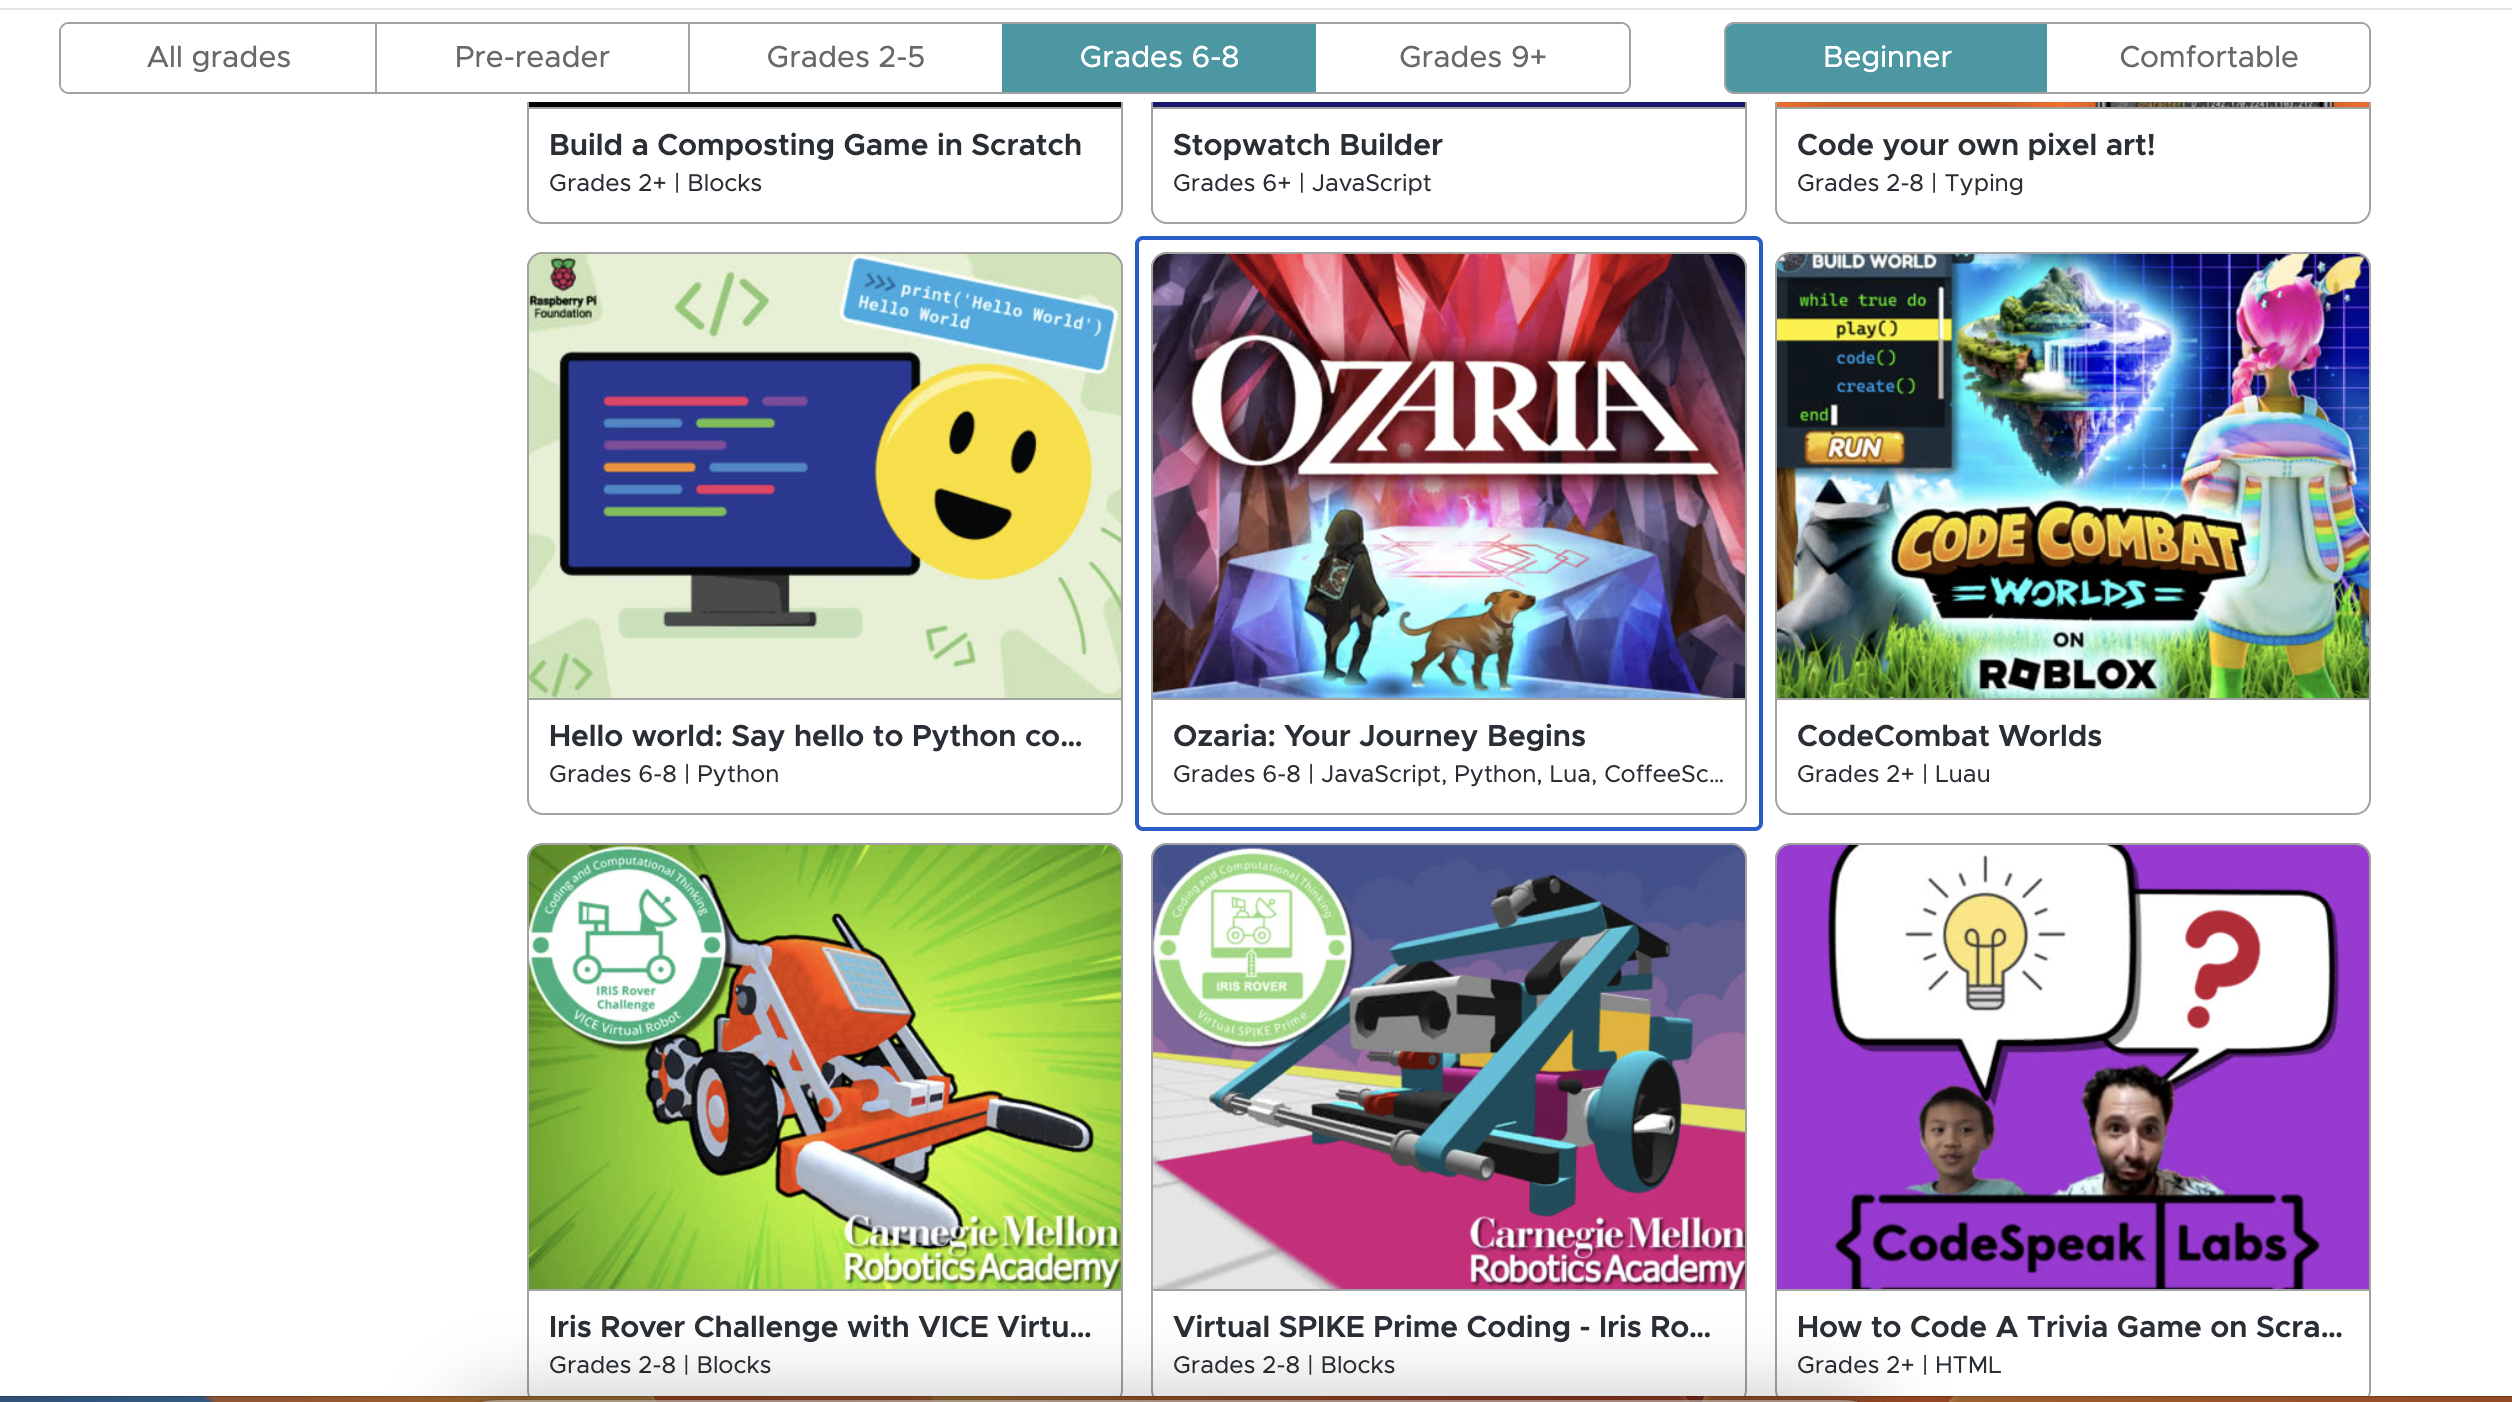
We will continue working on hour of code website to design our educational game for a chosen client.
Learning Intentions: We are learning to (WALT)...
Understand the basics of computational thinking.
understand basic coding using Hour of code website.
Success Criteria: I can/have...
- use computational thinking to write a simple program on a computer using logical steps
- use hour of code platform to code my educational game
Activities:
Hour of code - Google classroom
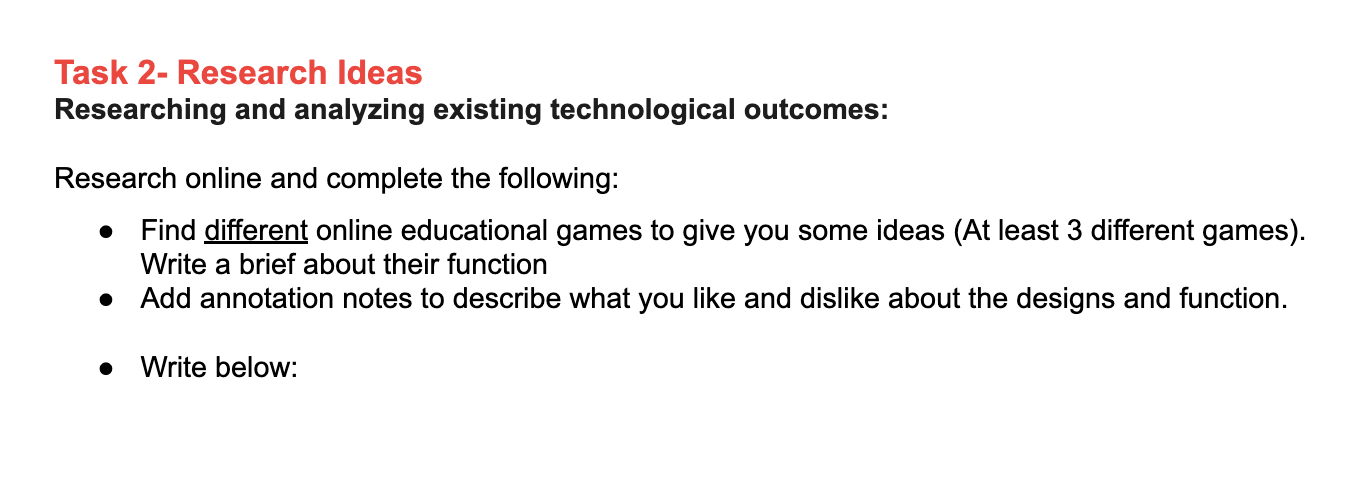
Assesment document on Google classroo


-
-
Opened: Friday, 15 March 2024, 12:00 AMDue: Thursday, 4 April 2024, 3:00 PM
-
-
Kia ora...
Welcome back to a new term.
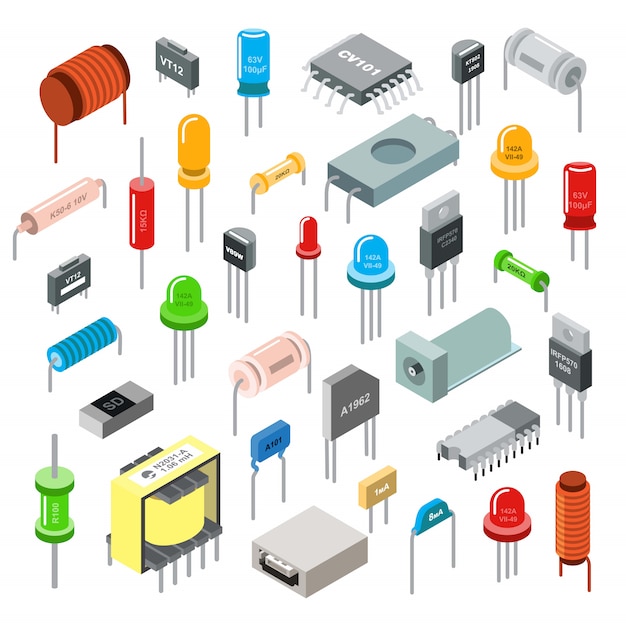
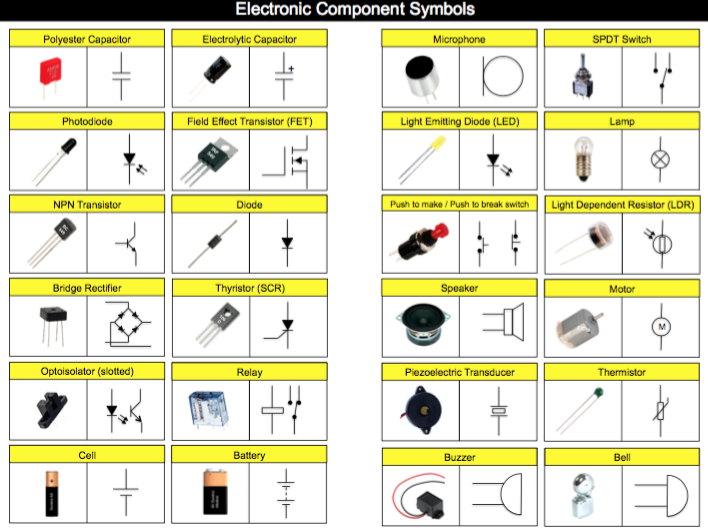
This week we will learn about electronic components and their symbols and use.
Success Criteria:
I can identify electronic components and their symbols in a circuit and explain their use.
Activities:
- Electronic components and their symbols activity on google classroom
Further Learning:
Extend your knowledge of electronic symbols by visiting Technology Student websiteLhttps://www.technologystudent.com/elec1/elecex.htm
- Electronic components and their symbols activity on google classroom
Further Learning:
Extend your knowledge of electronic symbols by visiting Technology Student websiteLhttps://technologystudent.com/elec1/compn1.htm
https://technologystudent.com/elec1/compn2.htm
https://technologystudent.com/elec1/compn3.htm
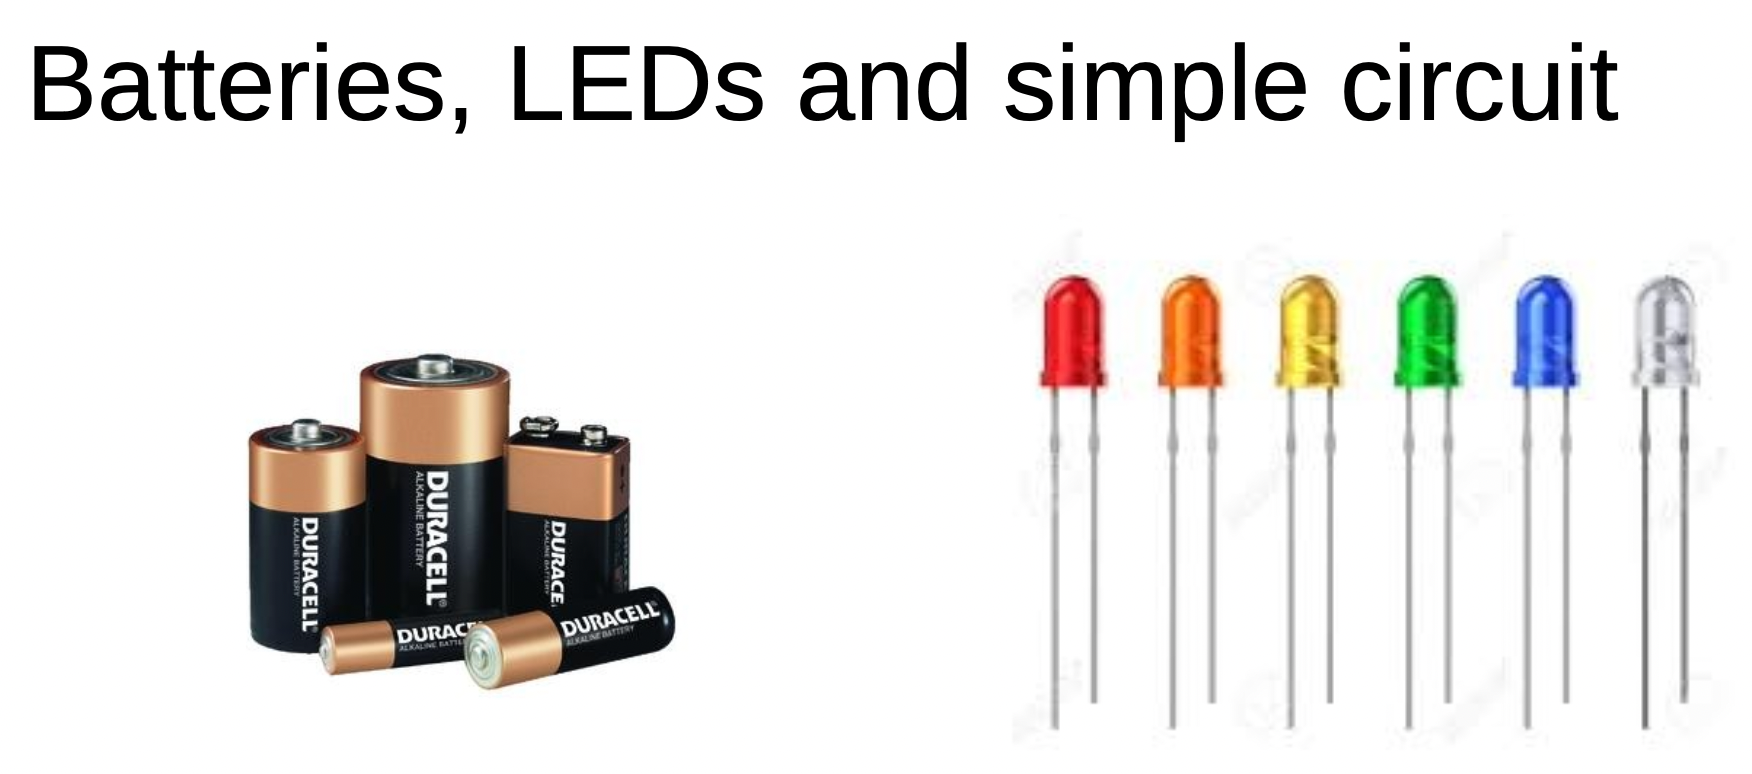
https://technologystudent.com/elec1/battery1.htm
-
Kia ora...
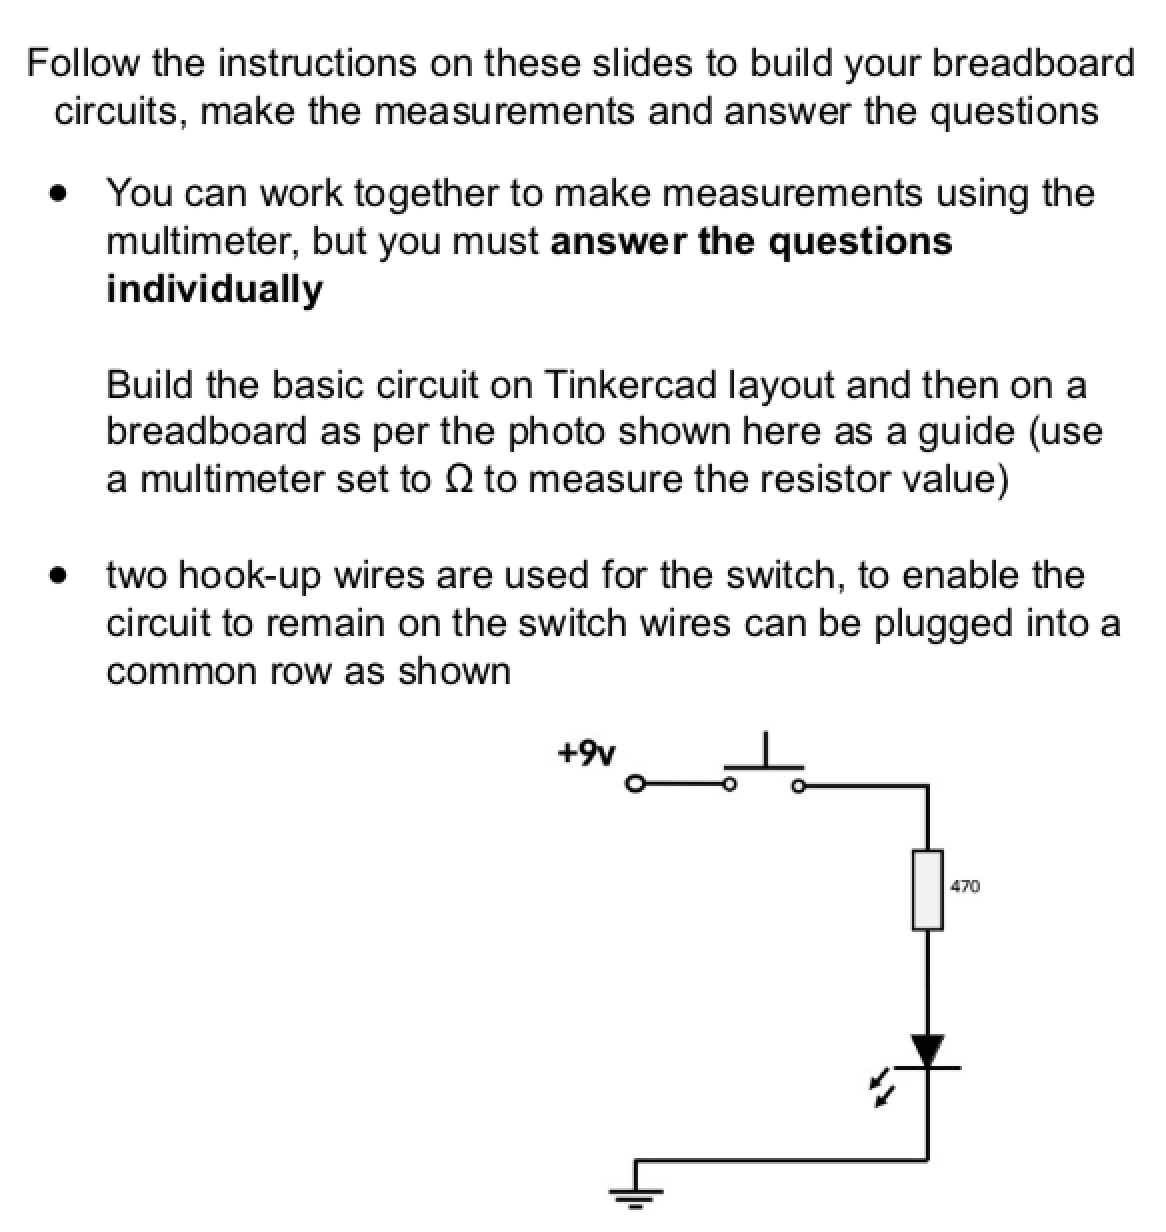
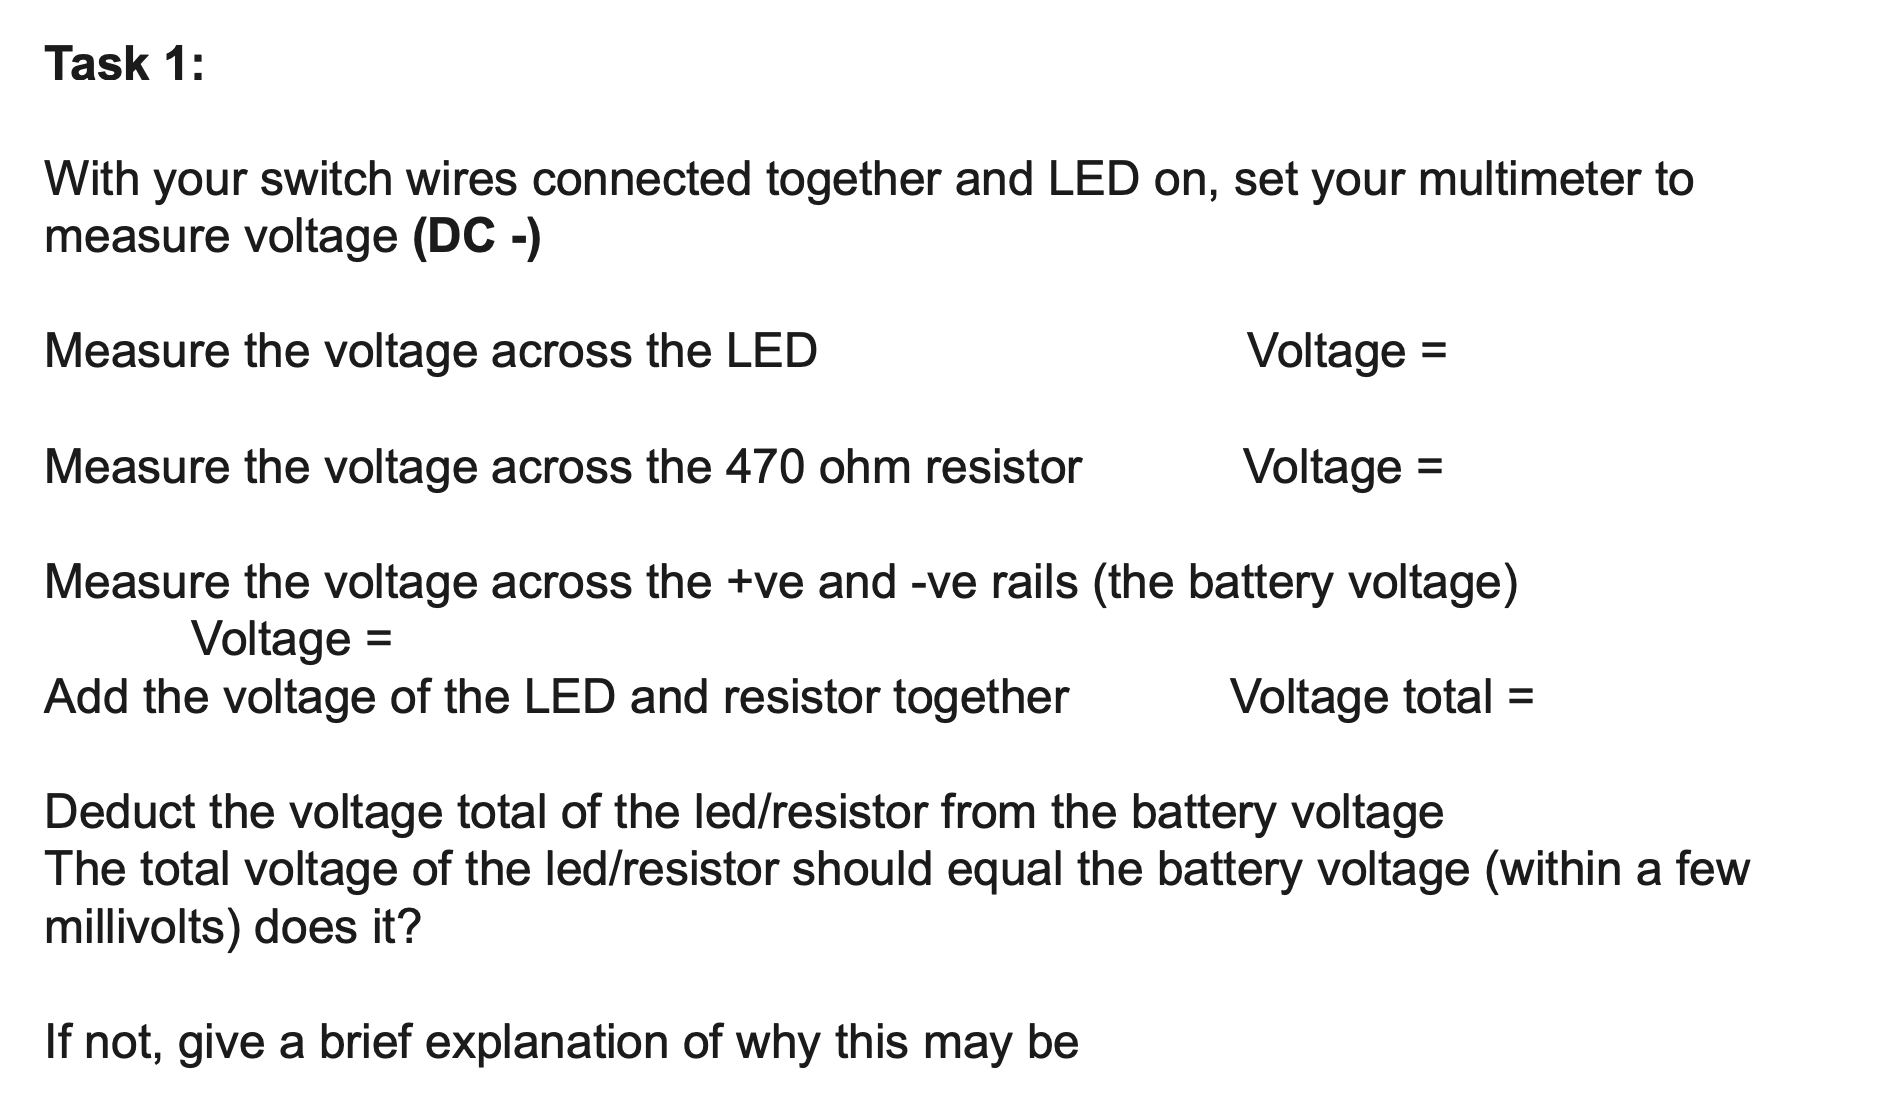
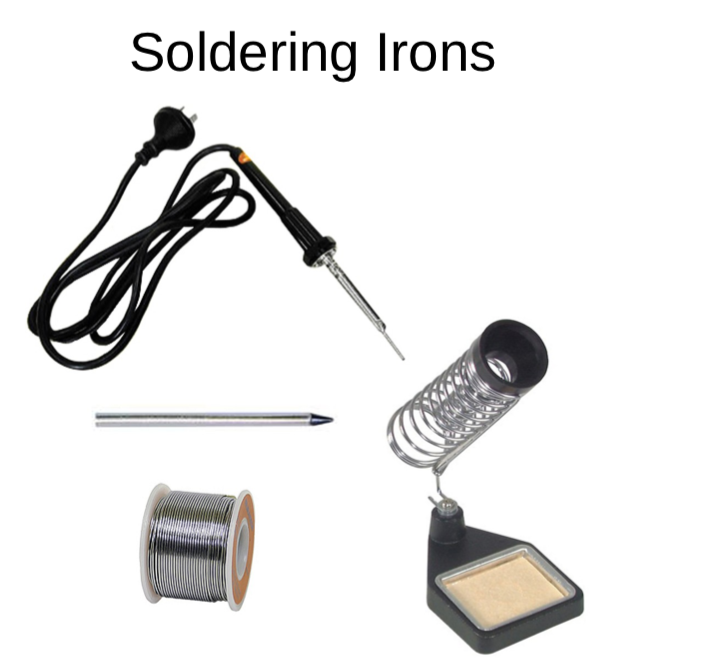
This week we will start to construct our firs LED circuit using Tinkercar software and then with electronic components with breadboard. we will also use soldering to make an actual circuit on cardboard.


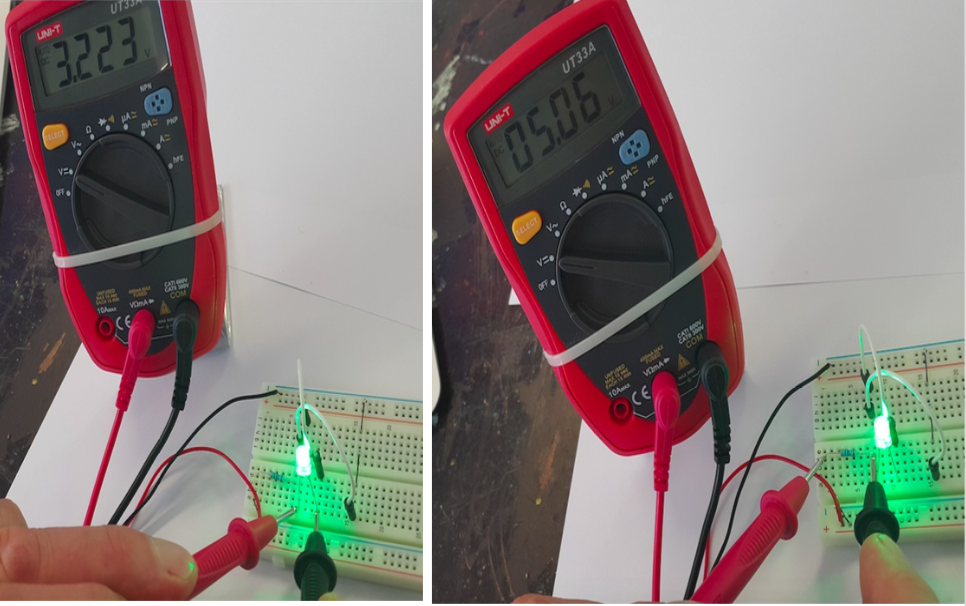
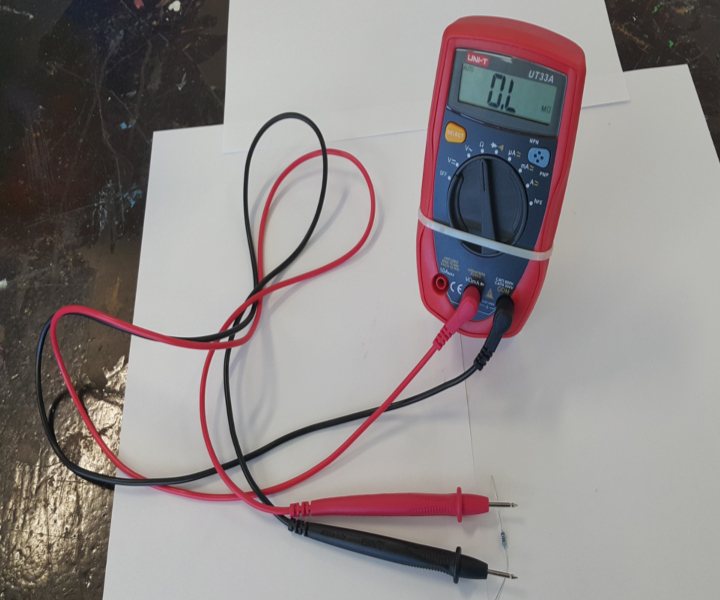
Success Criteria:
1- I can draw a simple LED circuit on Tinkercad : https://www.tinkercad.com/things/6pCm4c0kQ0I-surprising-hango/editel?tenant=circuits
2- I can construct a simple LED circuit using breadboard and electronic component
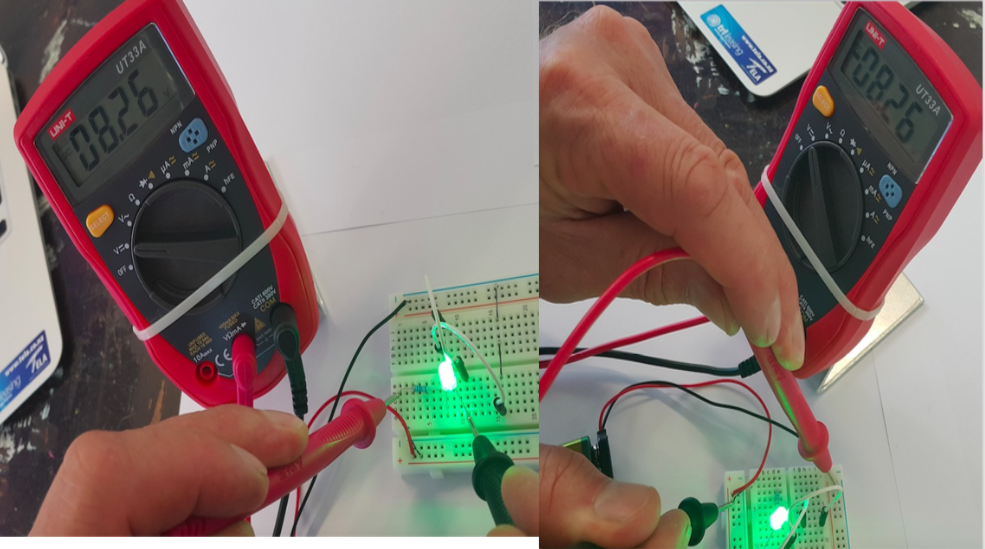
3- I can use the multimeter to measure voltage, resistance, current and continuity circuits
4- I can solder correctly and safely.
Activities:
- Link to Simple Electric circuit :
- Visit Simple LED circuit in the introduction to digital technology document.
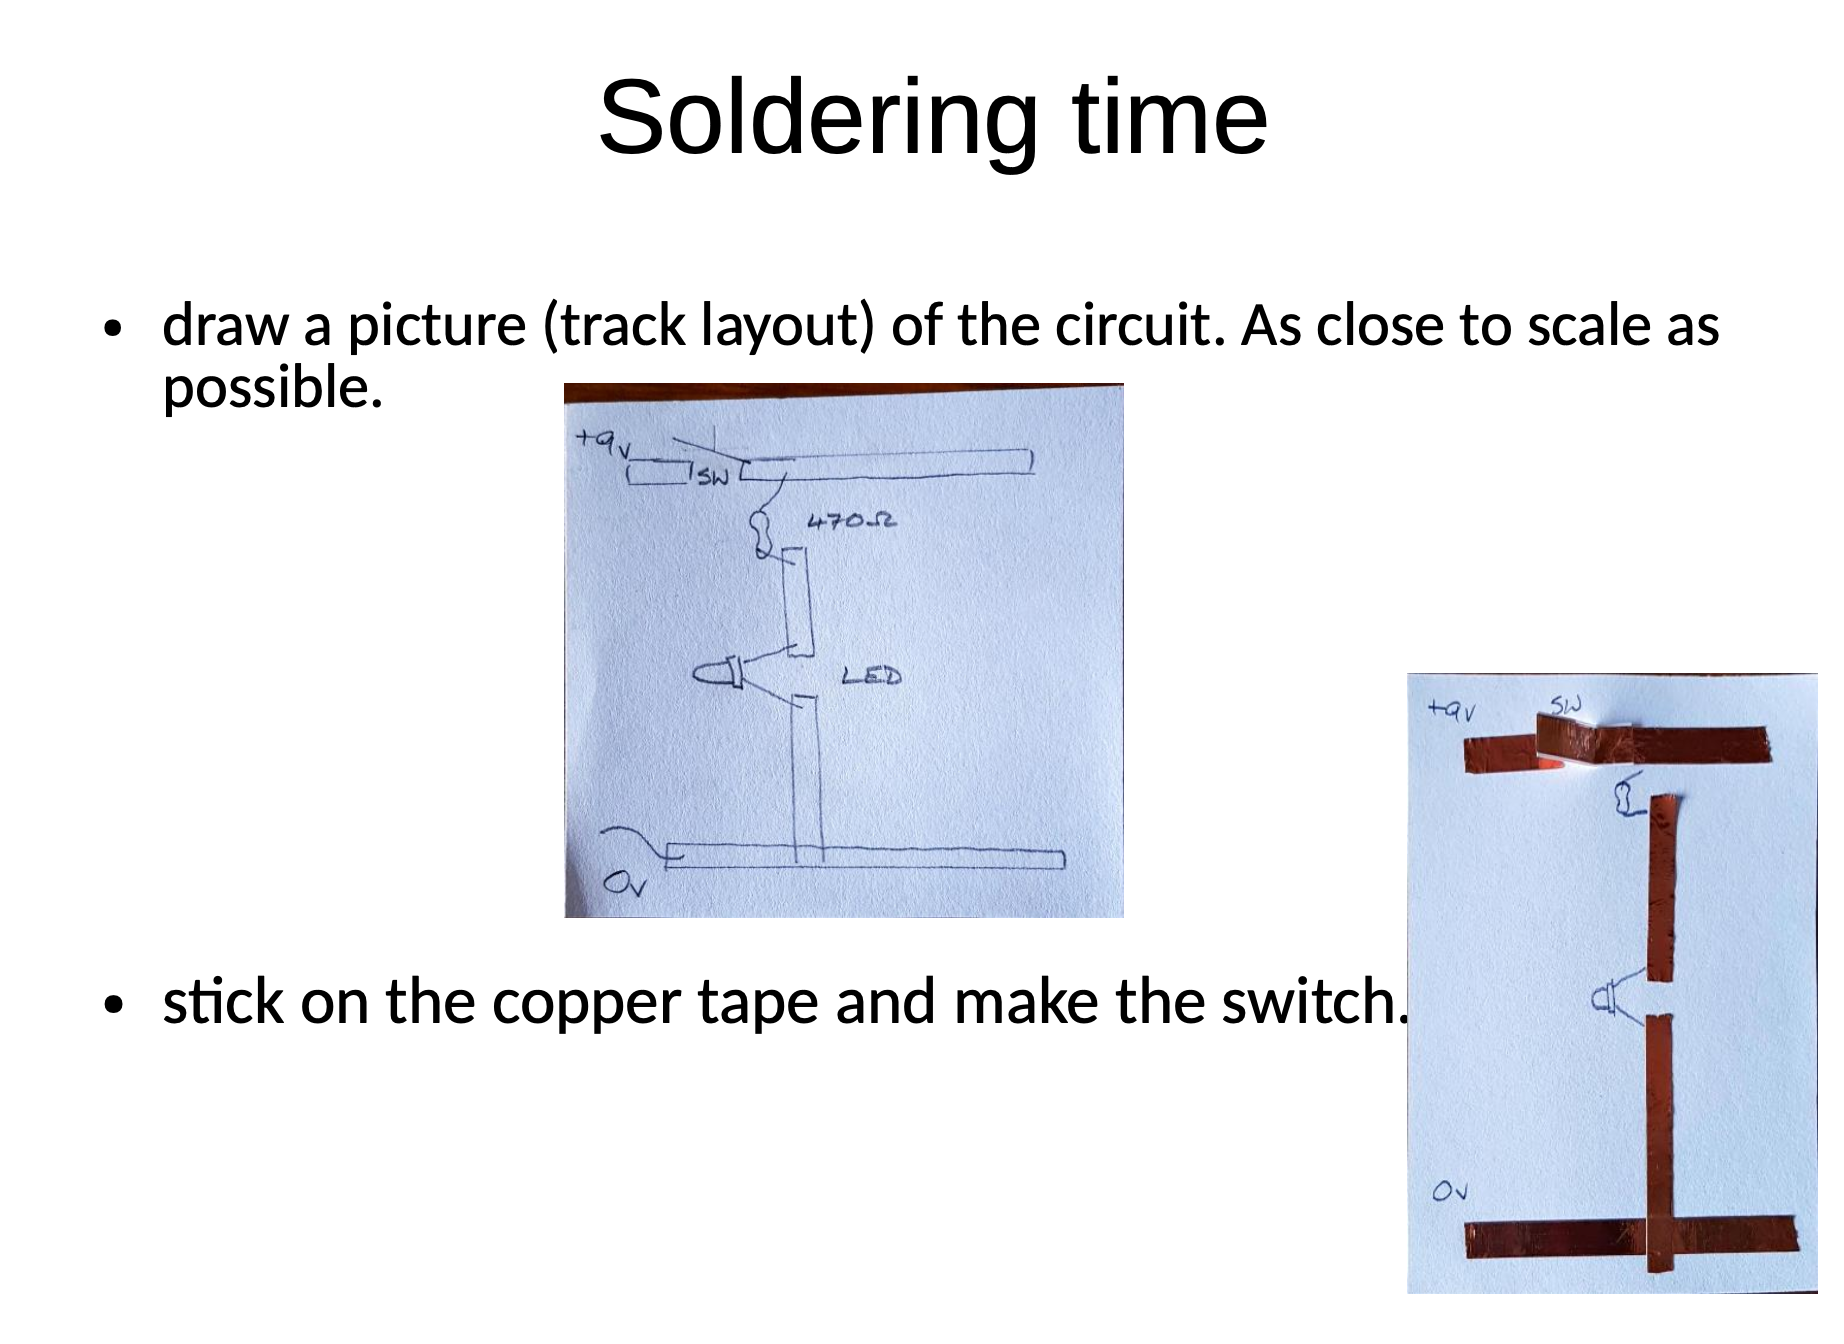
- Practical activity of soldering
-
Kia ora...
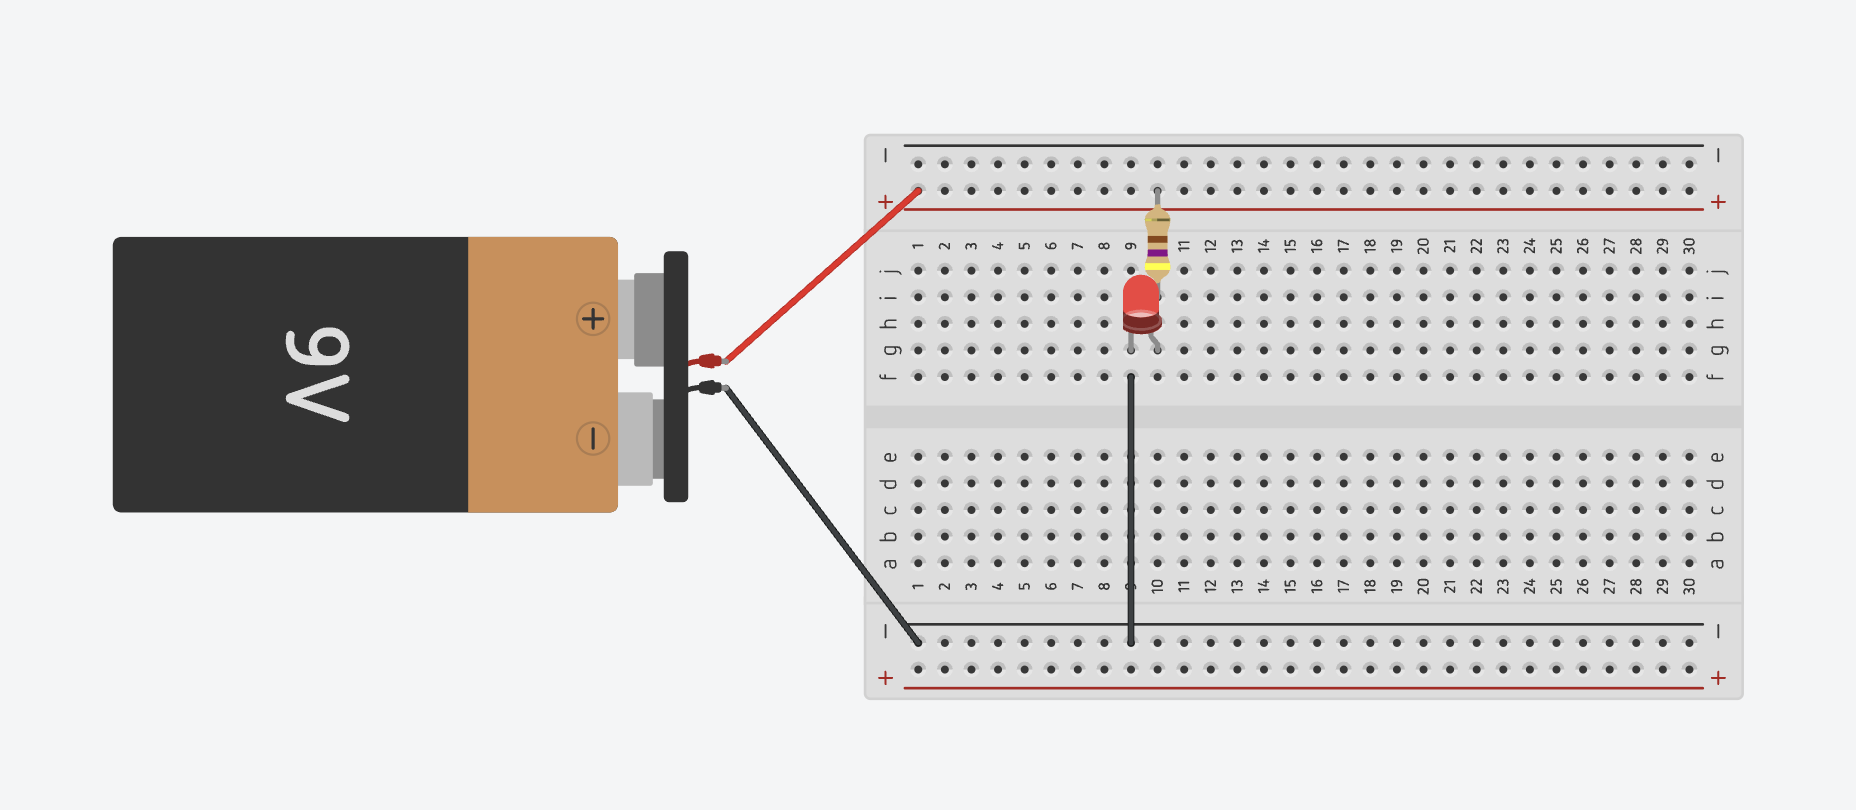
We will continue learning about how to construct our firs LED circuit using Tinkercar software and then with electronic components with breadboard. we will also use soldering to make an actual circuit on cardboard.

Success Criteria:
1- I can draw a simple LED circuit on Tinkercad : https://www.tinkercad.com/things/6pCm4c0kQ0I-surprising-hango/editel?tenant=circuits
2- I can construct a simple LED circuit using breadboard and electronic component
3- I can use the multimeter to measure voltage, resistance, current and continuity circuits
4- I can solder correctly and safely.
Activities:
- Link to Simple Electric circuit :
- Visit Simple LED circuit in the introduction to digital technology document.
- Practical activity of soldering

-
Kia ora...
We will continue learning about how to construct our firs LED circuit using Tinkercar software and then with electronic components with breadboard. we will also use soldering to make an actual circuit on cardboard.
Success Criteria:
1- I can draw a simple LED circuit on Tinkercad : https://www.tinkercad.com/things/6pCm4c0kQ0I-surprising-hango/editel?tenant=circuits
2- I can construct a simple LED circuit using breadboard and electronic component
3- I can use the multimeter to measure voltage, resistance, current and continuity circuits
4- I can solder correctly and safely.
Activities:
- Link to Simple Electric circuit :
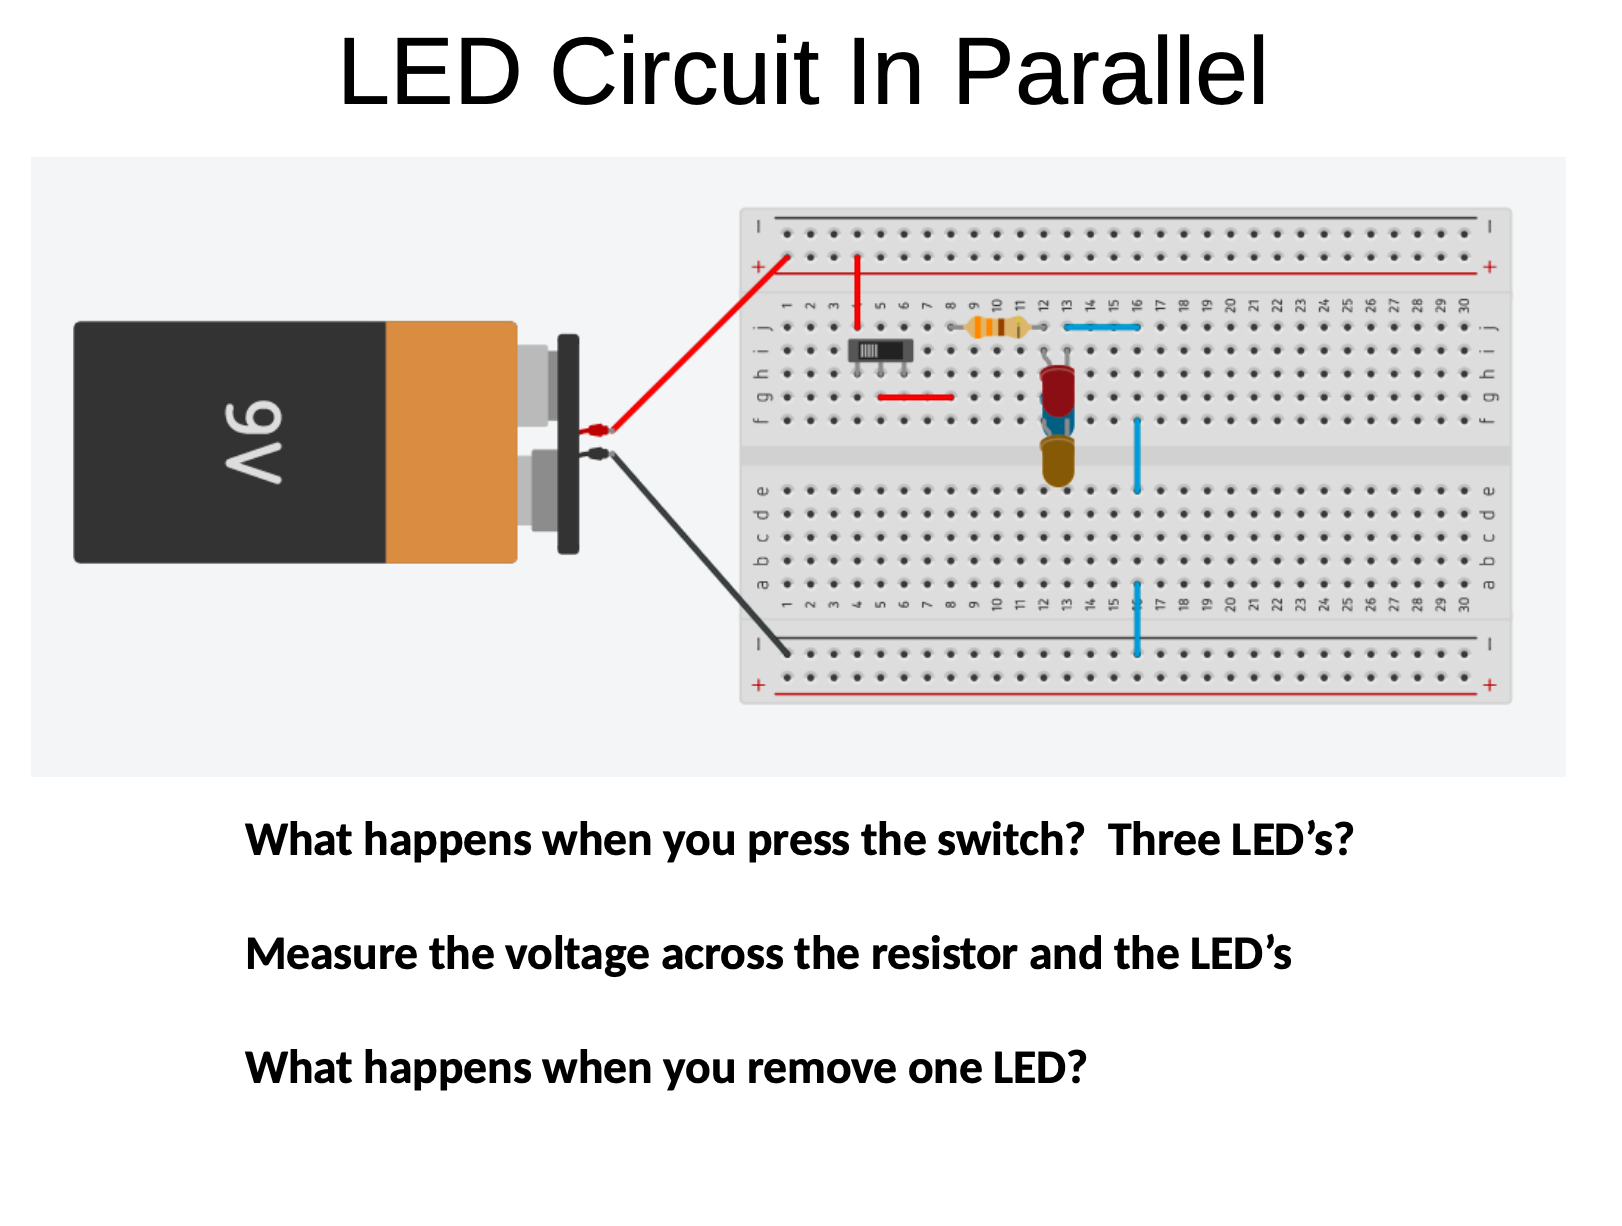
- Parallel Circuits
- Series Circuits
- Visit Simple LED circuit in the introduction to digital technology document.
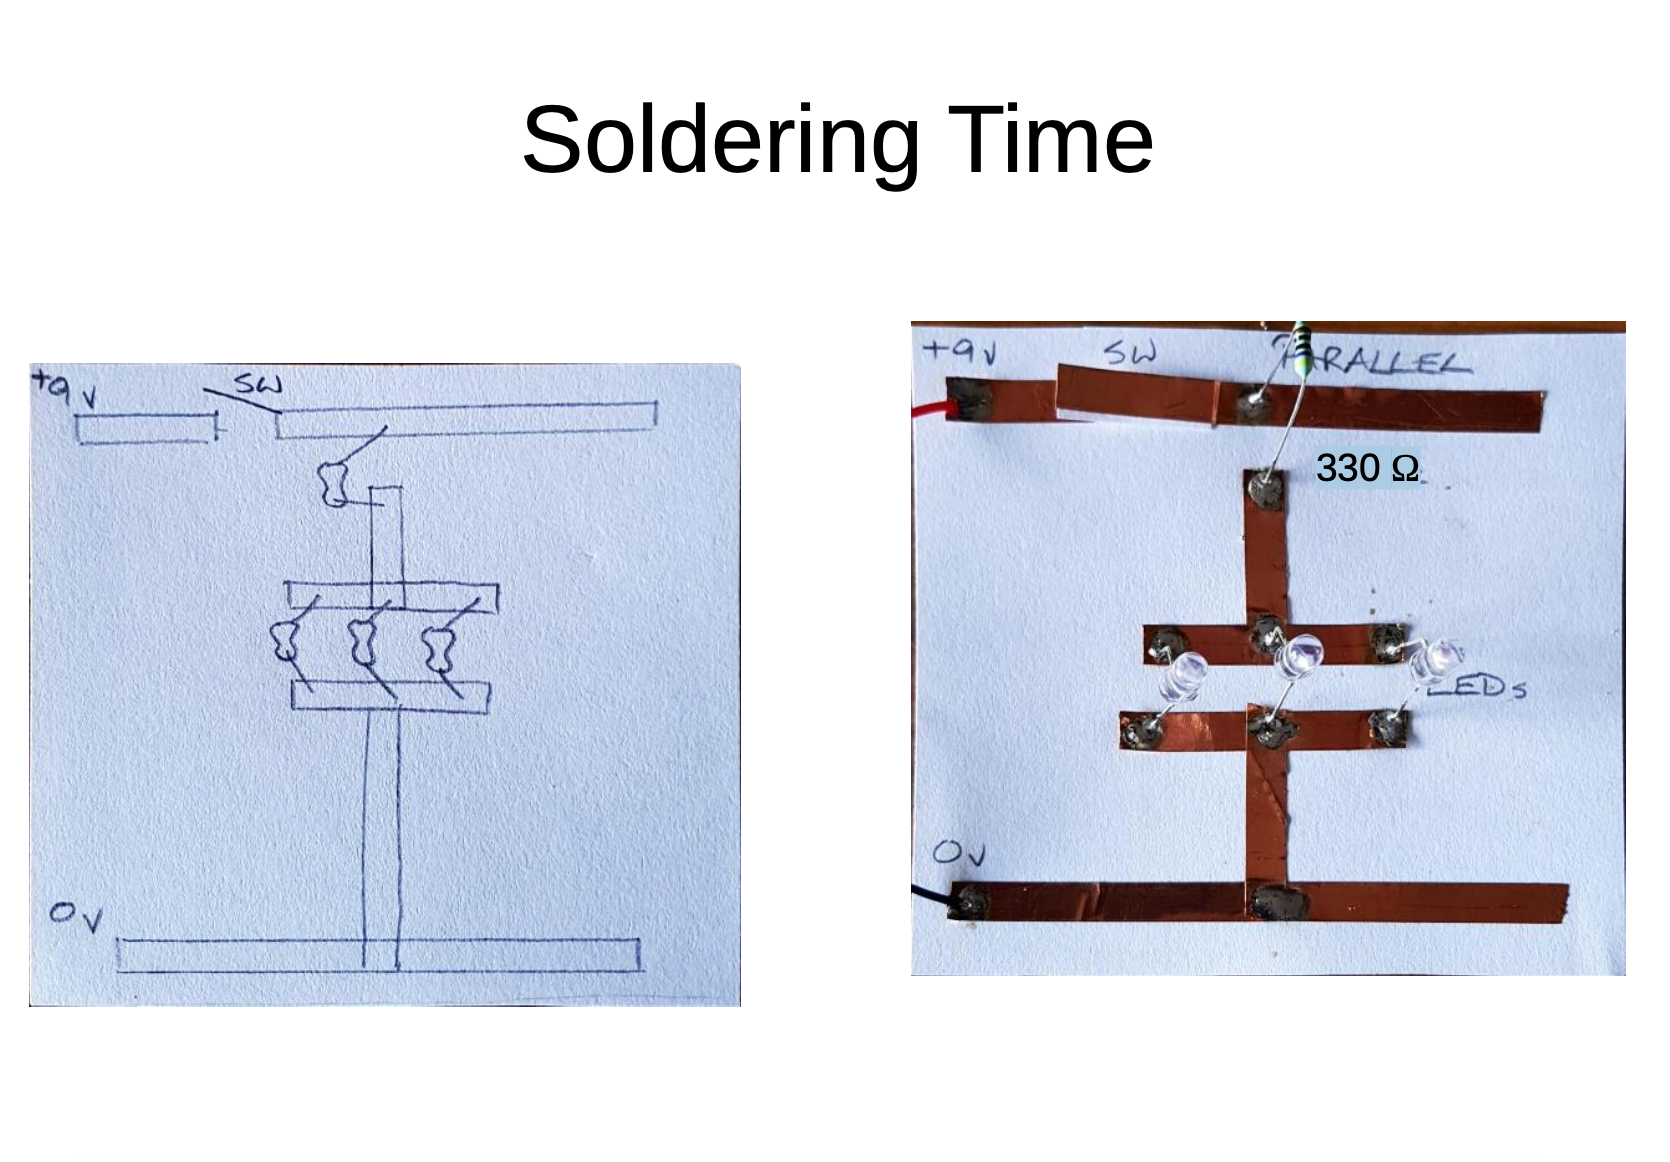
- Practical activity of soldering
Parallel circuits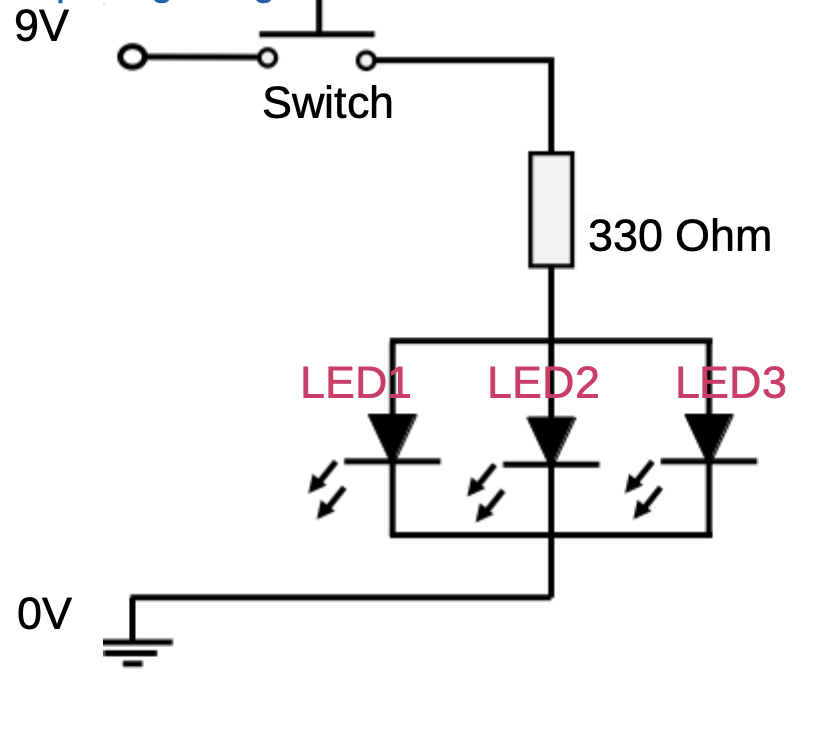
-
Kia ora...
We will continue learning about how to construct our firs LED circuit using Tinkercar software and then with electronic components with breadboard. we will also use soldering to make an actual circuit on cardboard.
Success Criteria:
1- I can draw a simple LED circuit on Tinkercad : https://www.tinkercad.com/things/6pCm4c0kQ0I-surprising-hango/editel?tenant=circuits
2- I can construct a simple LED circuit using breadboard and electronic component
3- I can use the multimeter to measure voltage, resistance, current and continuity circuits
4- I can solder correctly and safely.
Activities:
- Link to Simple Electric circuit :
- Parallel Circuits
- Series Circuits
- Visit Simple LED circuit in the introduction to digital technology document.
- Practical activity of soldering
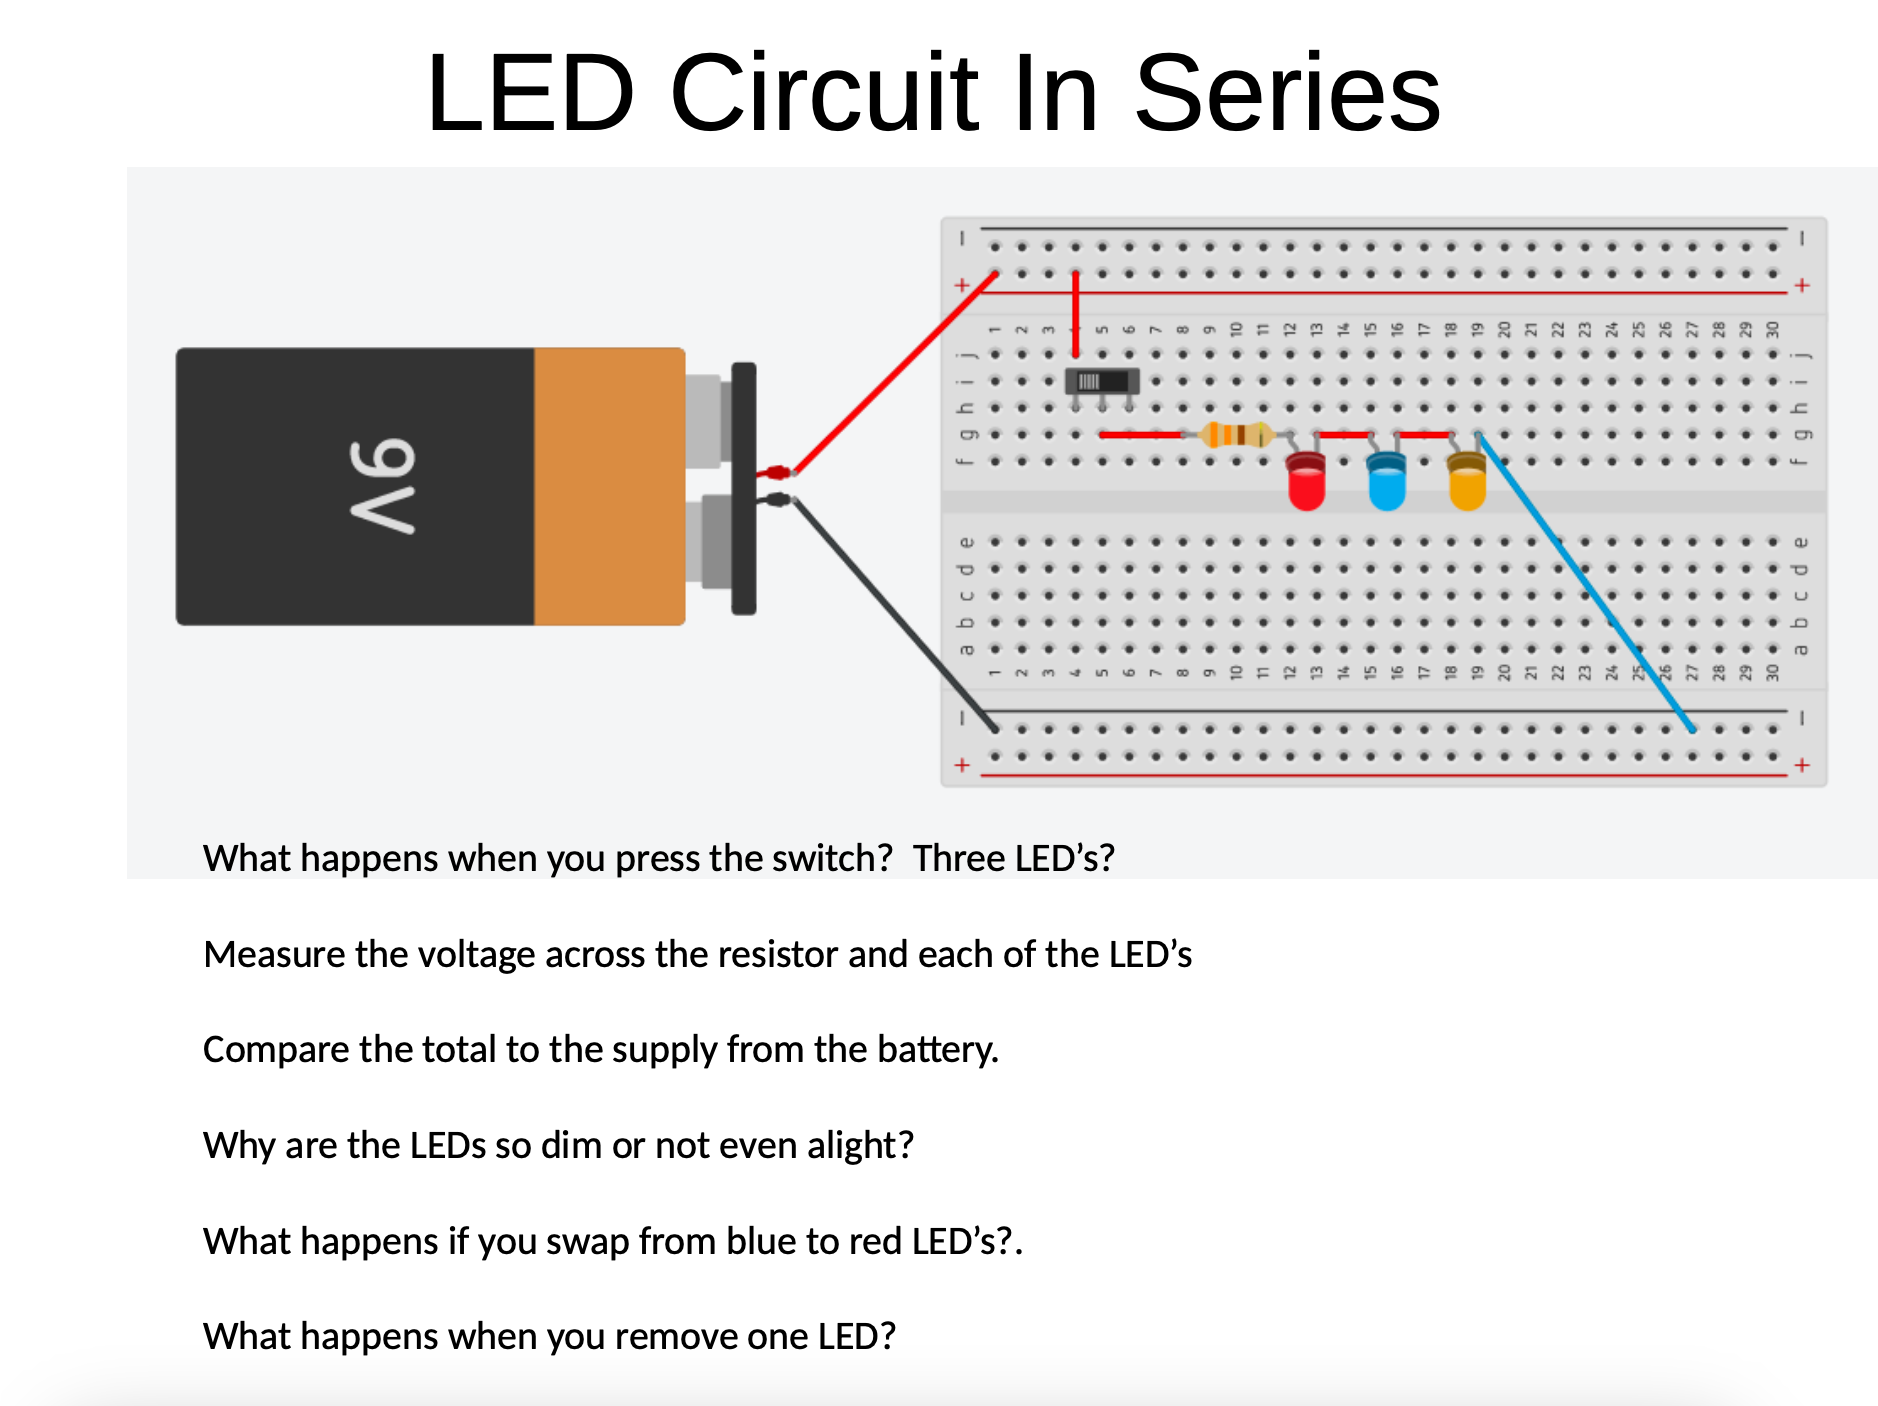
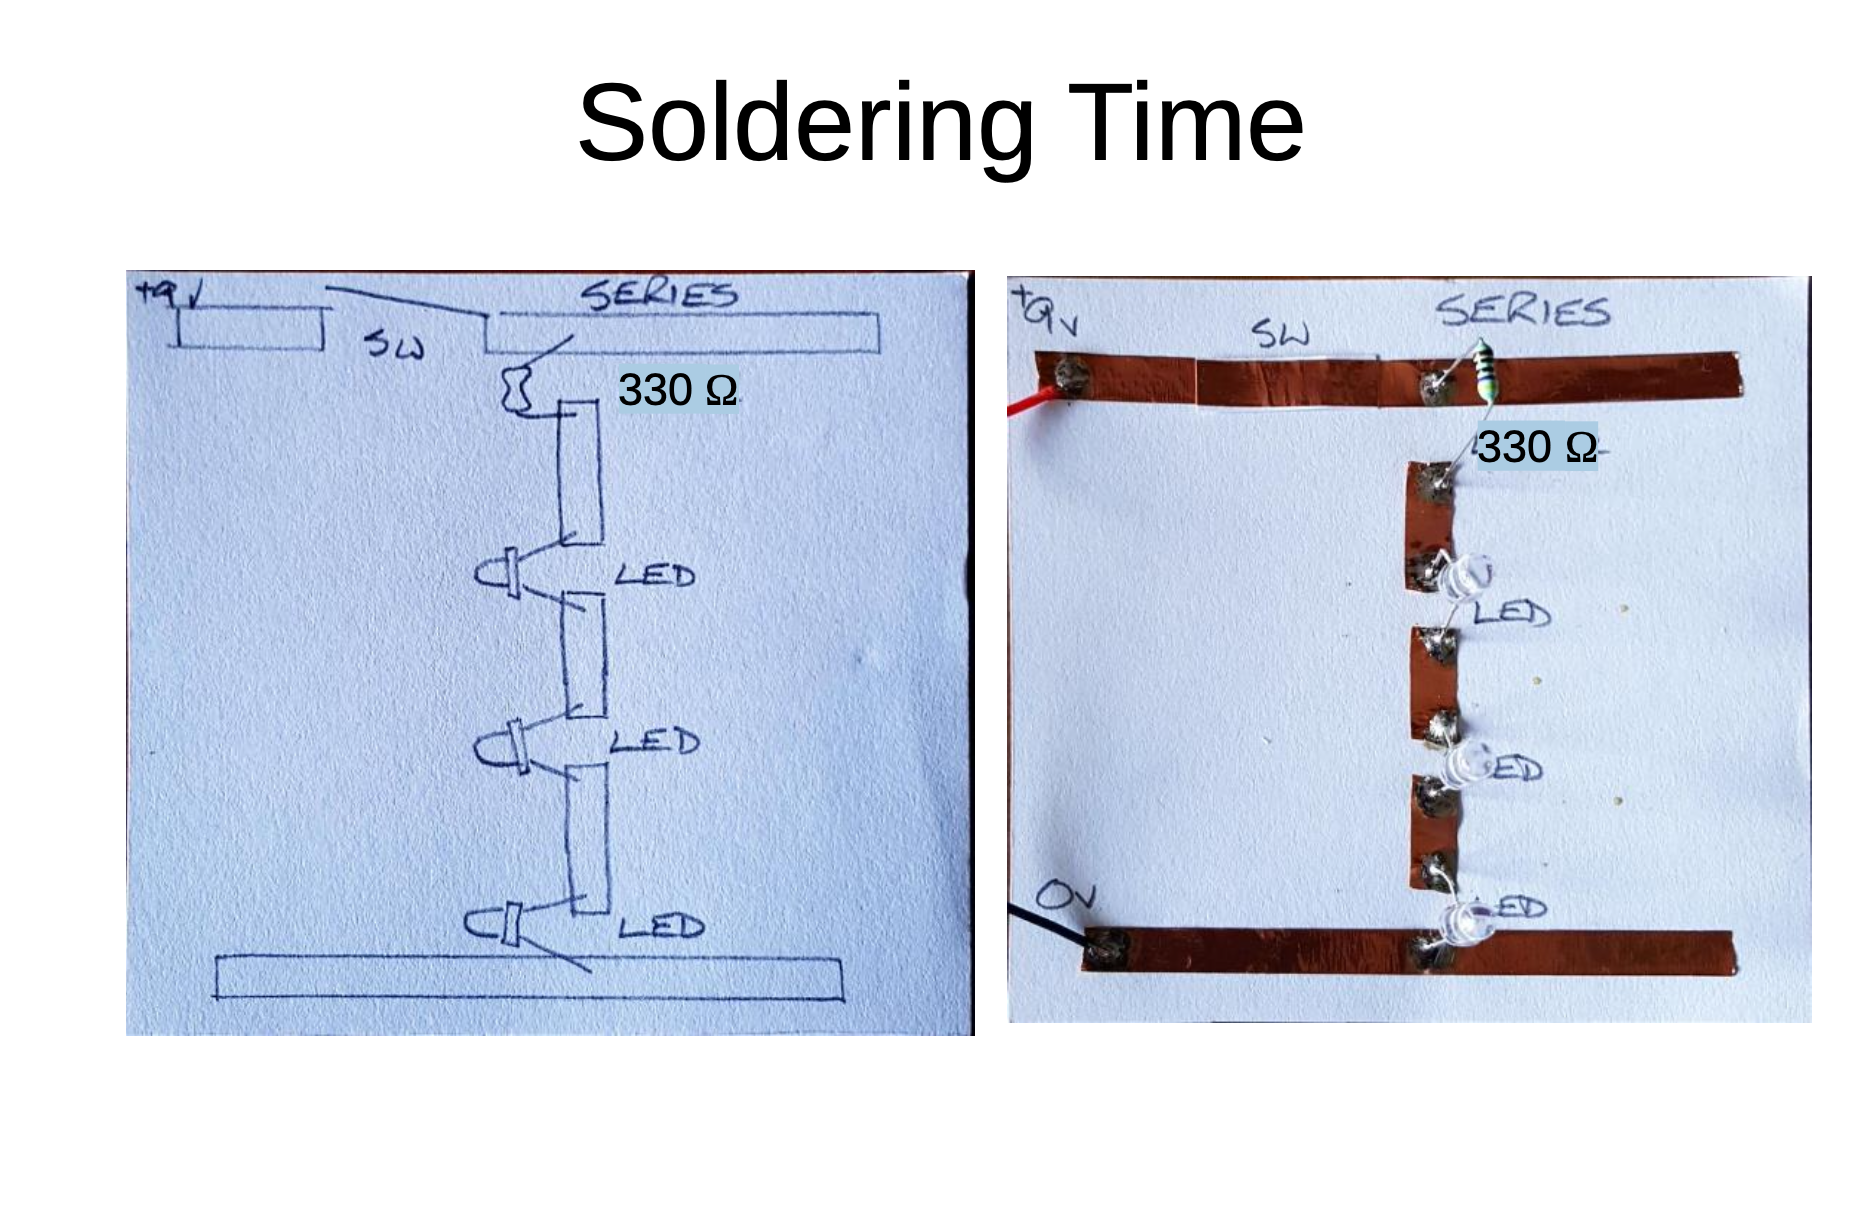
2- Series Circuit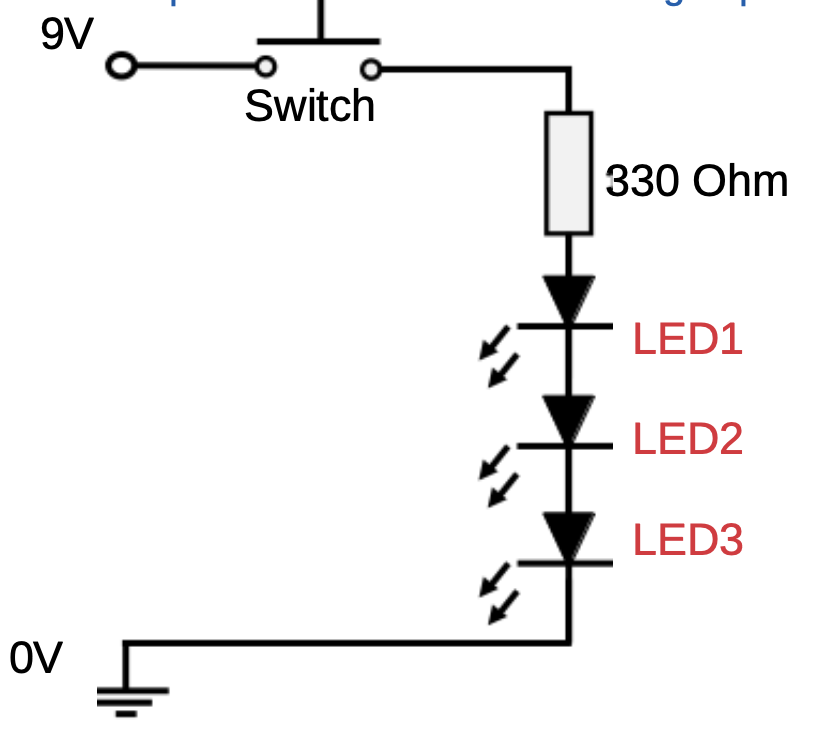
-
Kia ora...
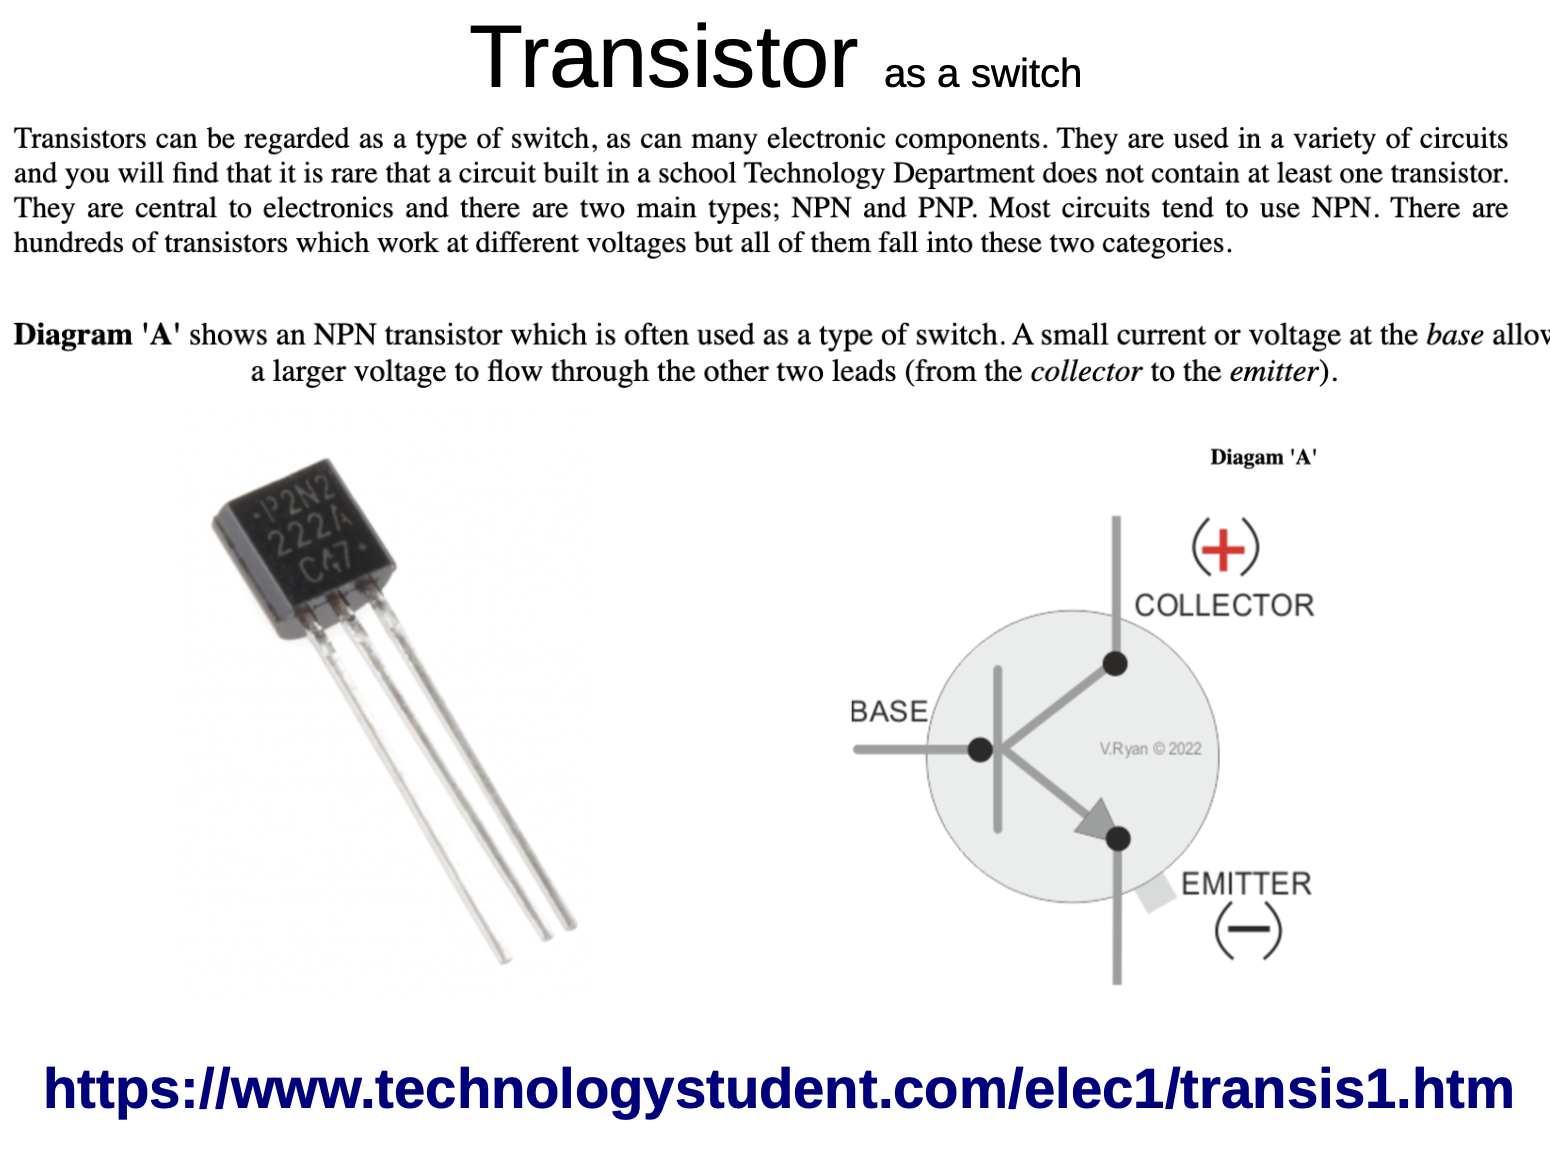
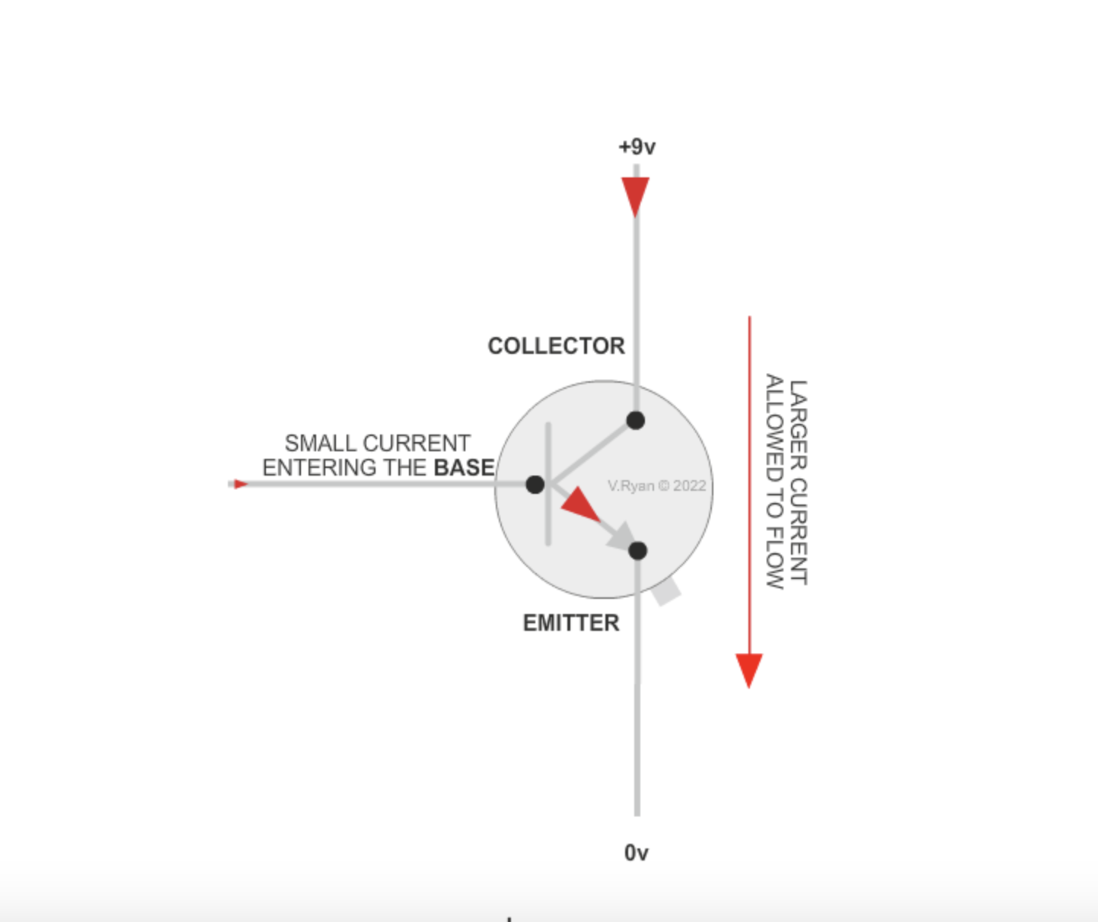
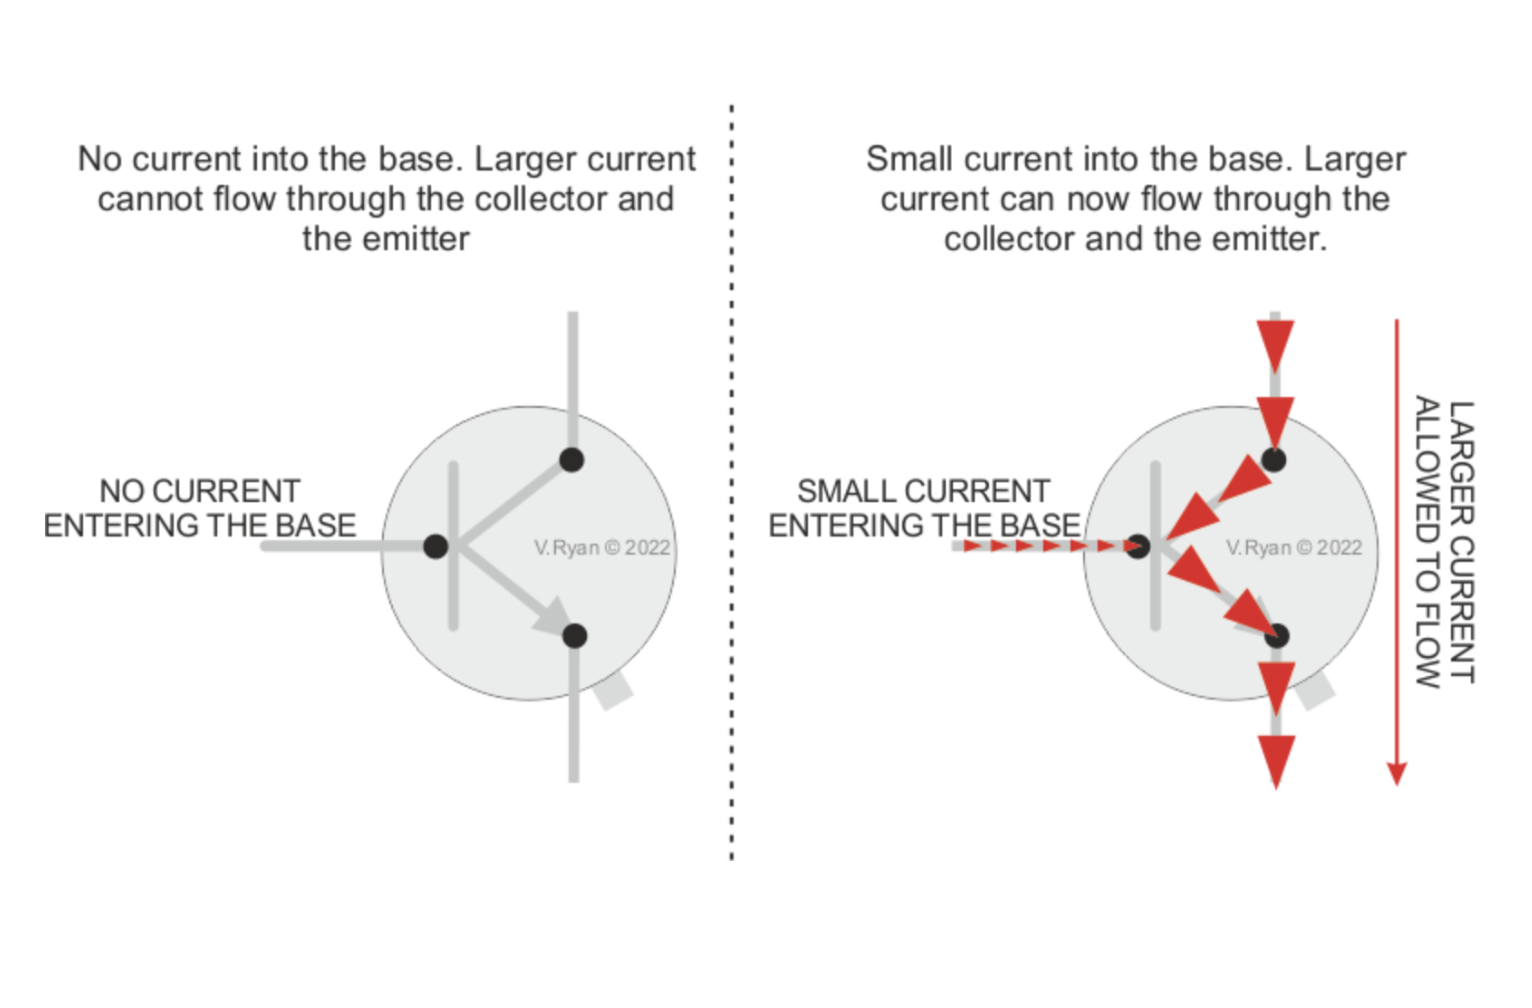
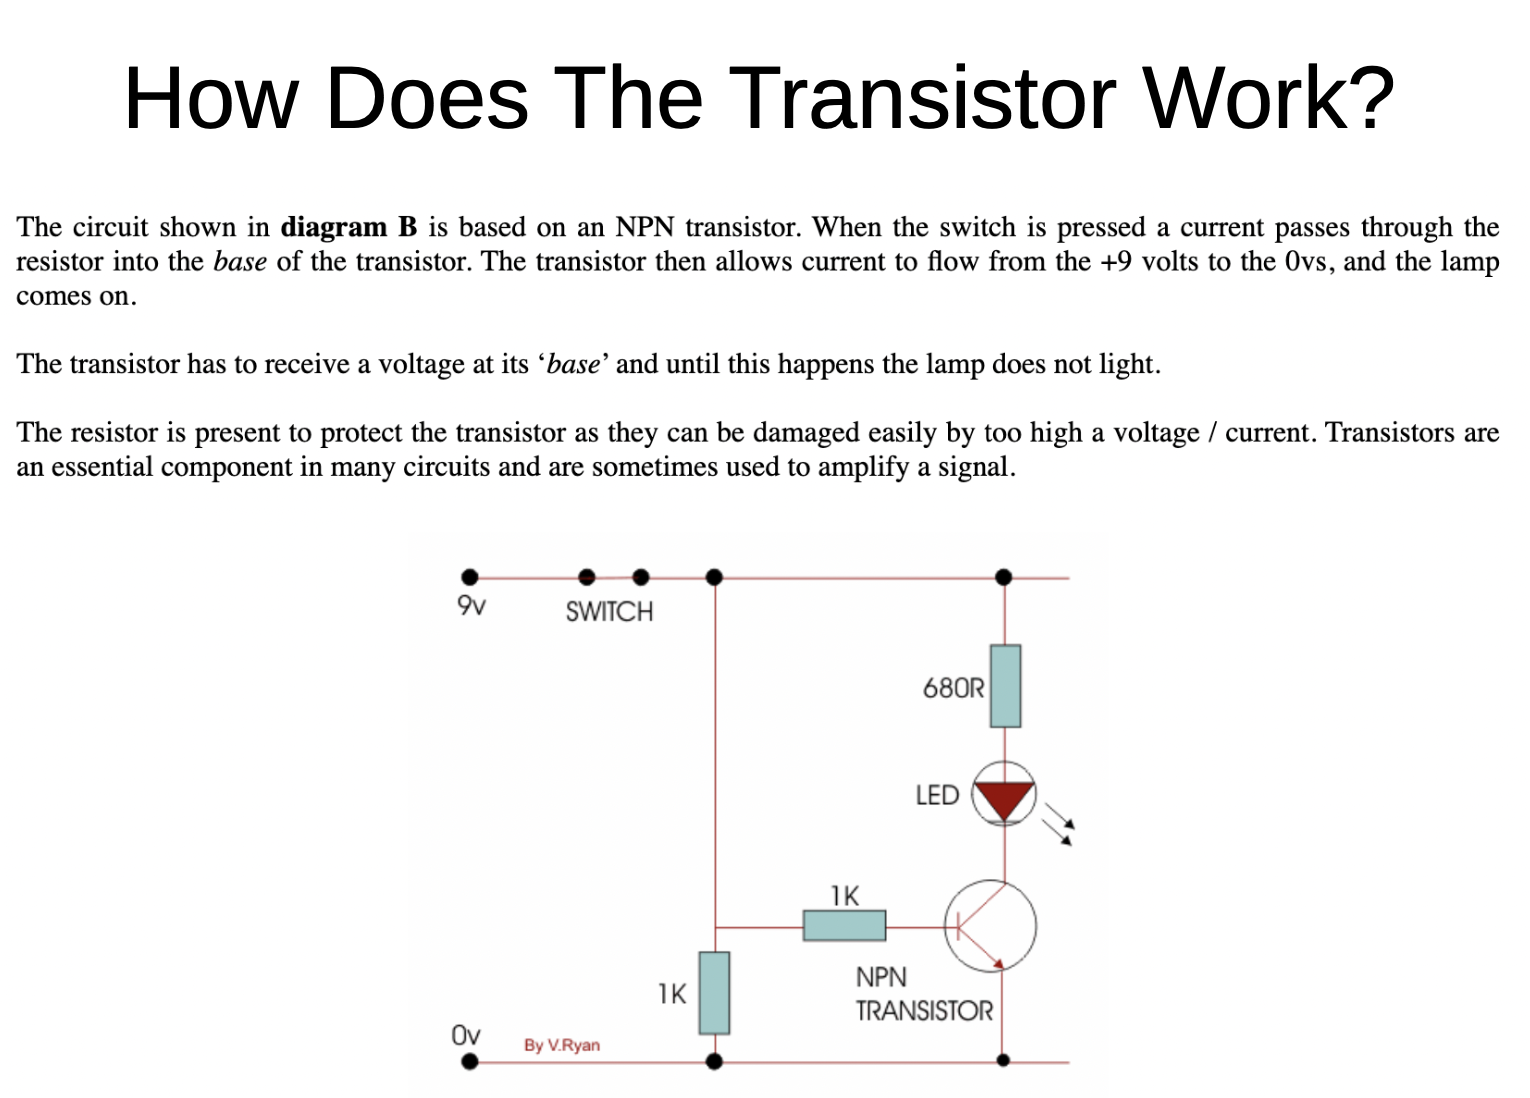
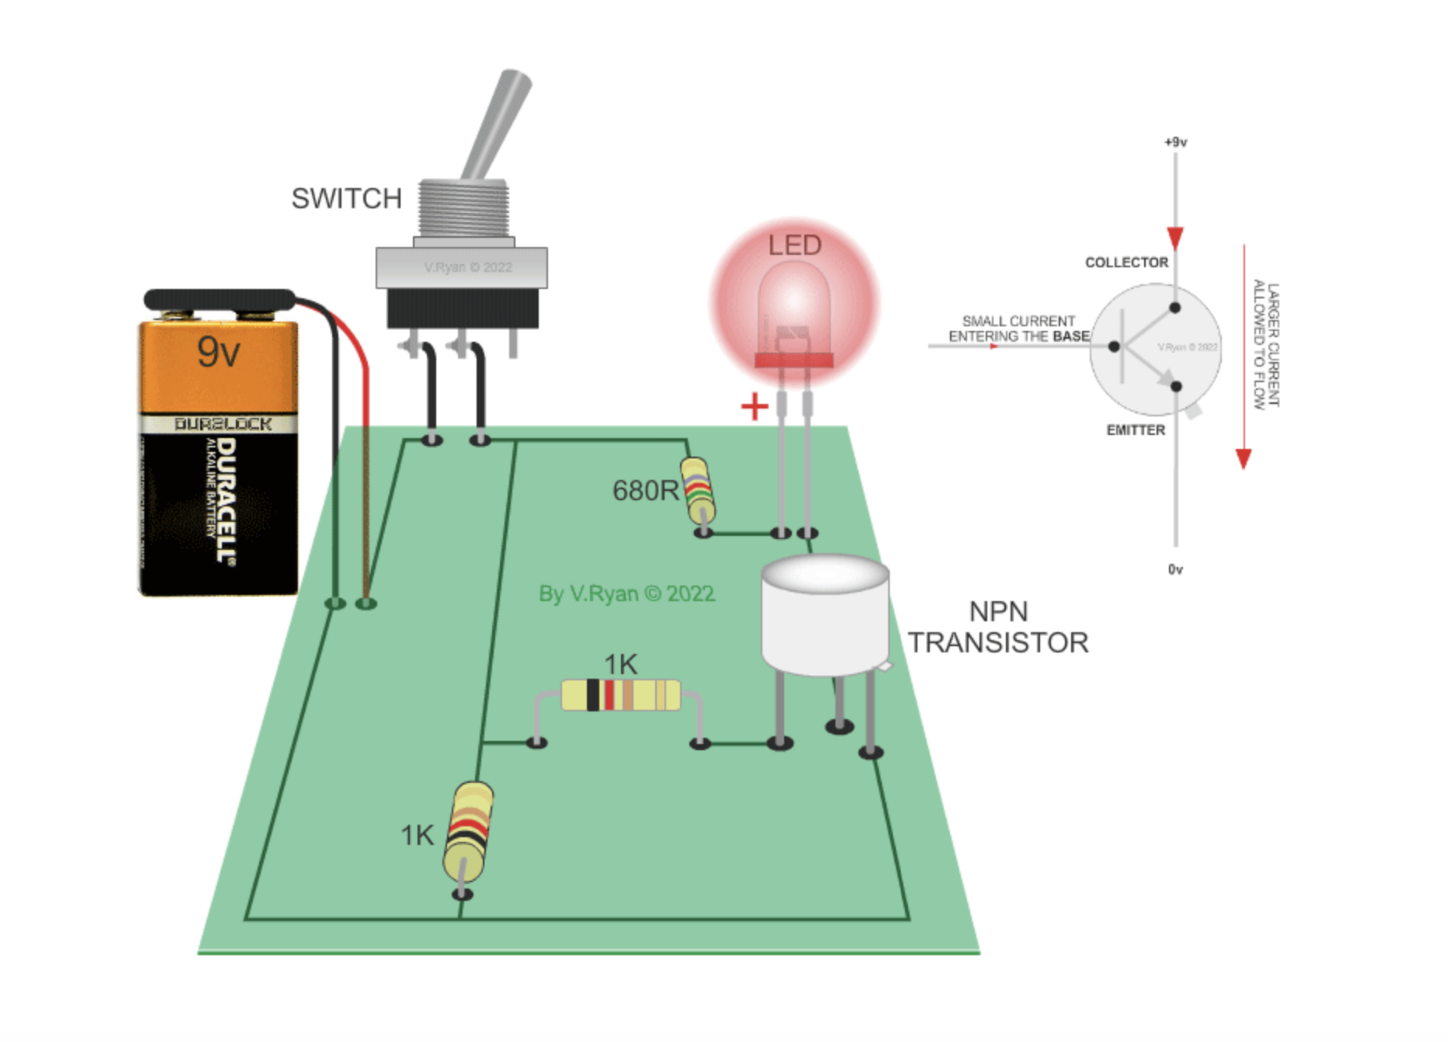
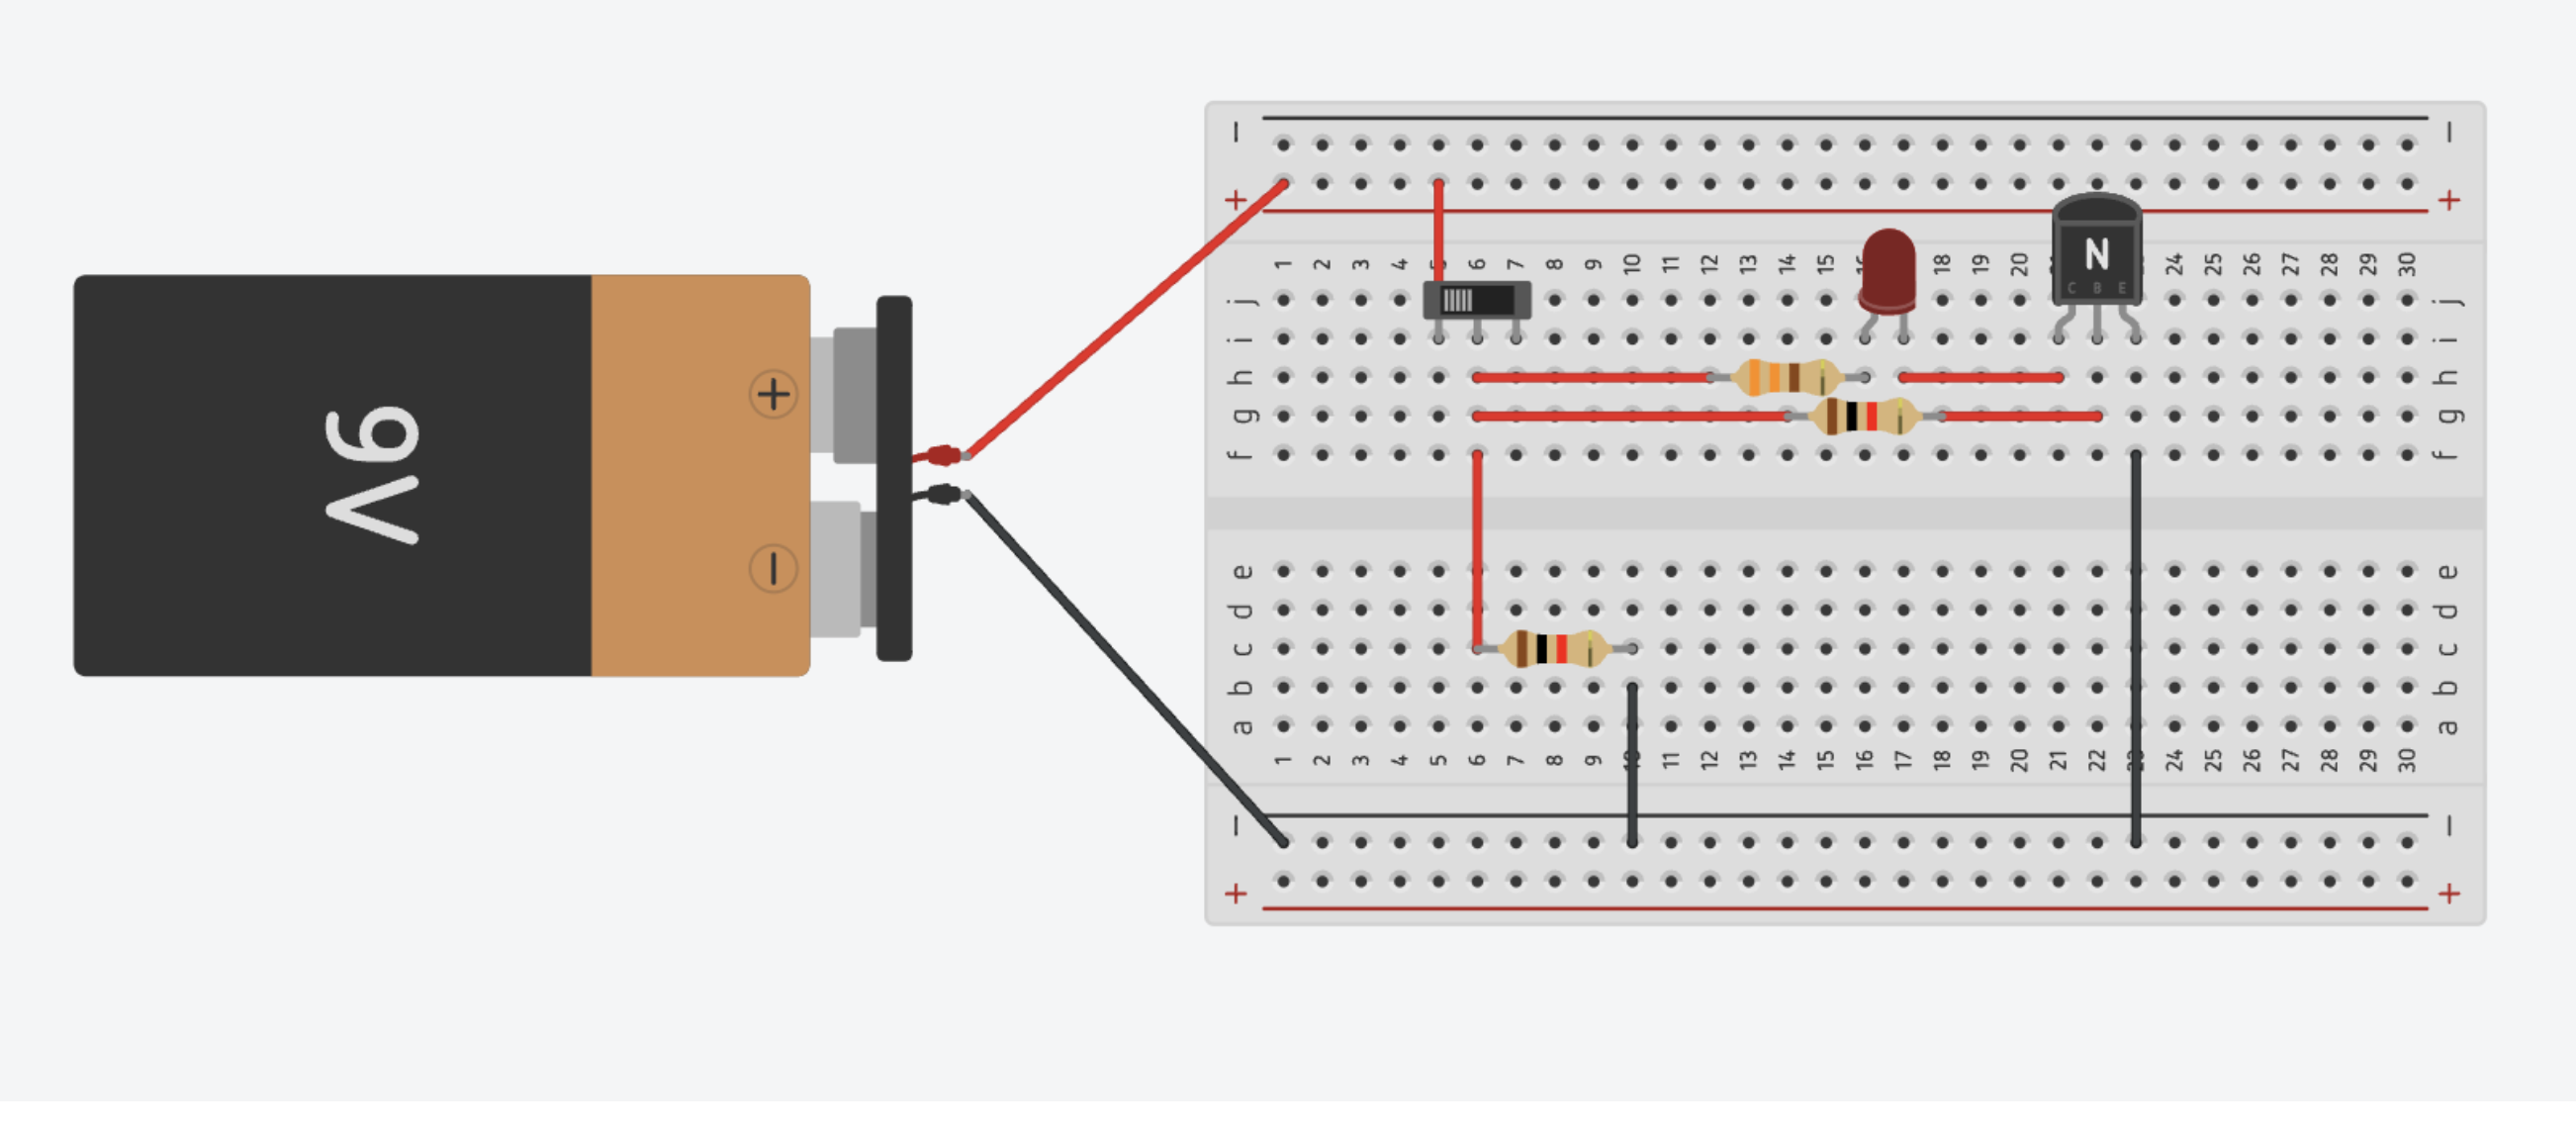
We will be learning about Transistors and how to construct an LED circuit using Tinkercar software and then with electronic components with breadboard. we will also use soldering to make an actual circuit on cardboard.
Success Criteria:
1- I can draw a simple LED circuit on Tinkercad : https://www.tinkercad.com/things/6pCm4c0kQ0I-surprising-hango/editel?tenant=circuits
2- I can construct a simple LED circuit using breadboard and electronic component including transistor
3- I can use the multimeter to measure voltage, resistance, current and continuity circuits
4- I can solder correctly and safely.
Activities:
- Link to Simple Electric circuit :
- Visit Simple LED circuit in the introduction to digital technology document.
- Practical activity of soldering
-
Kia ora...
We will be learning about Transistors and how to construct an LED circuit using Tinkercar software and then with electronic components with breadboard. we will also use soldering to make an actual circuit on cardboard.
Success Criteria:
1- I can draw a simple LED circuit on Tinkercad : https://www.tinkercad.com/things/6pCm4c0kQ0I-surprising-hango/editel?tenant=circuits
2- I can construct a simple LED circuit using breadboard and electronic component including transistor
3- I can use the multimeter to measure voltage, resistance, current and continuity circuits
4- I can solder correctly and safely.
Activities:
1-Simple LDR Circuit ( Light Sensitive)
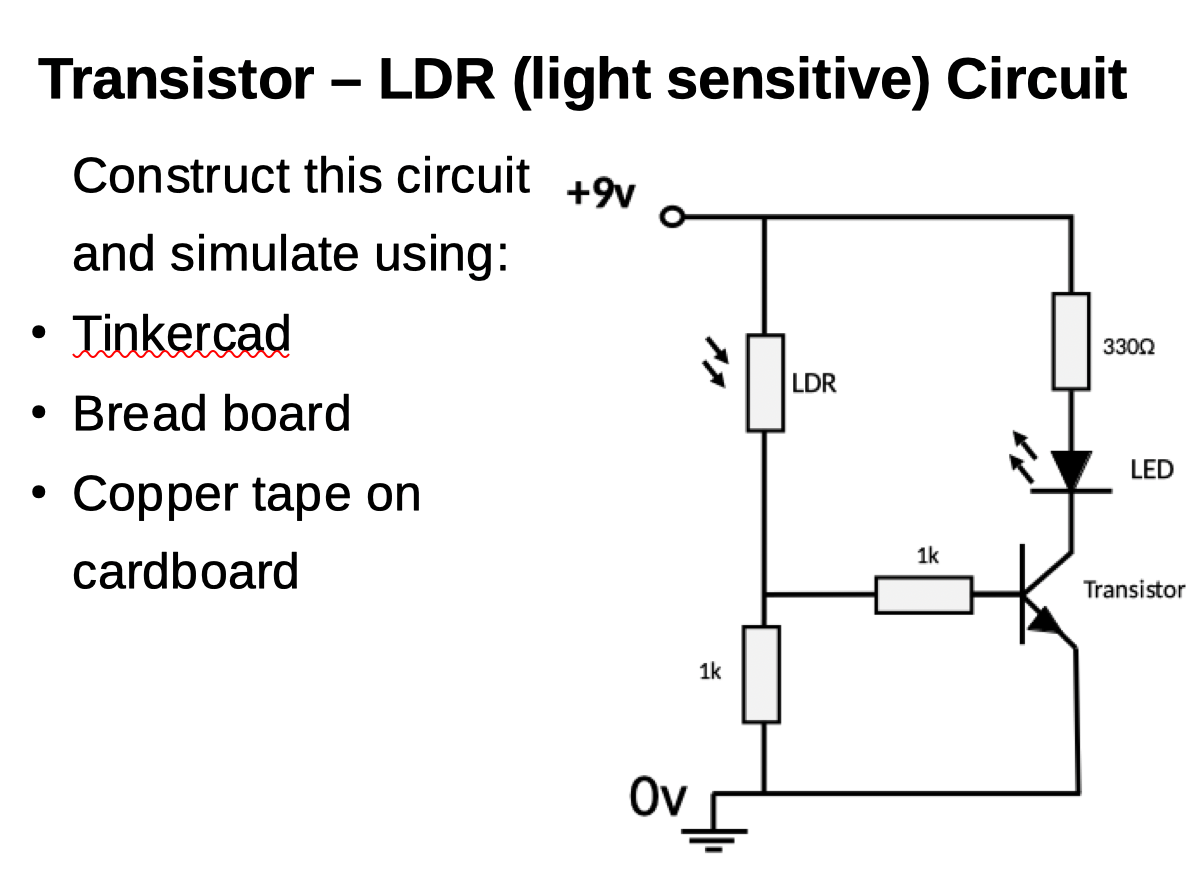
On Tinkercad:
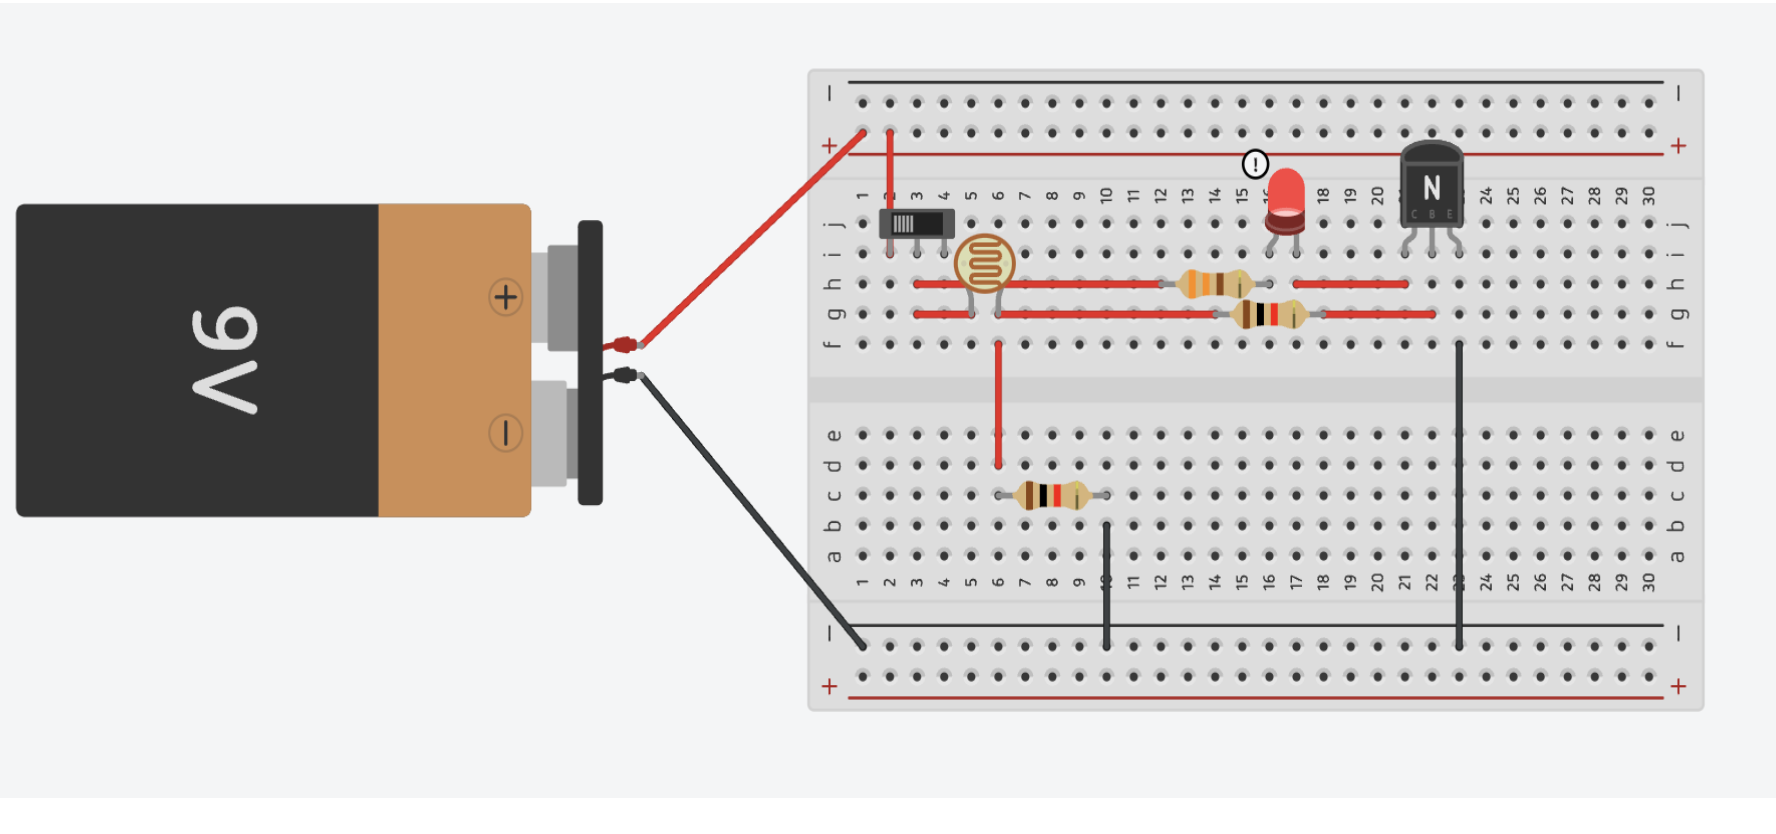
On Breadboard:
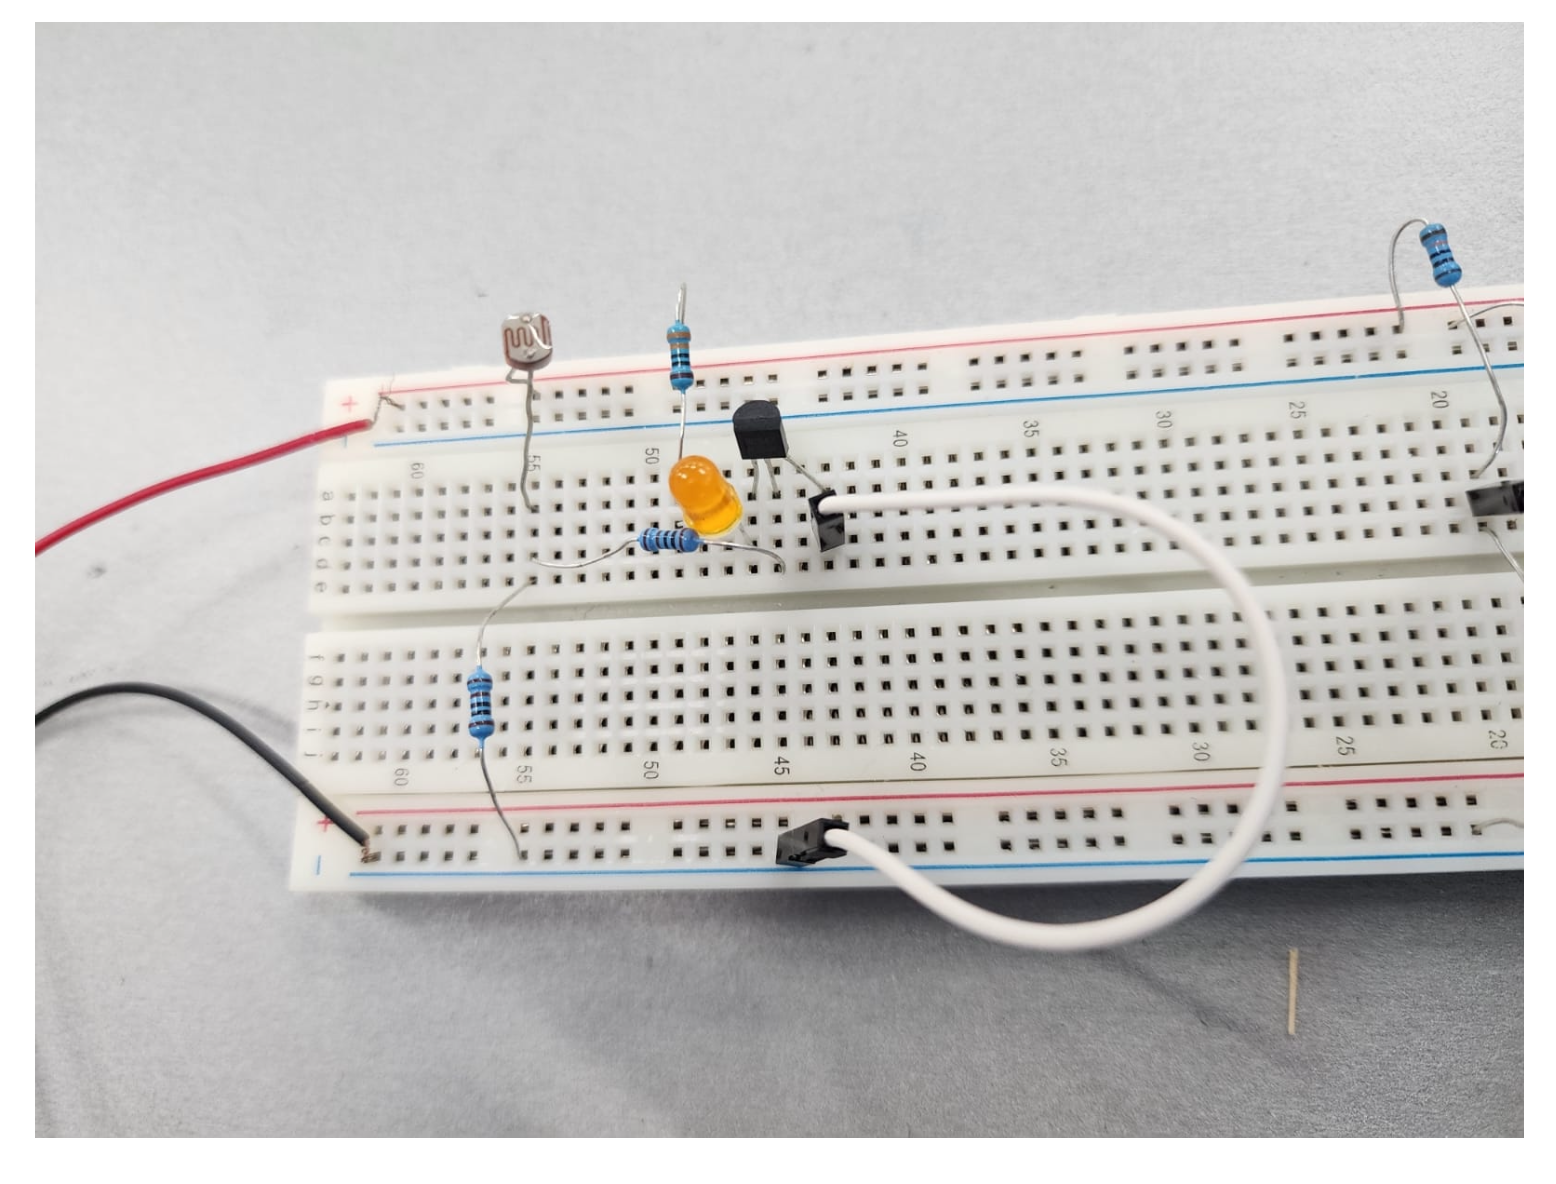
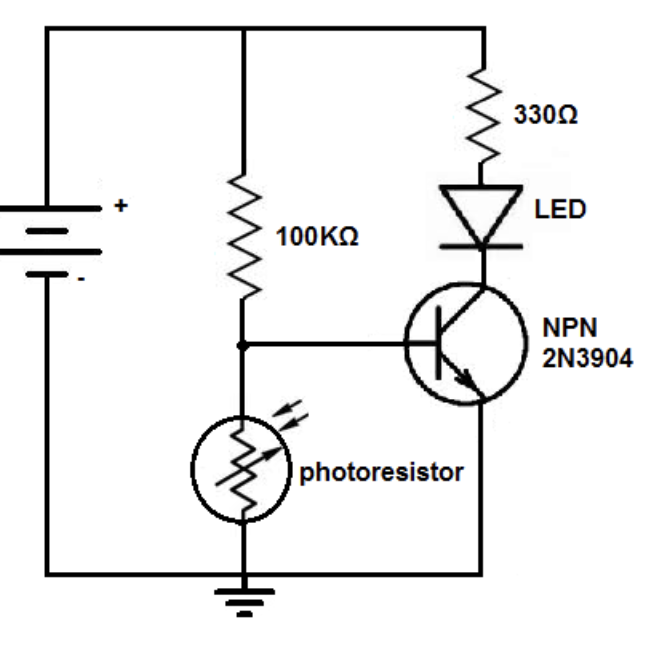
2- Dark Sensitive LDR Circuit:
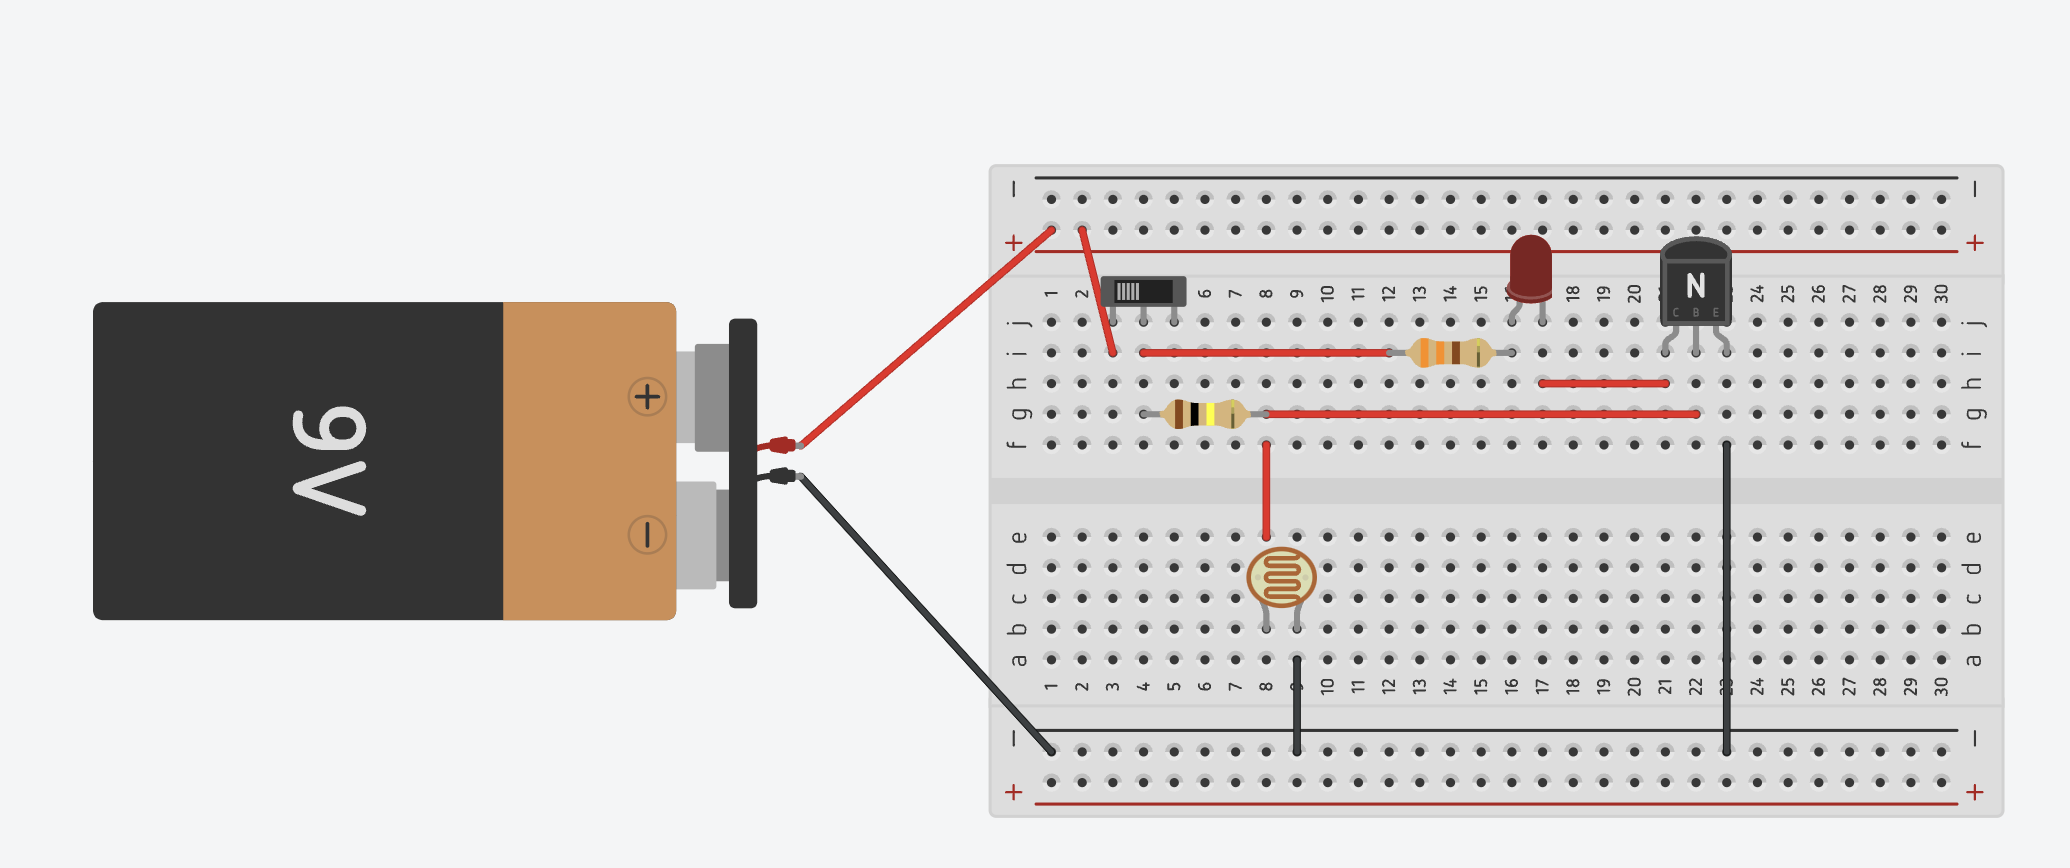
On Tinkercad:
On Breadboard:


Circuit Diagram To Build:

-
Kia ora...
We will be learning about Transistors and how to construct an LED circuit using Tinkercar software and then with electronic components with breadboard. we will also use soldering to make an actual circuit on cardboard.
Success Criteria:
1- I can draw a simple LED circuit on Tinkercad : https://www.tinkercad.com/things/6pCm4c0kQ0I-surprising-hango/editel?tenant=circuits
2- I can construct a simple LED circuit using breadboard and electronic component including transistor
3- I can use the multimeter to measure voltage, resistance, current and continuity circuits
4- I can solder correctly and safely.
Activities:
Transistor - Dark Sensitive LDR Circuit:

On Tinkercad:

On Breadboard:


Circuit Diagram To Build:

-
Kia ora...
We will be learning about Transistors and how to construct an LED circuit using Tinkercar software and then with electronic components with breadboard. we will also use soldering to make an actual circuit on cardboard.
Success Criteria:
1- I can draw a simple LED circuit on Tinkercad : https://www.tinkercad.com/things/6pCm4c0kQ0I-surprising-hango/editel?tenant=circuits
2- I can construct a simple LED circuit using breadboard and electronic component including transistor
3- I can use the multimeter to measure voltage, resistance, current and continuity circuits
4- I can solder correctly and safely.
Activities:
-
Kia ora...
We will continue learning about Transistors and how to construct an LED circuit using Tinkercar software and then with electronic components with breadboard. we will also use soldering to make an actual circuit on cardboard.
Success Criteria:
1- I can draw a simple LED circuit on Tinkercad : https://www.tinkercad.com/things/6pCm4c0kQ0I-surprising-hango/editel?tenant=circuits
2- I can construct a simple LED circuit using breadboard and electronic component including transistor
3- I can use the multimeter to measure voltage, resistance, current and continuity circuits
4- I can solder correctly and safely.
First I will start with my Pepeha:

Our class karakia:

Activities:
Transistor Dark Sensitive LDR Circuit:
On Tinkercad:

On Breadboard:


Circuit Diagram To Build:

-
Kia ora...
We will continue learning about Transistors and how to construct an LED circuit using Tinkercar software and then with electronic components with breadboard. we will also use soldering to make an actual circuit on cardboard.
Success Criteria:
1- I can draw a simple LED circuit on Tinkercad : https://www.tinkercad.com/things/6pCm4c0kQ0I-surprising-hango/editel?tenant=circuits
2- I can construct a simple LED circuit using breadboard and electronic component including transistor
3- I can use the multimeter to measure voltage, resistance, current and continuity circuits
4- I can solder correctly and safely.
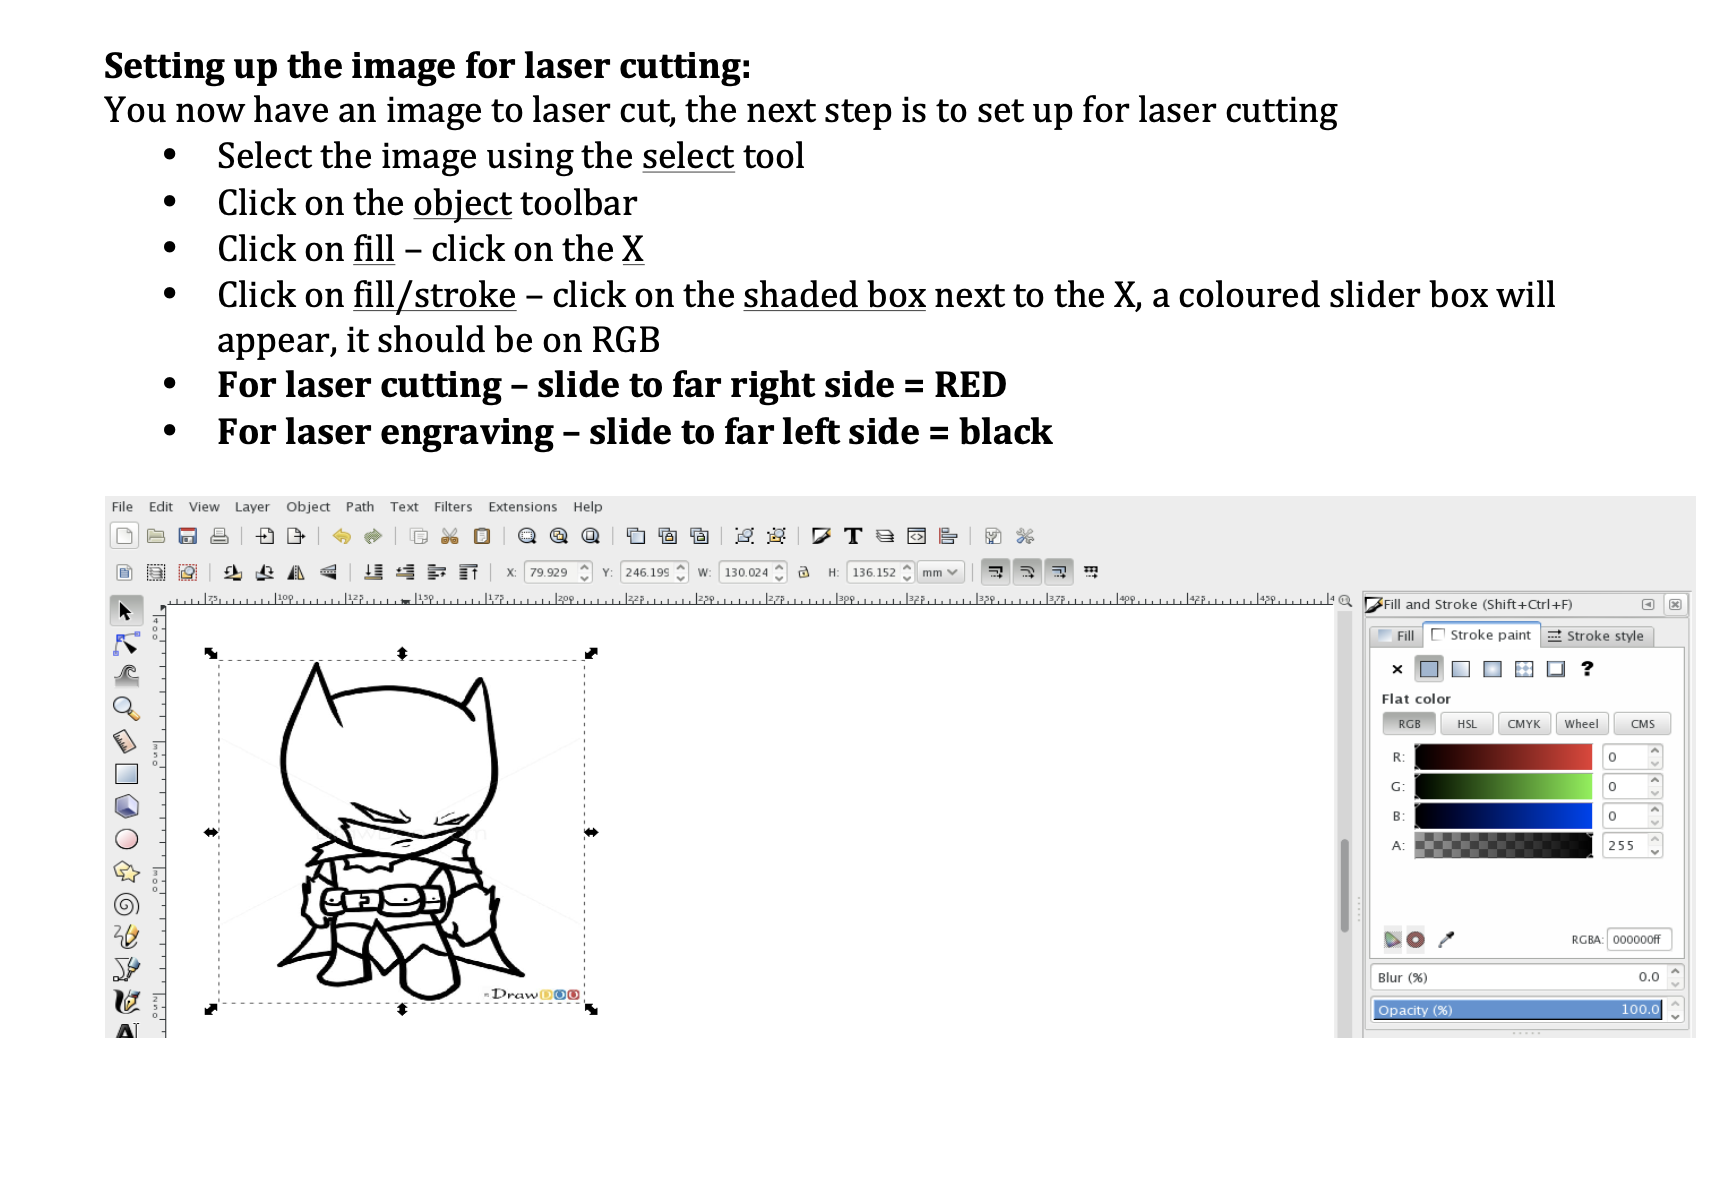
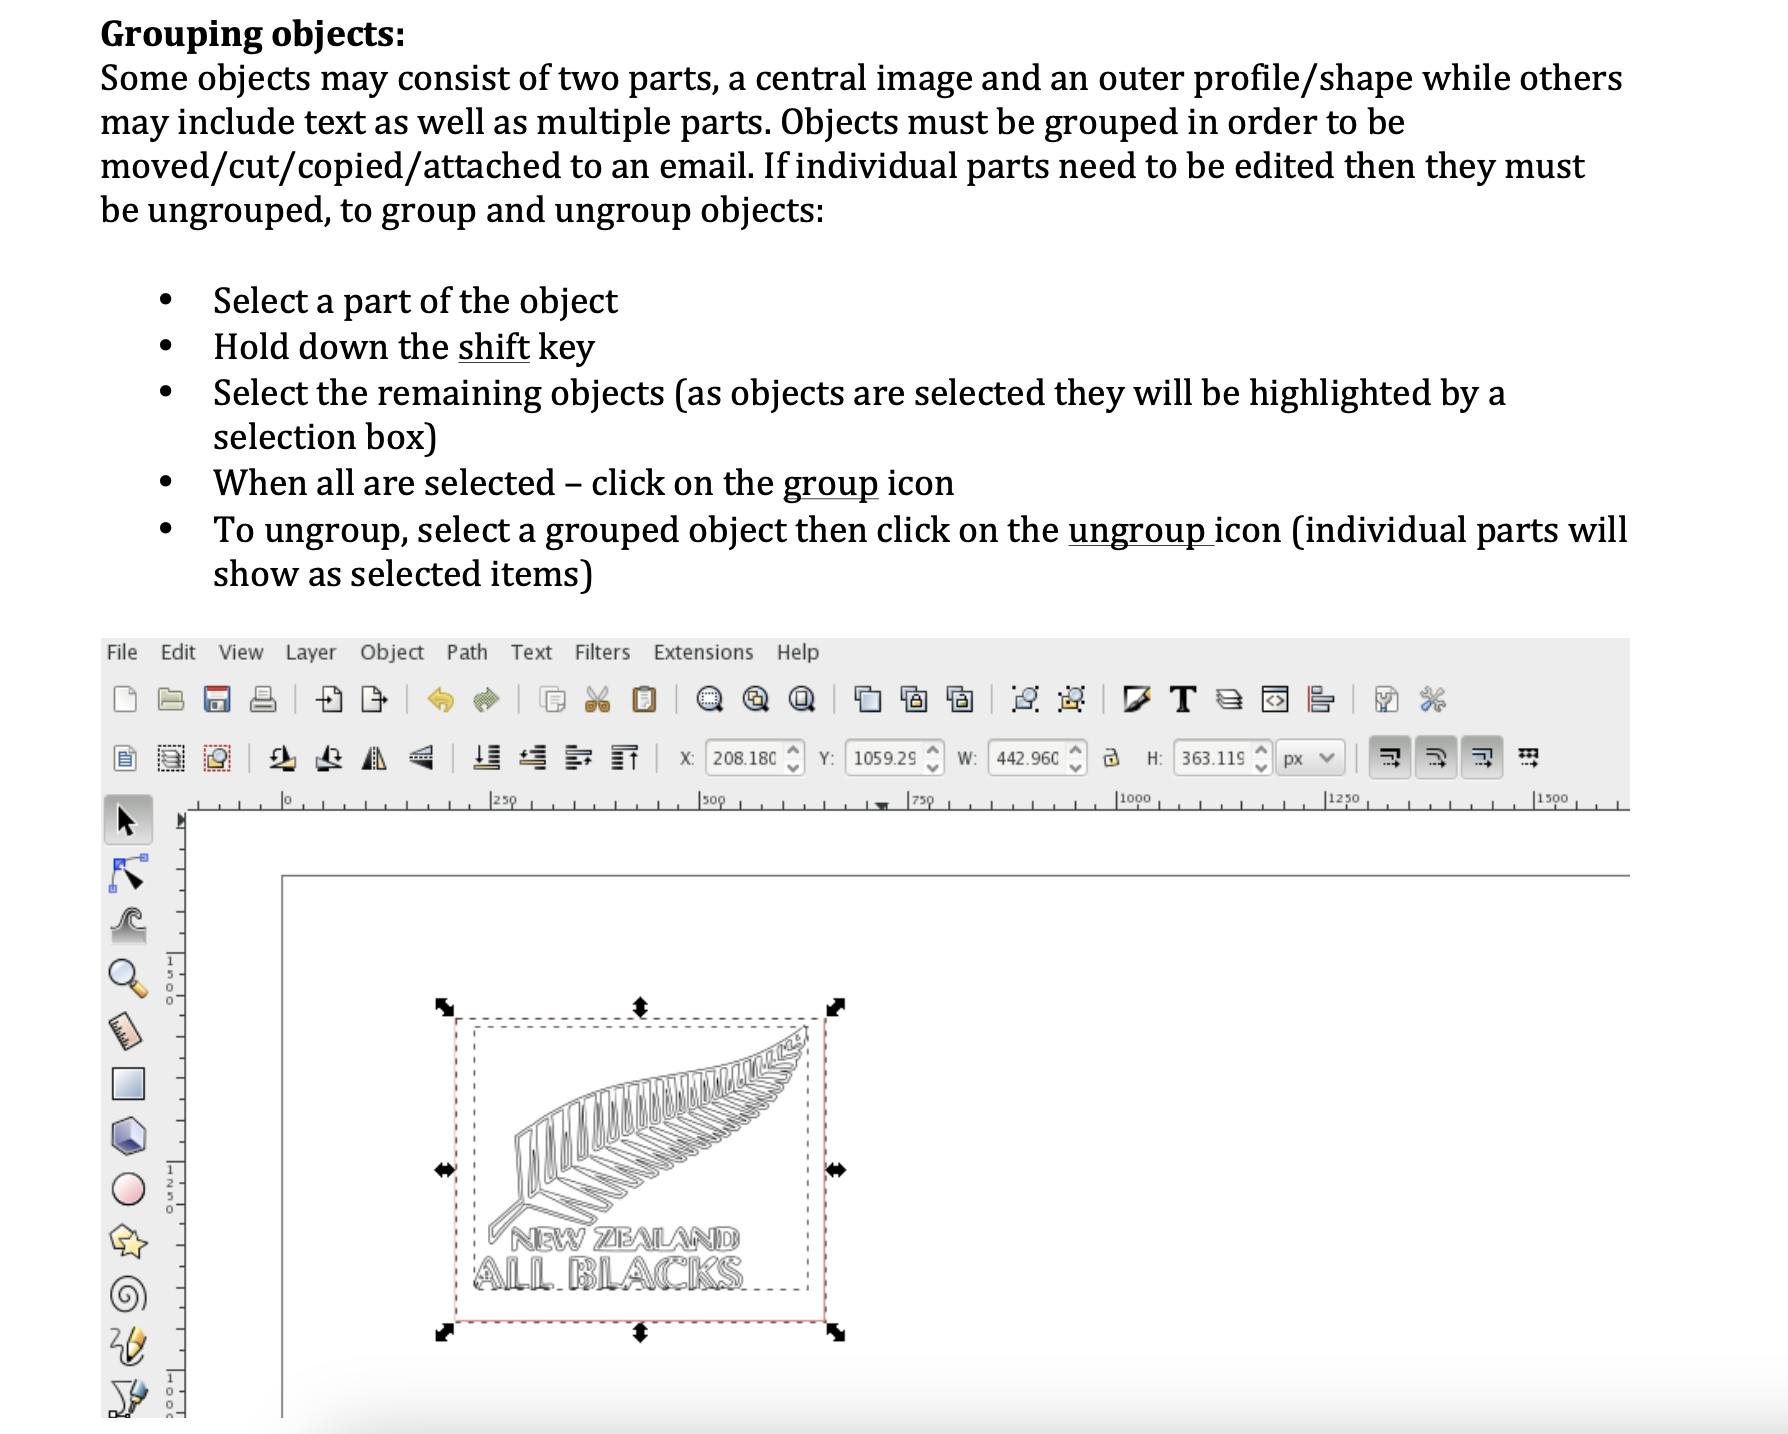
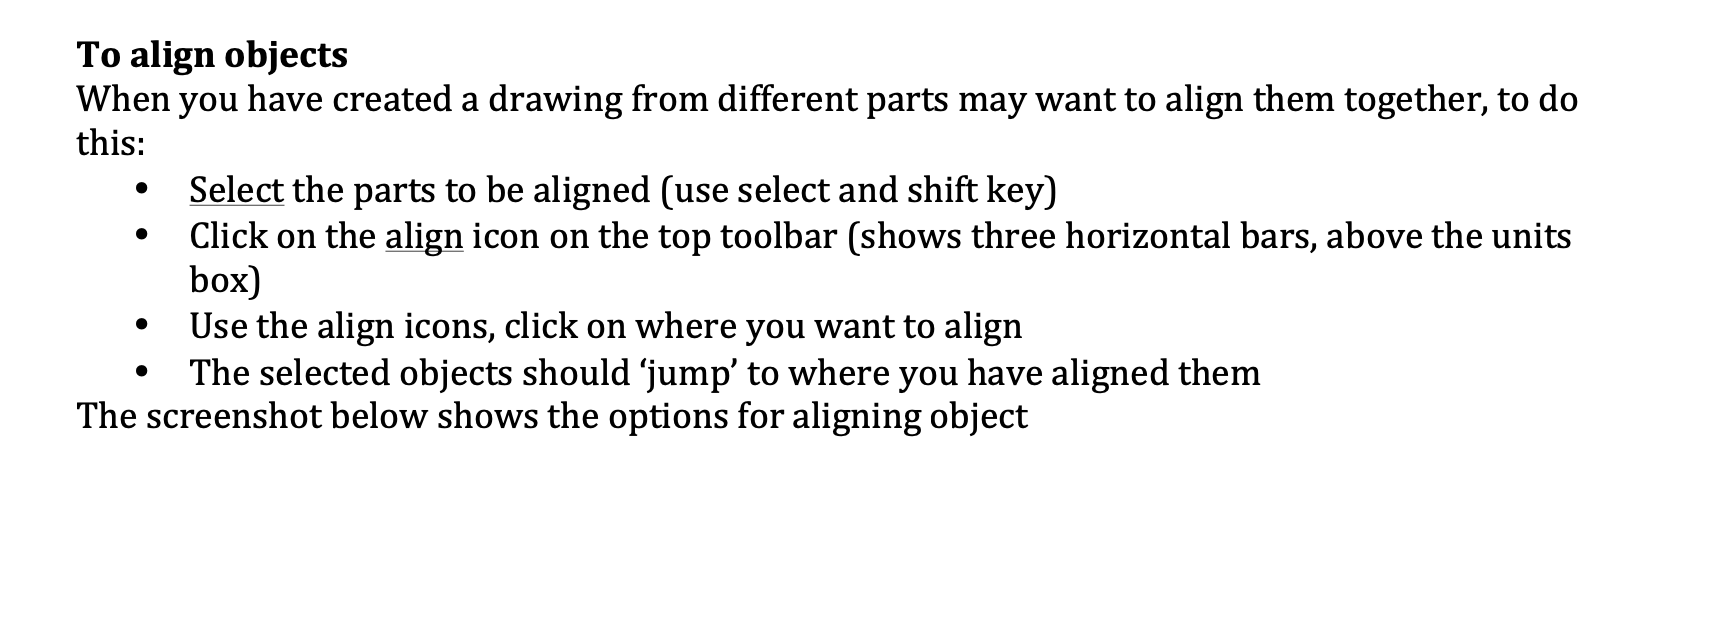
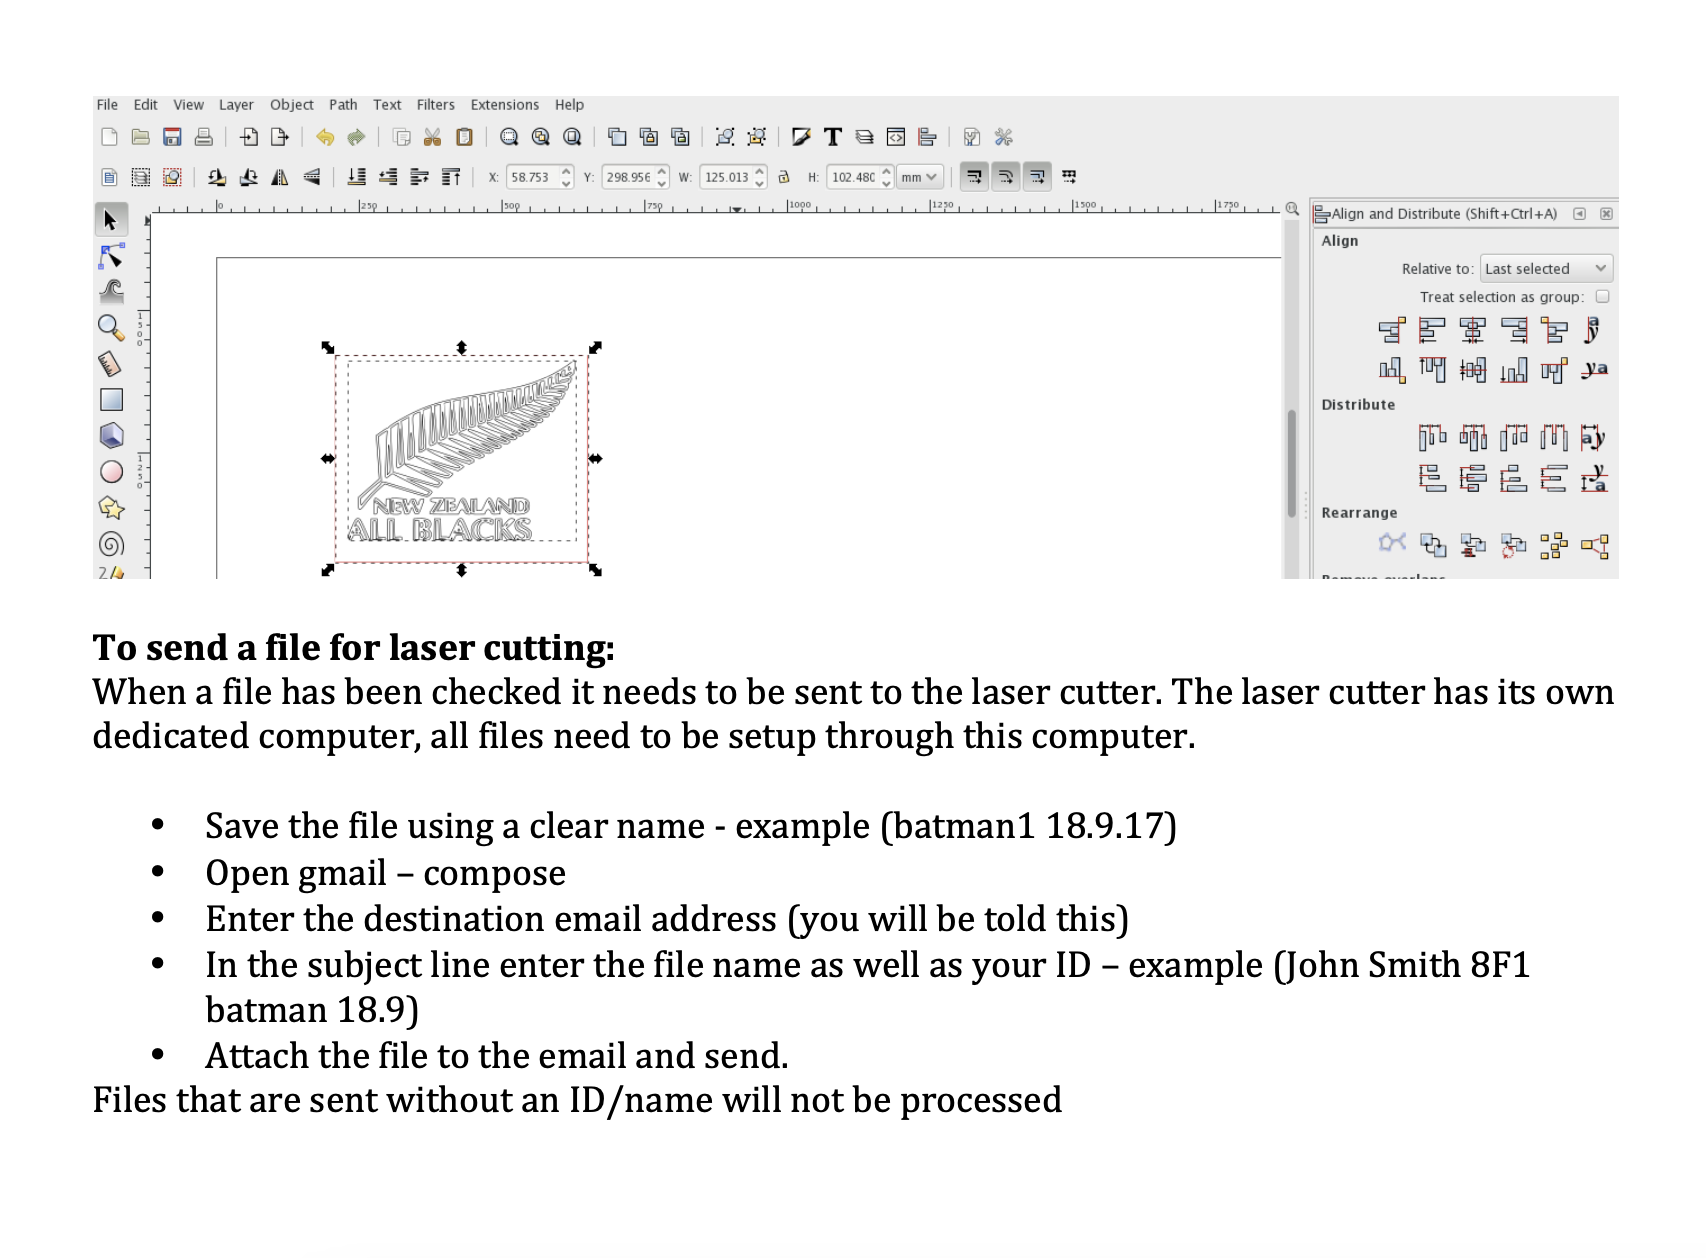
5- I can use inkscape software to draw my design
Activities:
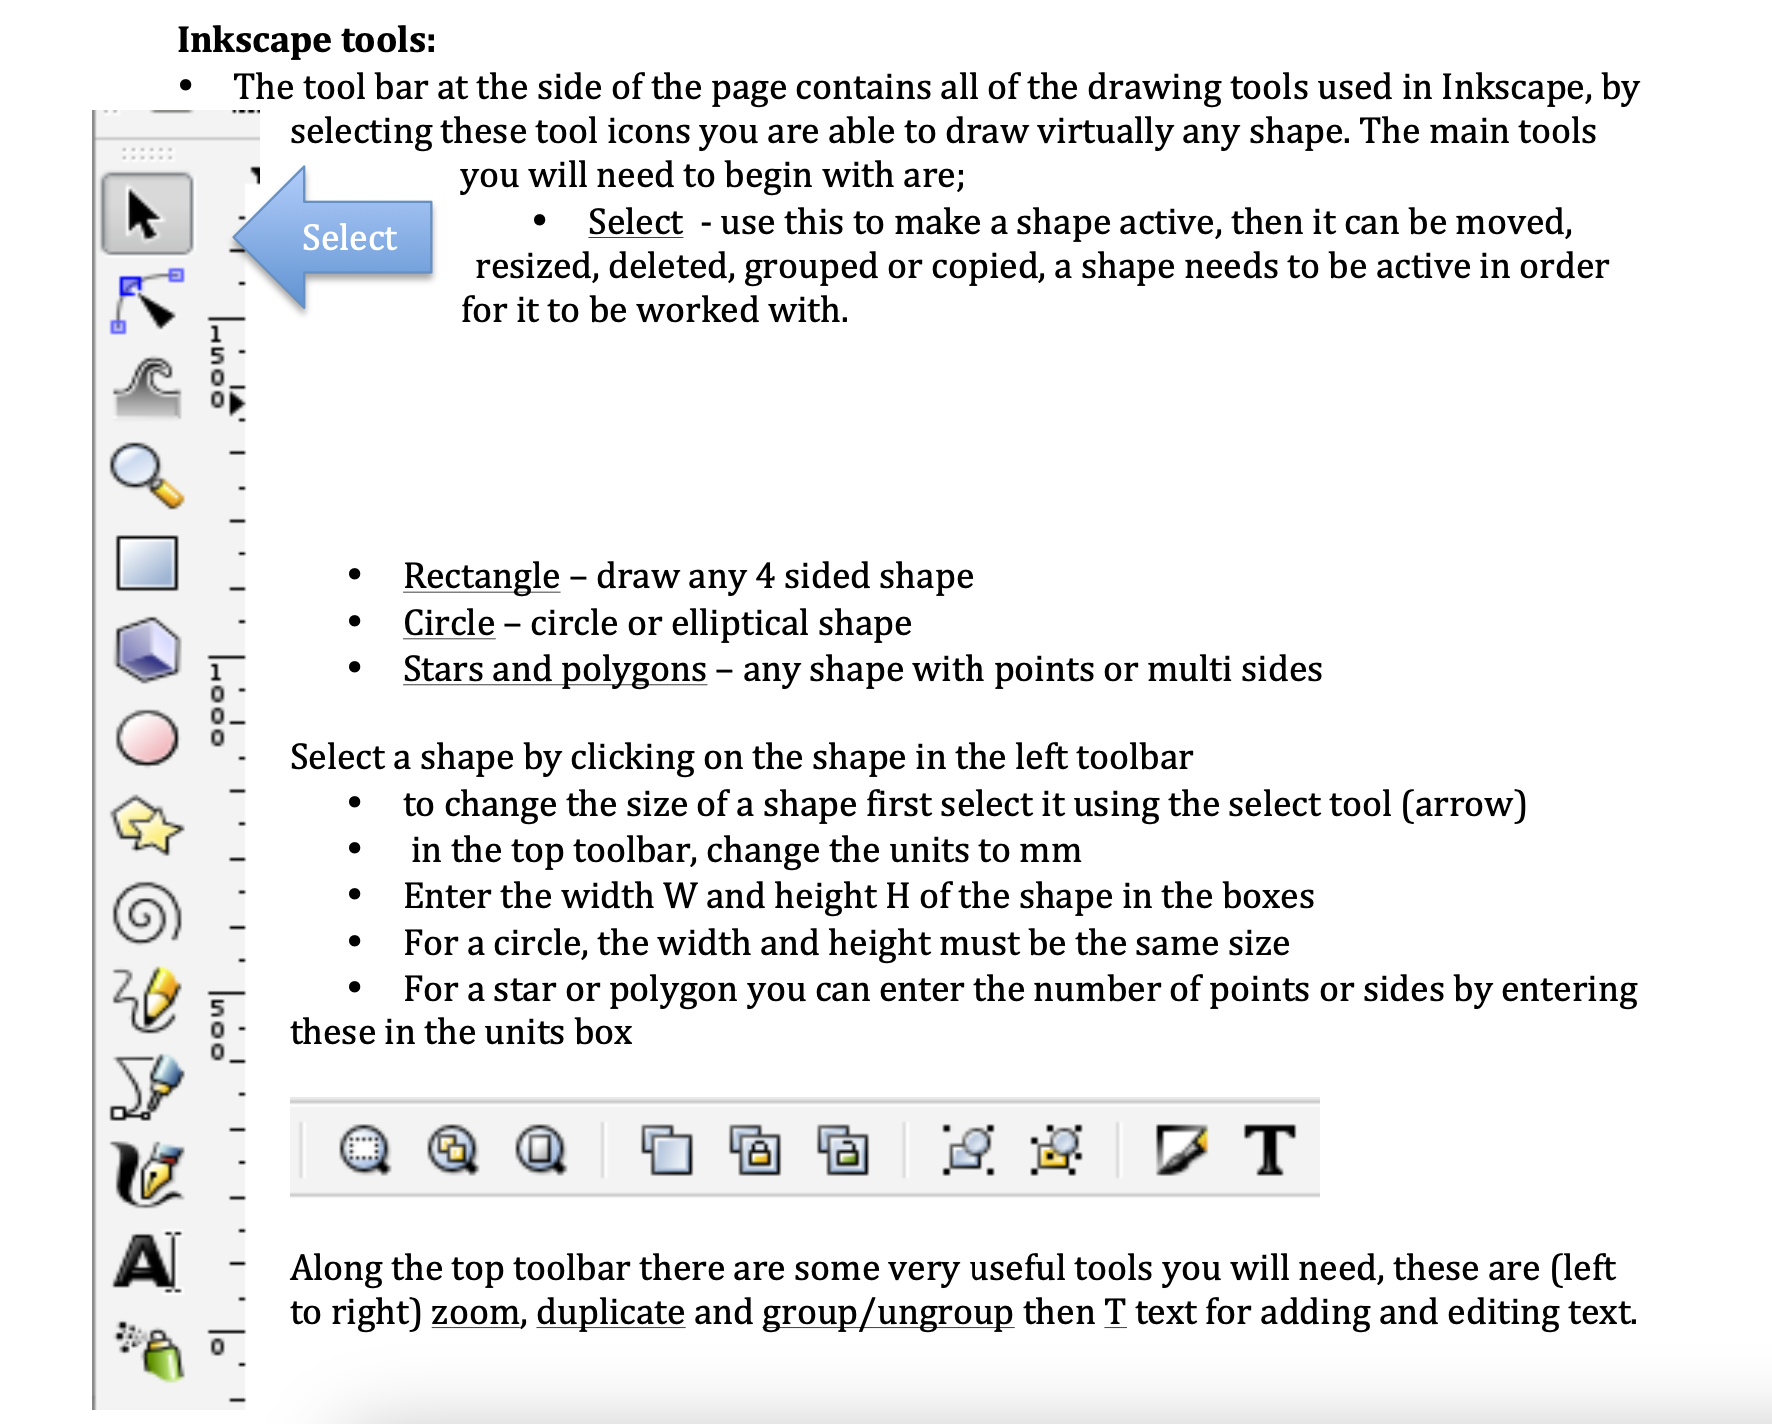
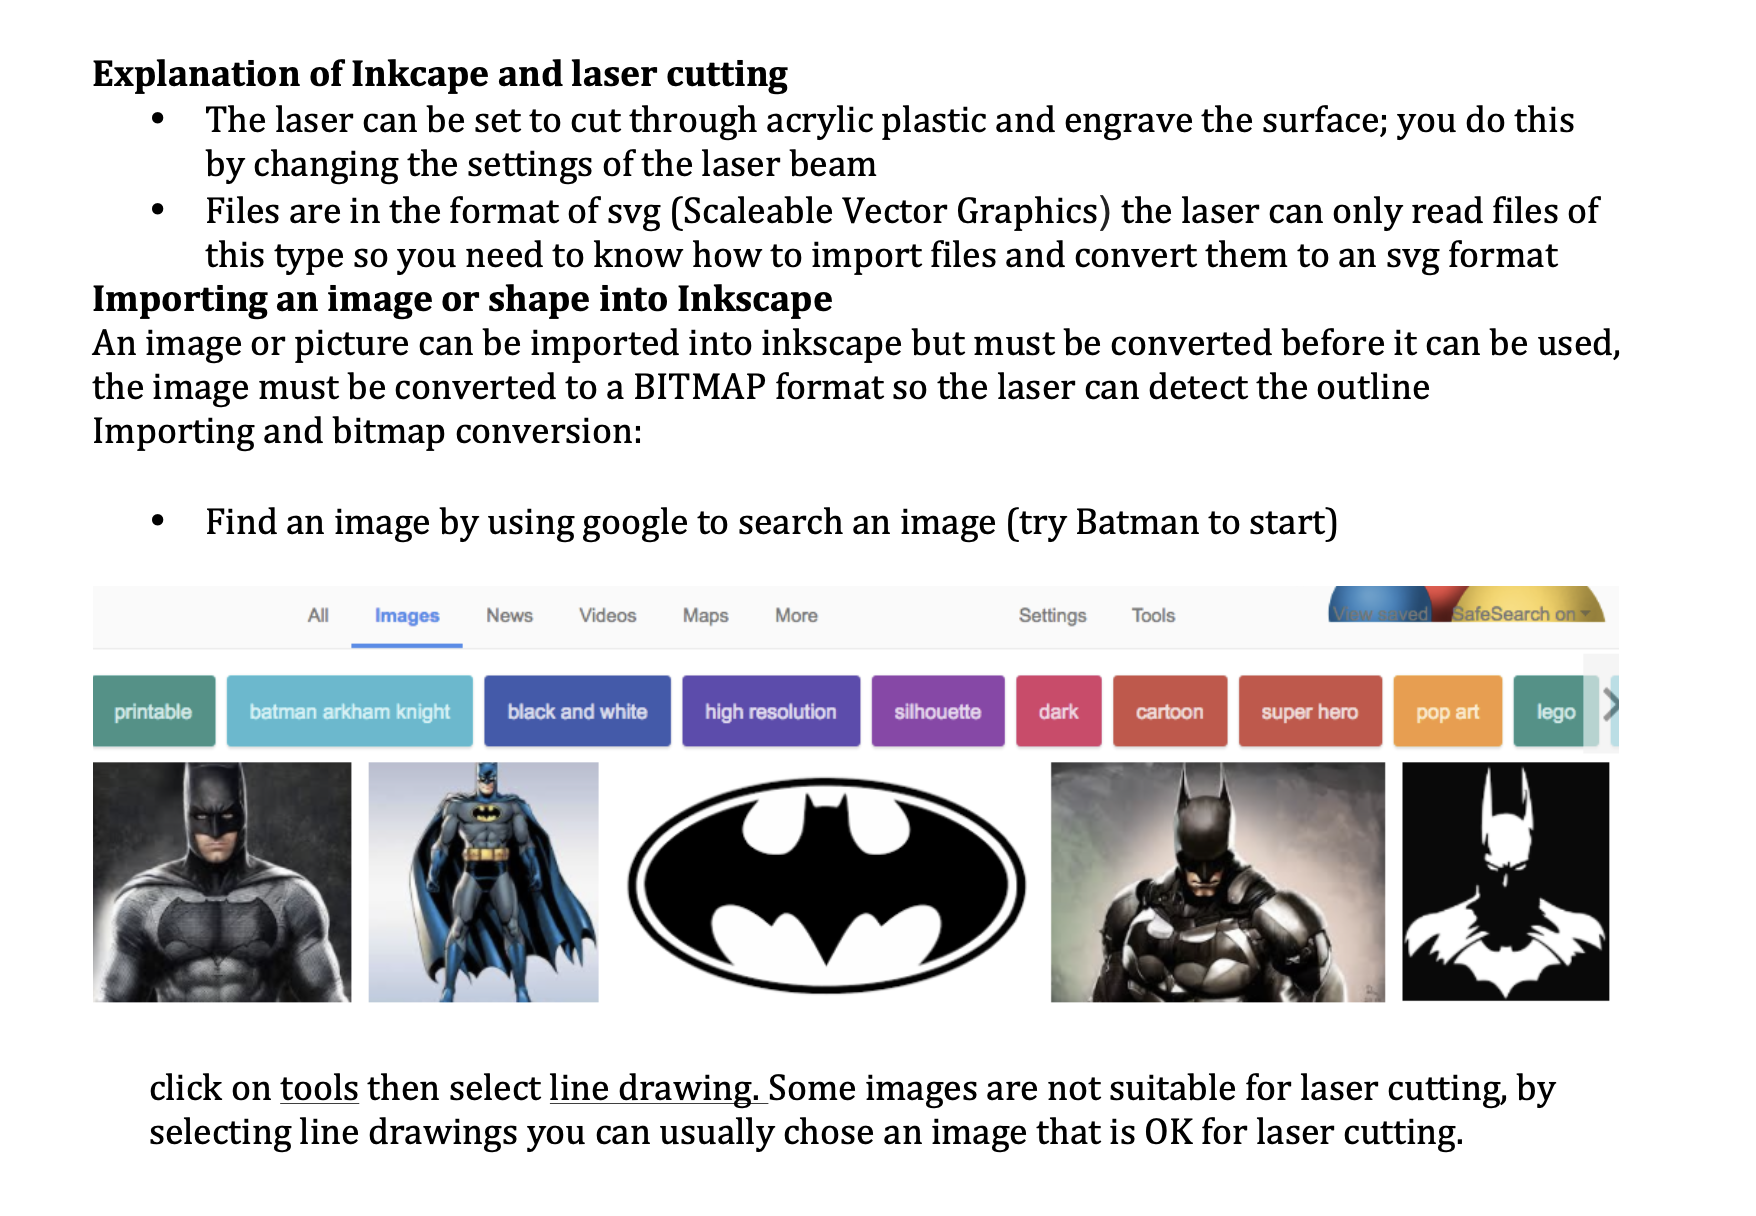
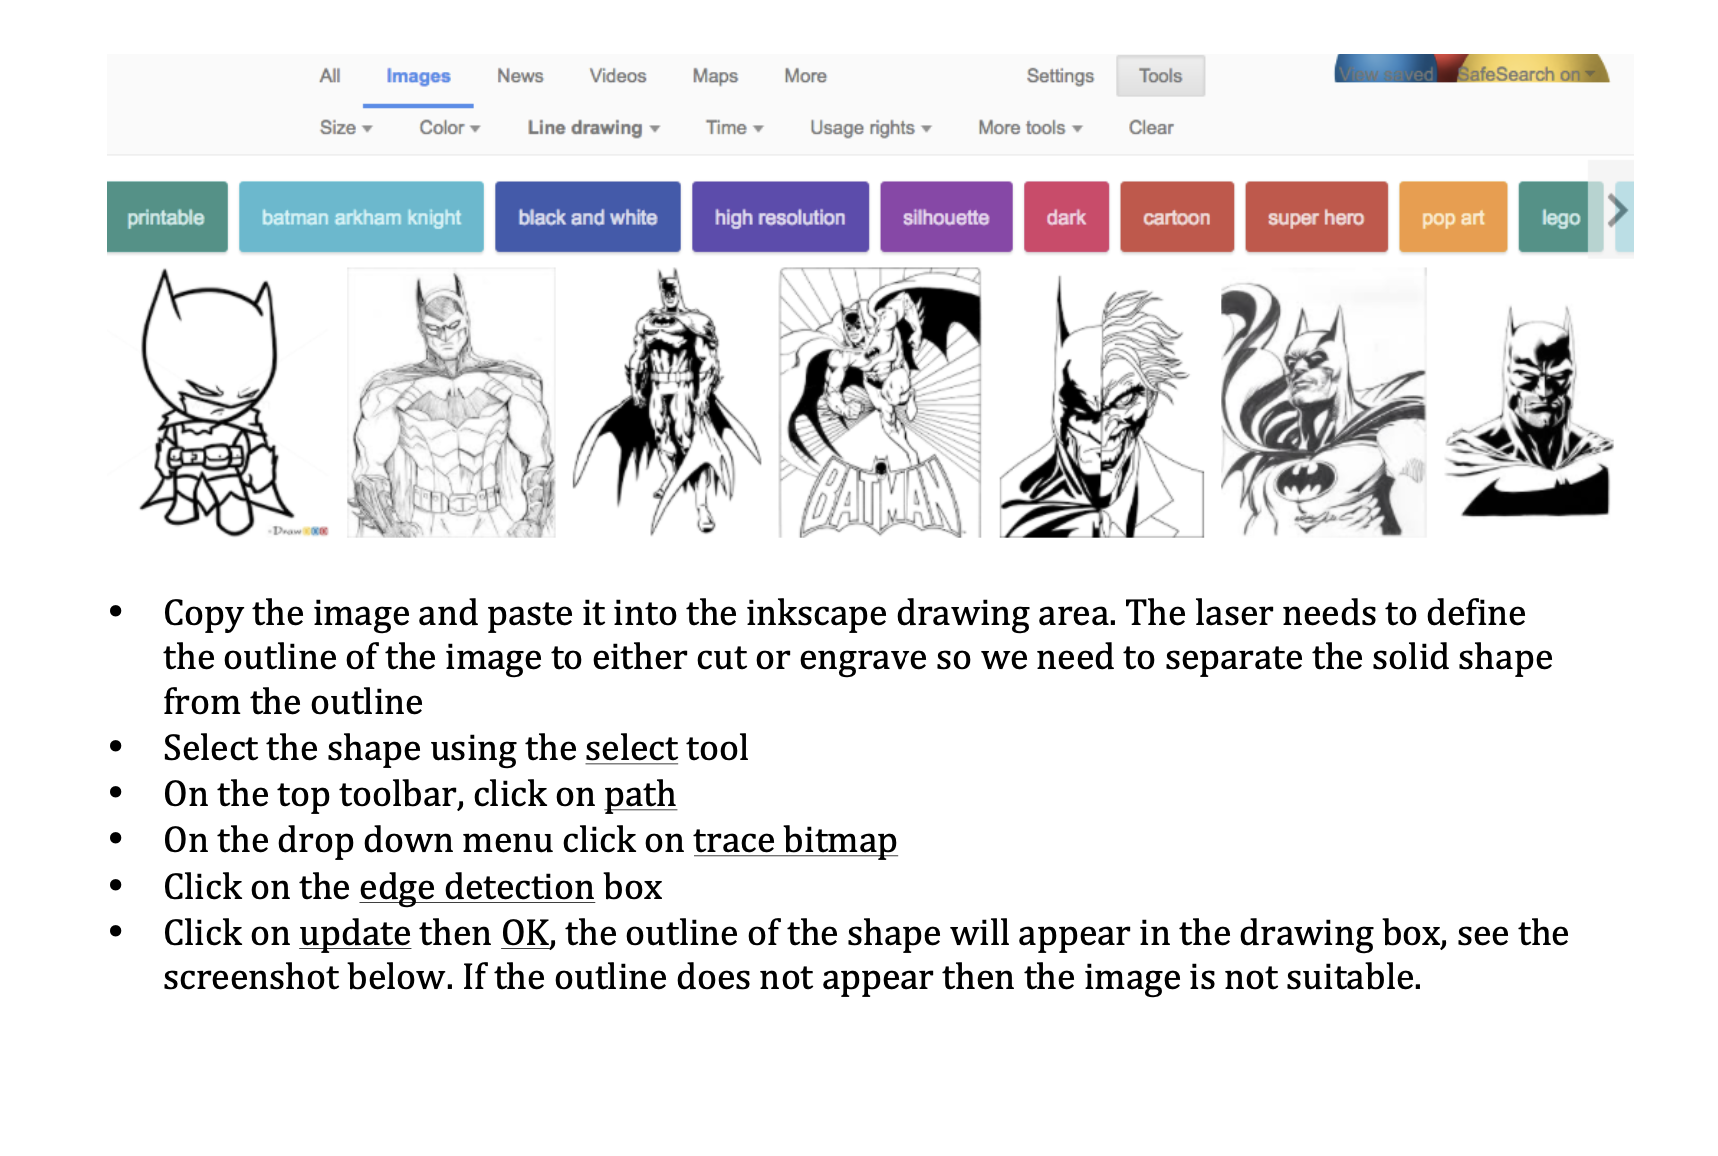
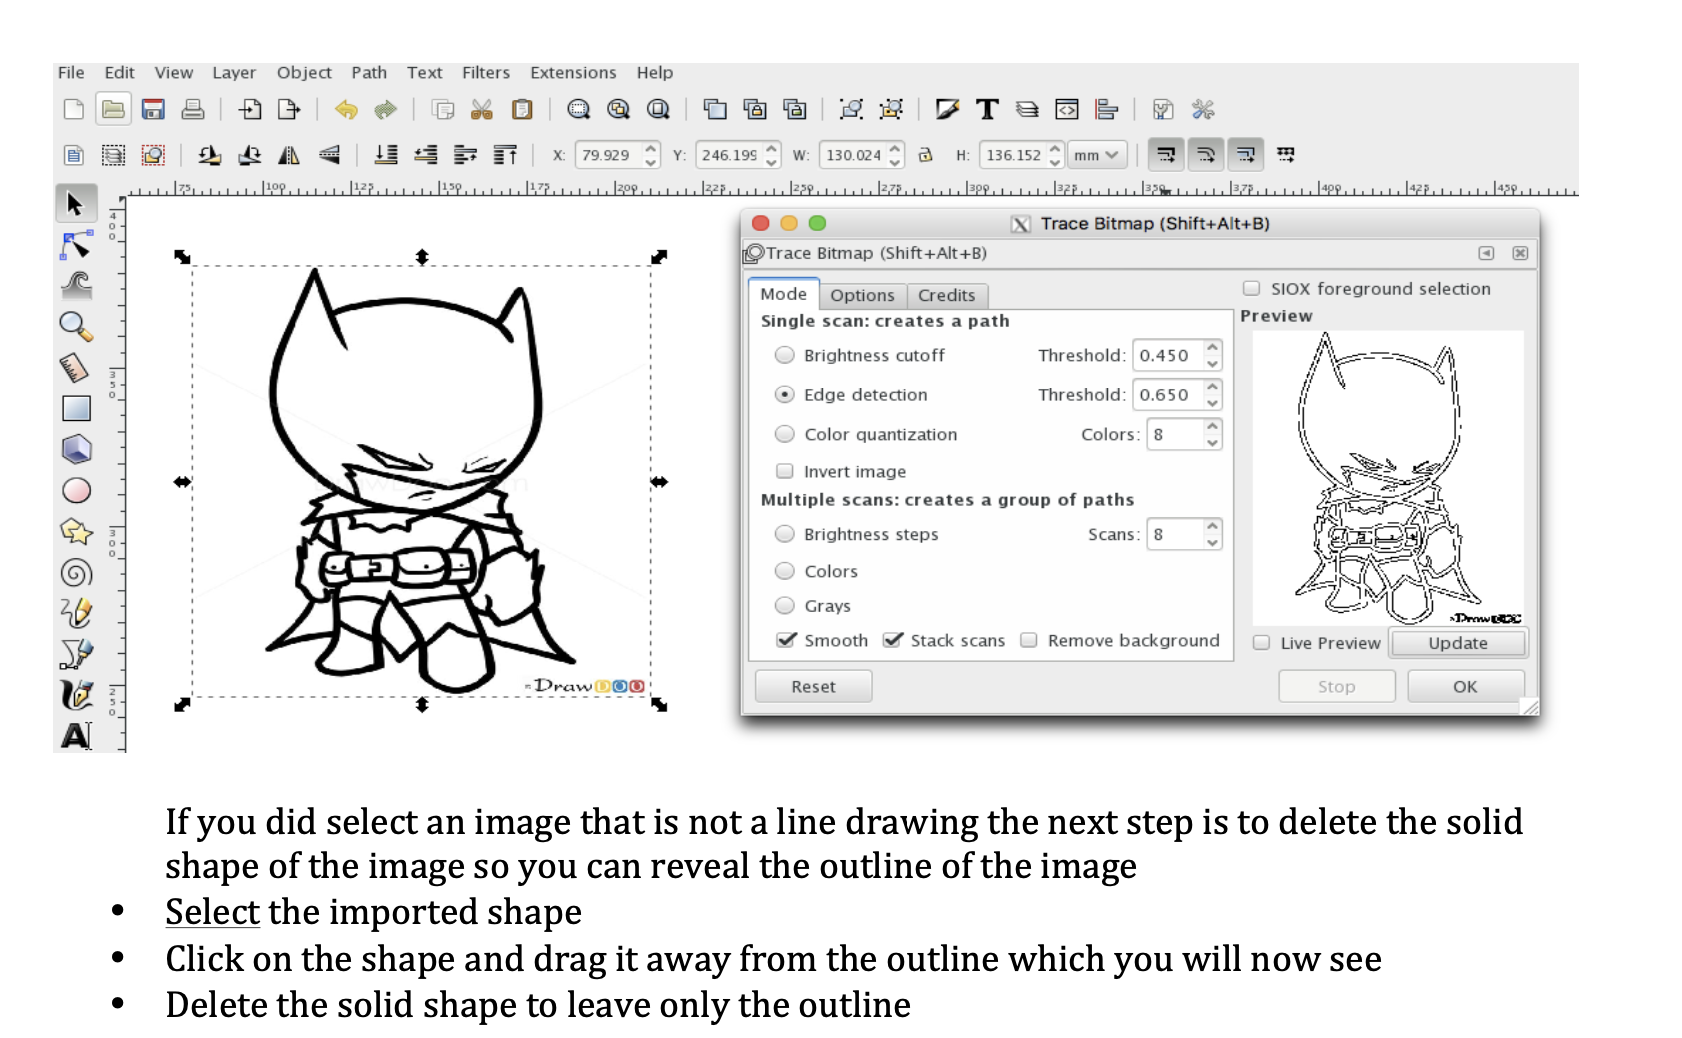
Start drawing your design using INKSCAPE software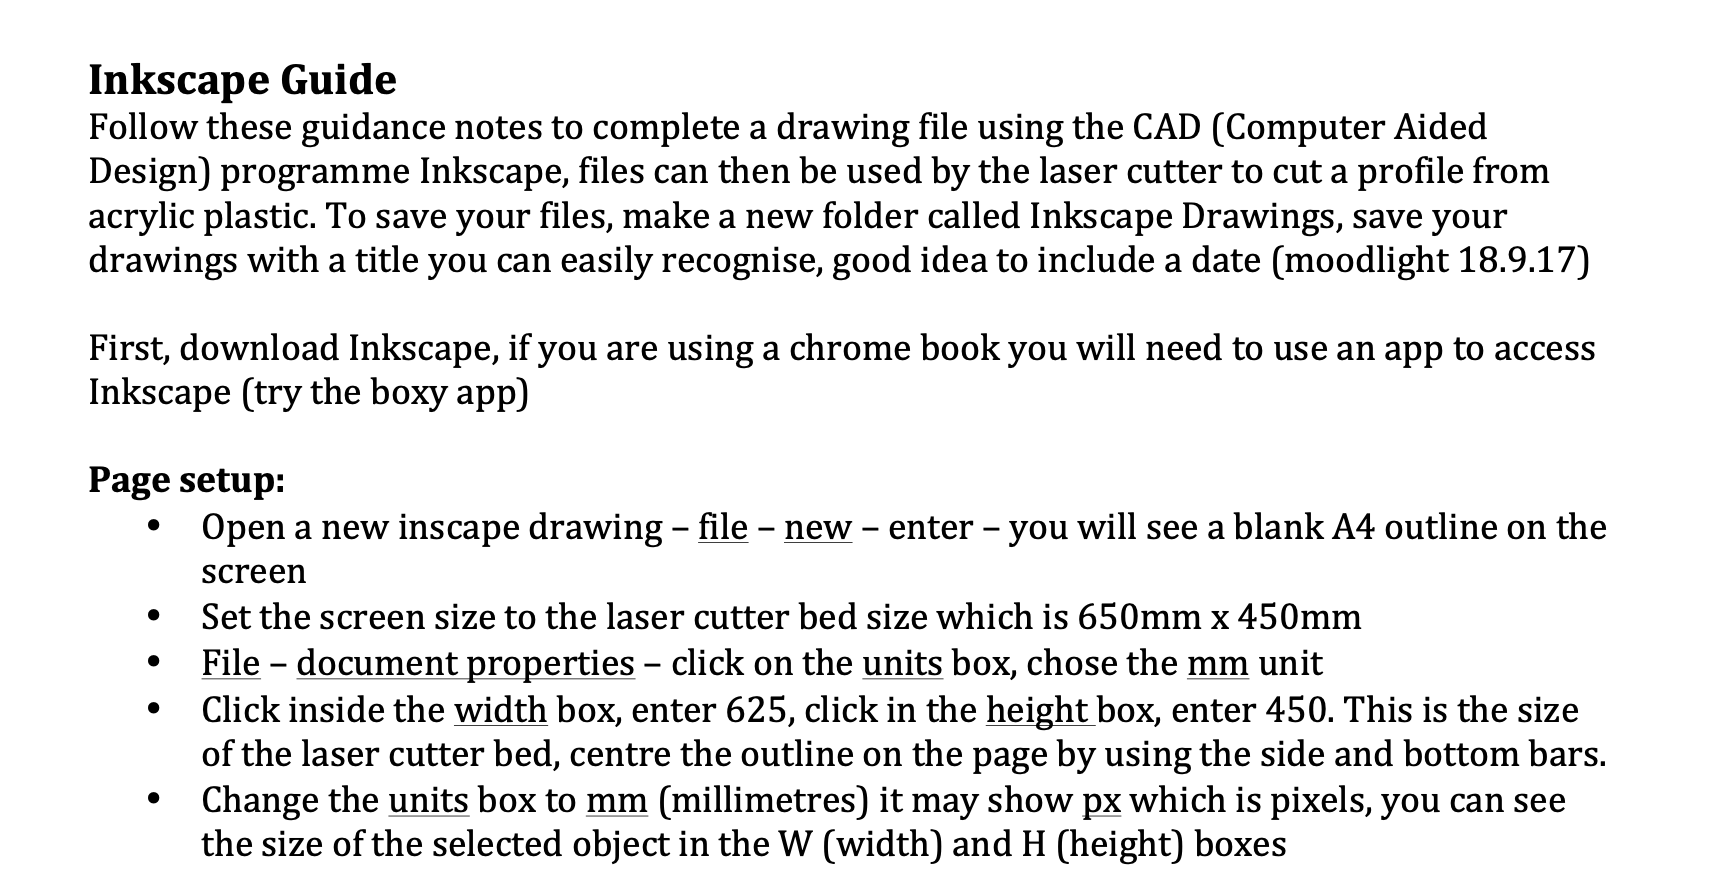

-
Kia ora...
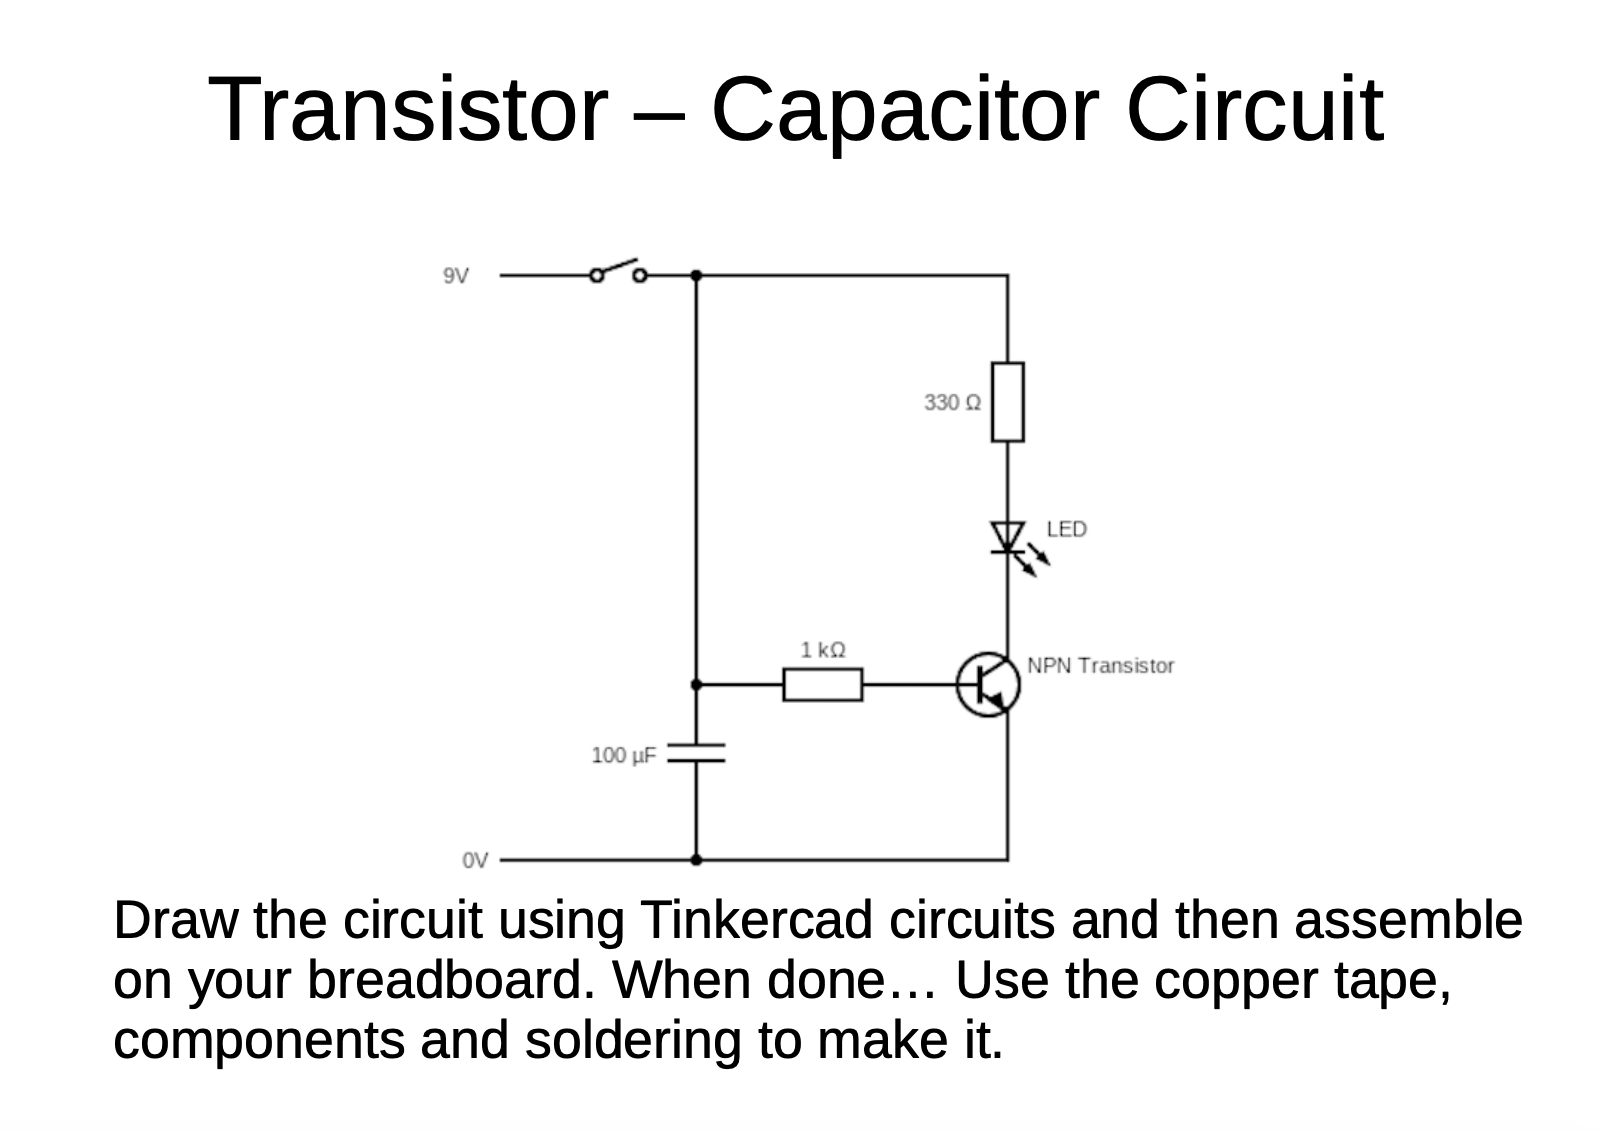
In this week we will build our transister - Capacitor circuit using Tinkercar software and then with electronic components with breadboard. we will also use soldering to make an actual circuit on cardboard.
Success Criteria:
1- I can construct a simple parallel and series LED circuit using breadboard and electronic component
2- I can use the multimeter to measure voltage, resistance, current and continuity circuits
3- I can solder correctly and safely.
4-I can construct a transister - Capacitor circuit and explain how transitor works
5- I can use and explain how LDR works
Activities:
- Link to Simple Electric circuit :
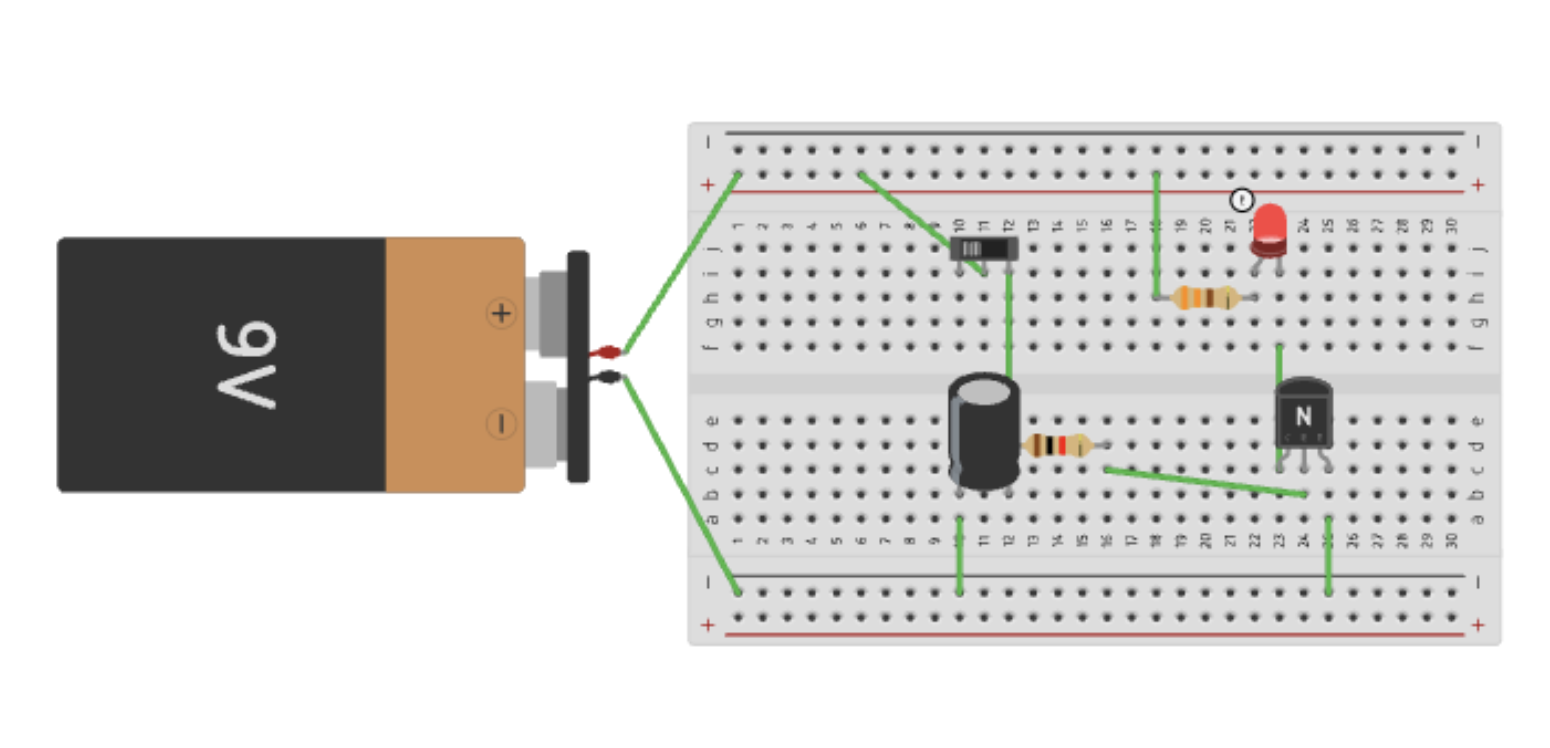
- Construct a transistor - Capacitor circuit using Tinkercad software then build on actual breadboard and components.
- Practical activity of soldering.
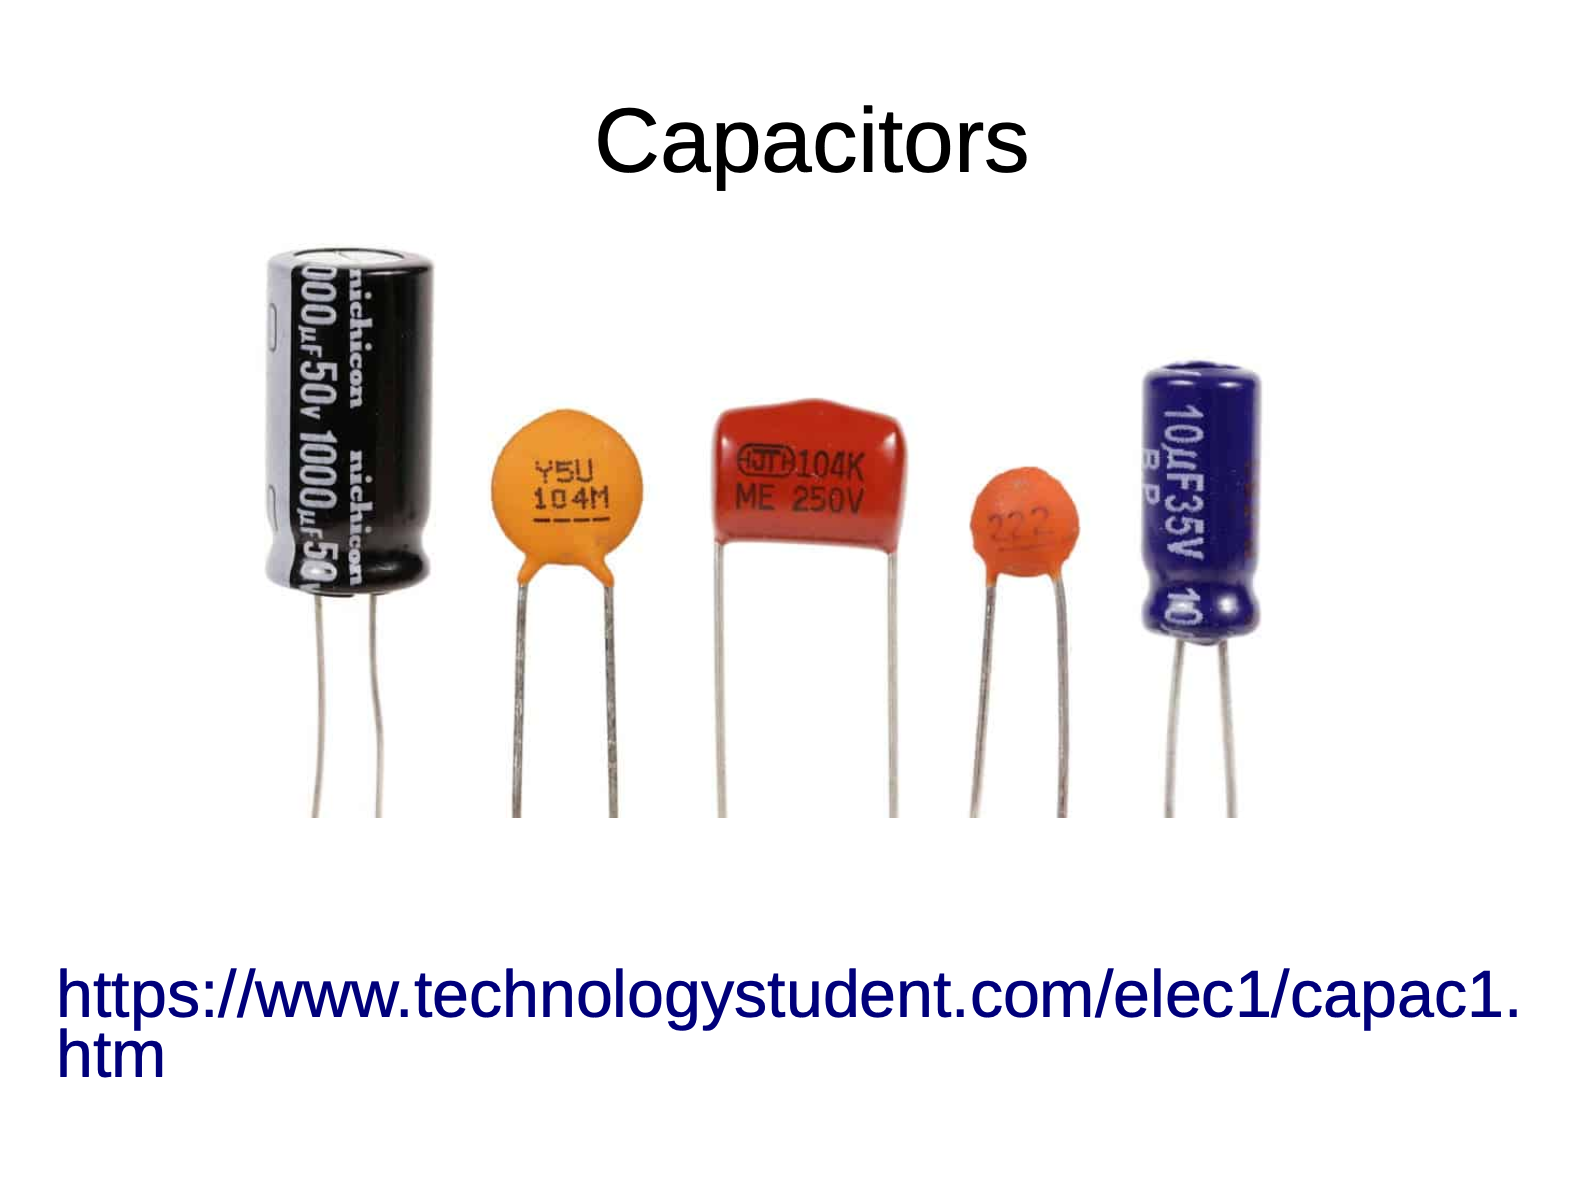
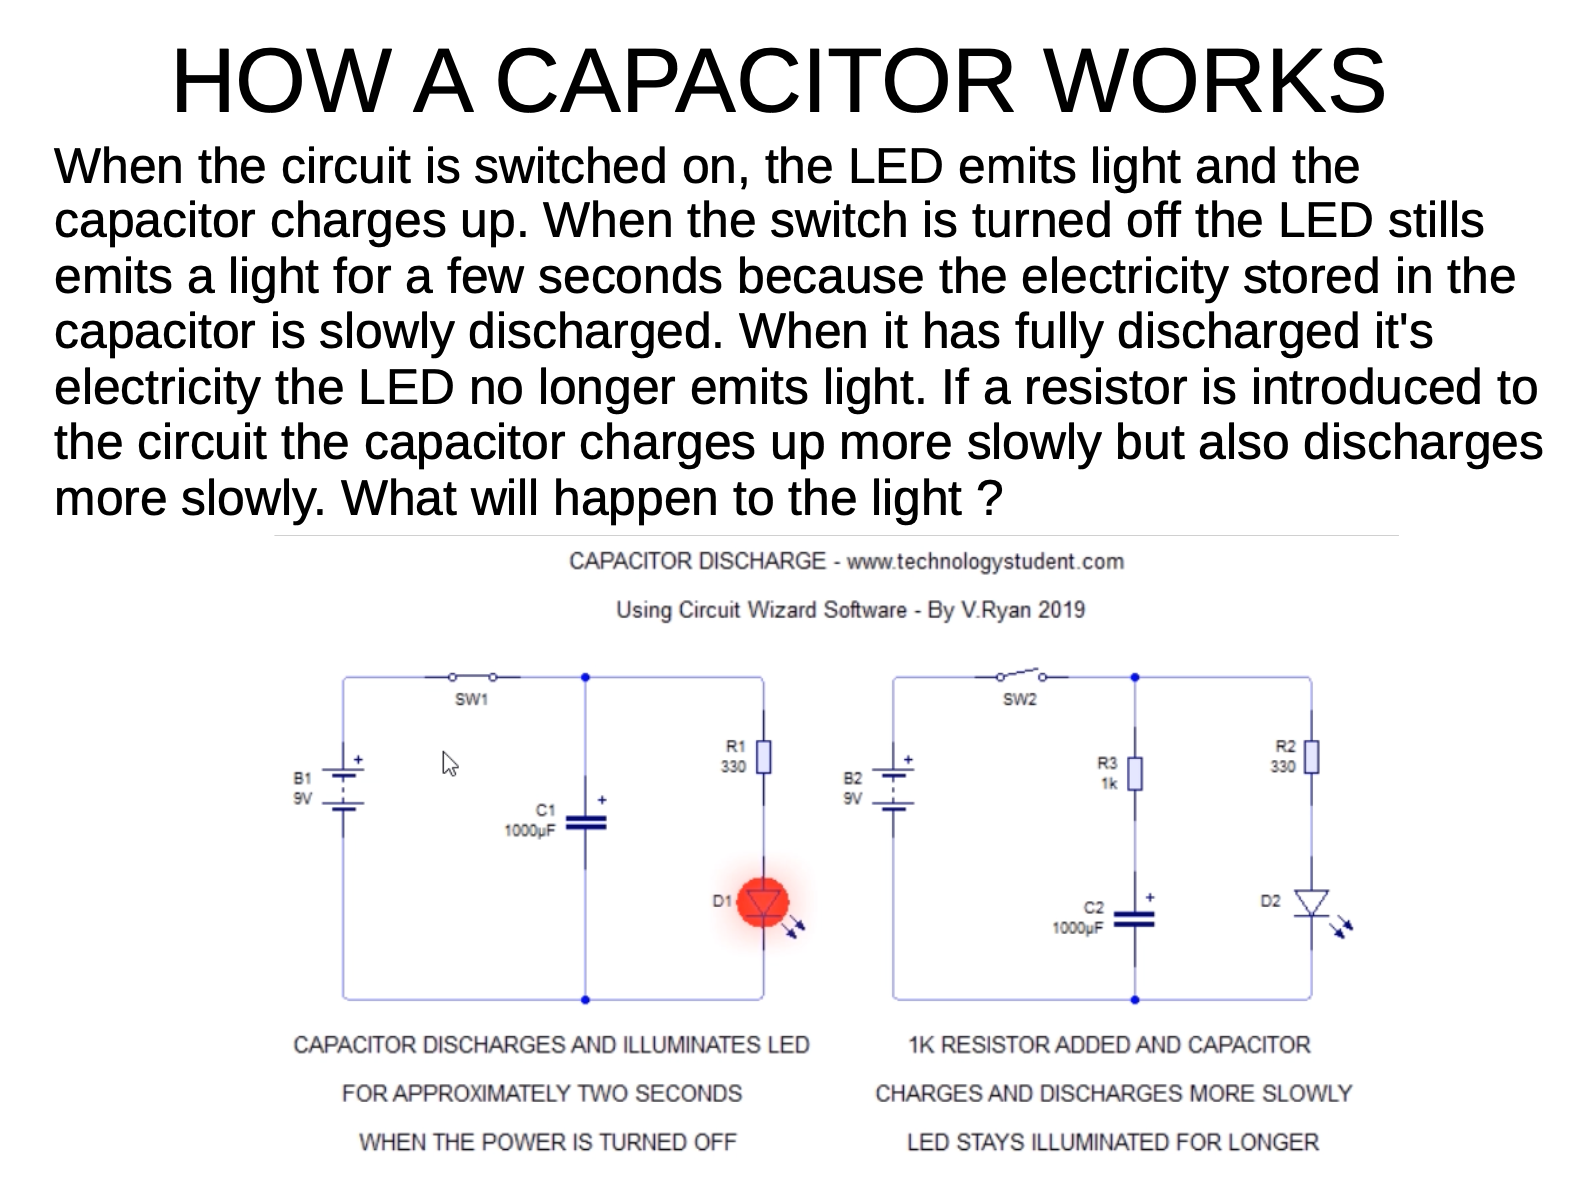
https://www.technologystudent.com/elec1/capac1.htm
-
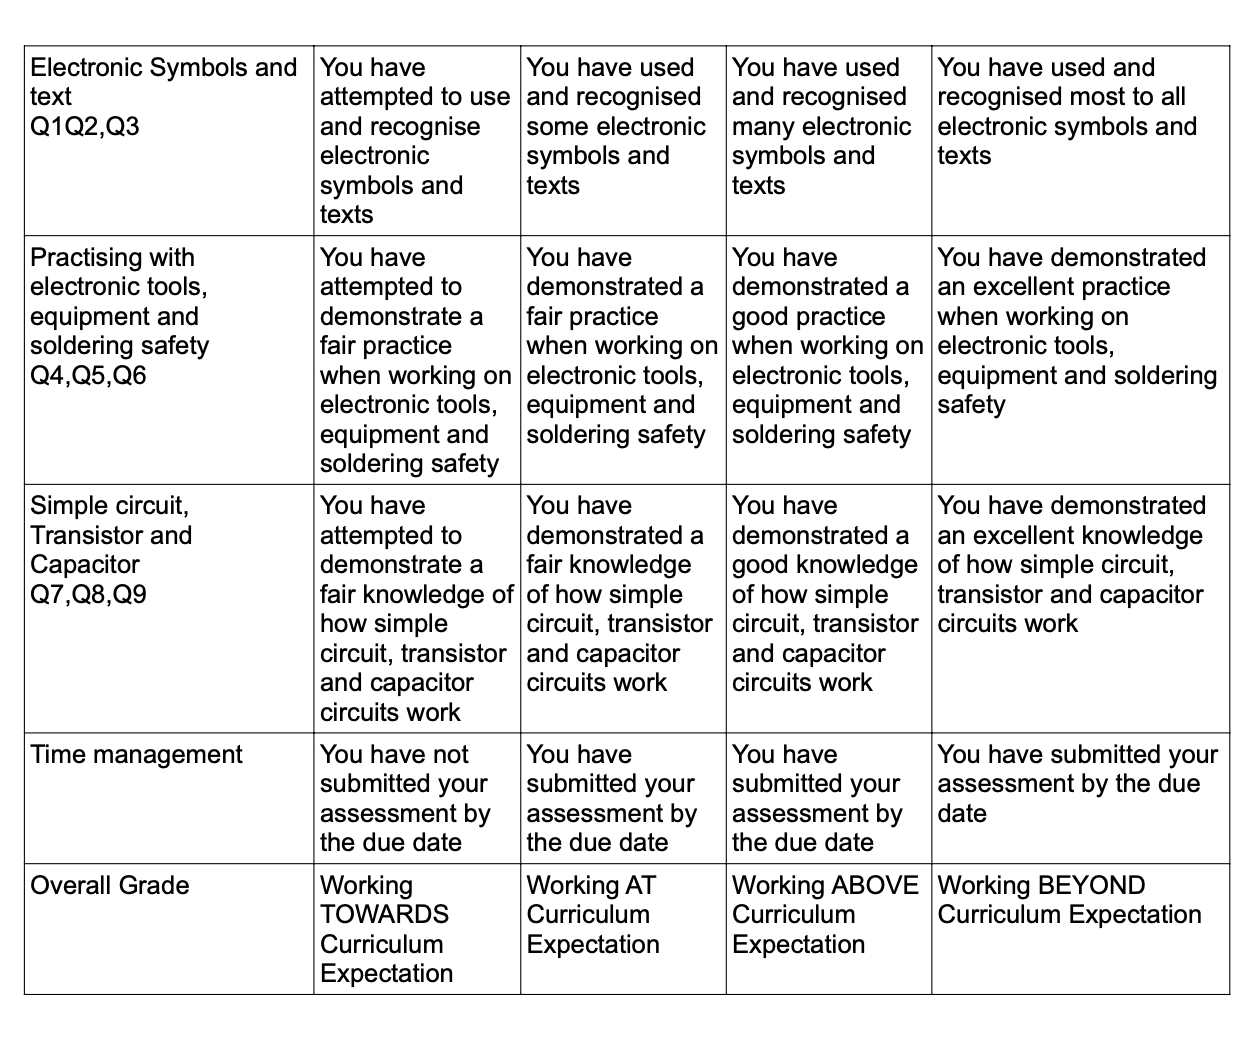
9DGT1 Assessment-2 Electronic Systems- Symbols and Circuits Rubric
-
Kia ora...
In this week we will build our transister - Capacitor circuit using Tinkercar software and then with electronic components with breadboard. we will also use soldering to make an actual circuit on cardboard.
Success Criteria:
1- I can construct a simple parallel and series LED circuit using breadboard and electronic component
2- I can use the multimeter to measure voltage, resistance, current and continuity circuits
3- I can solder correctly and safely.
4-I can construct a transister - Capacitor circuit and explain how transitor works
5- I can use and explain how LDR works
Activities:
- Link to Simple Electric circuit :
- Construct a transistor - Capacitor circuit using Tinkercad software then build on actual breadboard and components.
- Practical activity of soldering.
https://www.technologystudent.com/elec1/capac1.htm

-
Kia ora...
Welcome back to the digital technology course. I hope you have had a great school break and recharged your batteries for a new term.
Welcome to term2.
This week we will start learning about the 555 timer integrated circuits.

Learning Intentions:
use a 555 timer integrated circuit (IC) to operate an output for a specific amount of time
Success Criteria: I can/have...
construct a working prototype circuit using a 555 IC
Activities:
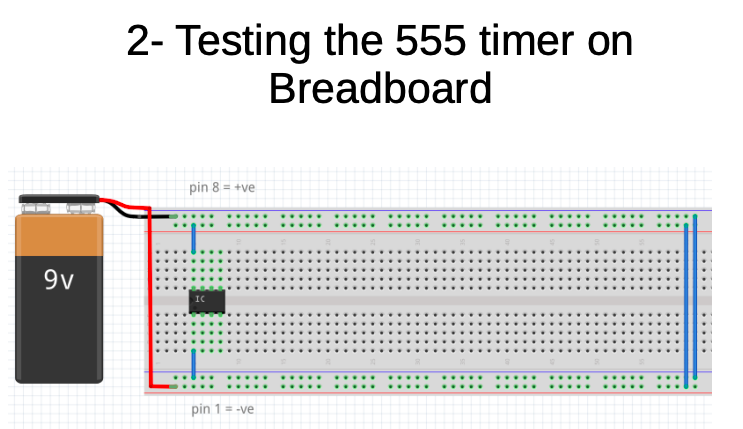
- insert the 555 into the breadboard, connect the power supply connections
- test for a voltage between the power pins, pin 1 = negative and pin 8 = positive
- when a voltage has been established, disconnect the 9V battery
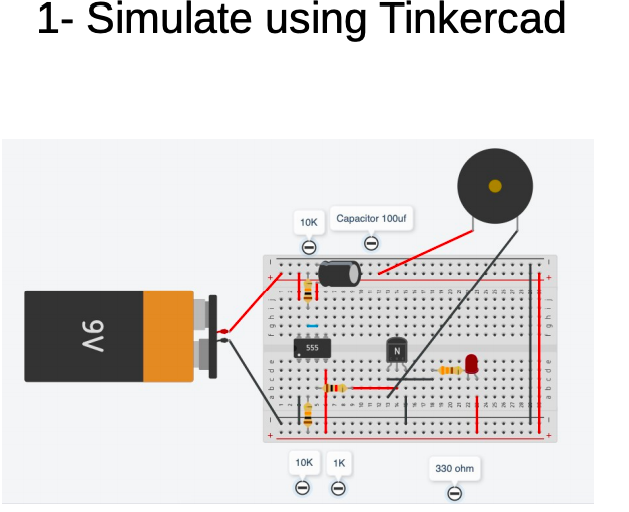
- look at the Tinkercad circuit diagram, learn the component symbols and where the components are connected to
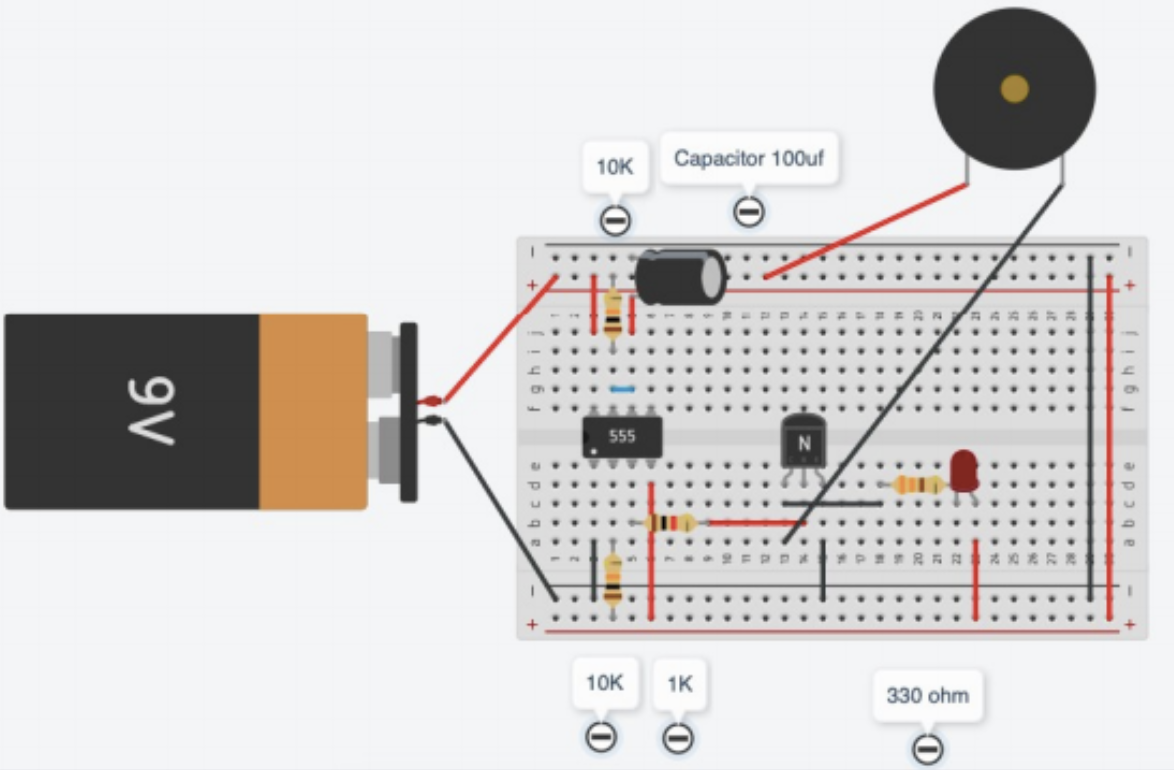
- insert the components as per the bread board diagram - connection wires must be straight and flat on the board - NO SPAGHETTI WIRES
- the switch will be made from two pieces of hook-up wire
- test it, LED should be on and then off for about 1 second
- Replace the capacitor 100 microfarad with 1000 microfarade and the LED will be on for 10 sec.
Time constant formula is T = R x CYou may find this website useful: http://www.555-timer-circuits.comdiagrams and pictures are loaded on your weekly course page
Now build this on actual breadboard using actual components:
-
Kia ora...
Steady Hand Game Using 555 Timer

Learning Intentions:
use a 555 timer integrated circuit (IC) to operate an output for a specific amount of time
Success Criteria: I can/have...
construct a working prototype circuit using a 555 IC
Activities:
- insert the 555 into the breadboard, connect the power supply connections
- test for a voltage between the power pins, pin 1 = negative and pin 8 = positive
- when a voltage has been established, disconnect the 9V battery
- look at the Tinkercad circuit diagram, learn the component symbols and where the components are connected to
- insert the components as per the bread board diagram - connection wires must be straight and flat on the board - NO SPAGHETTI WIRES
- the switch will be made from two pieces of hook-up wire
- test it, LED should be on and then off for about 1 second
You may find this website useful: http://www.555-timer-circuits.com/
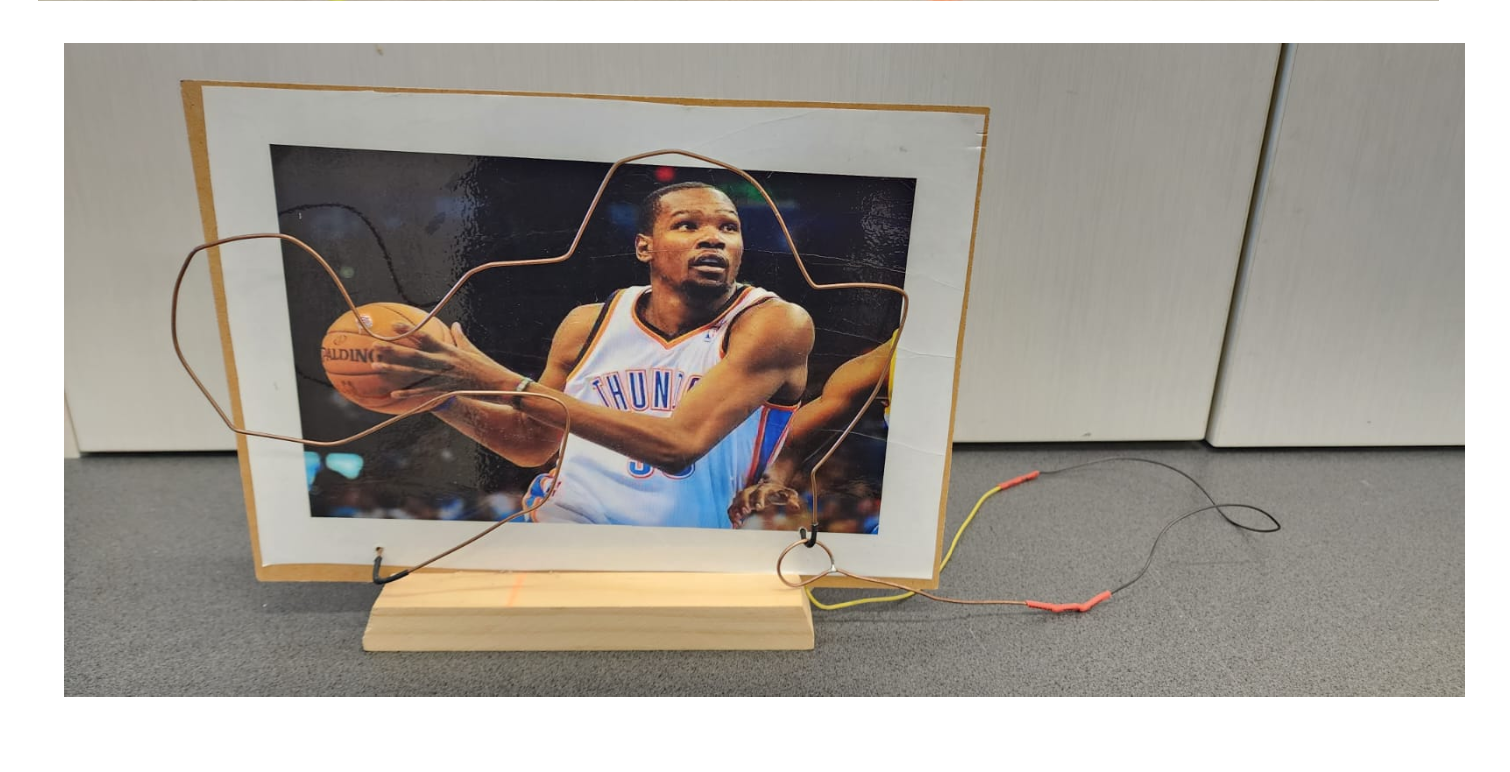
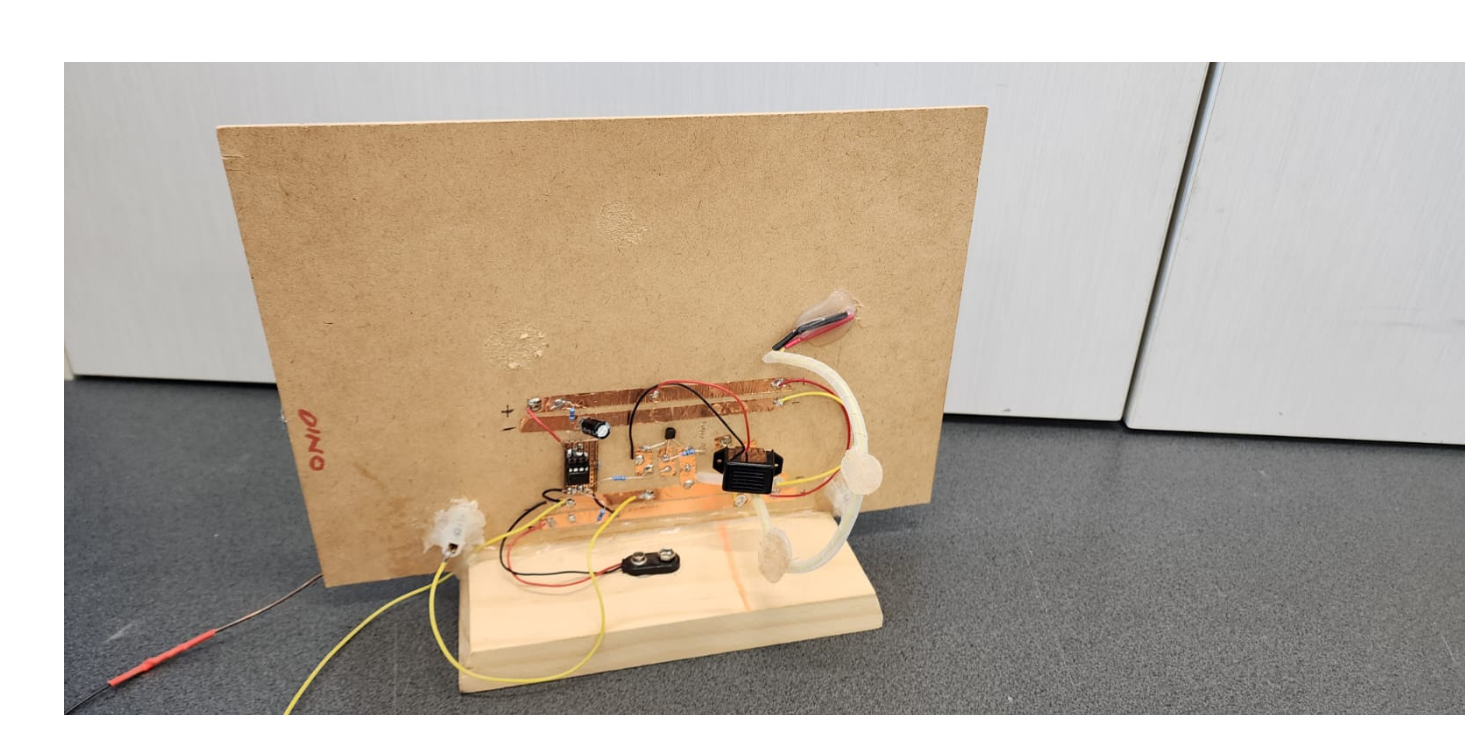
Construct the steady hand game using 555 timer.
Follow the photos for instructions:


-
Kia ora...
Steady Hand Game Using 555 Timer

Learning Intentions:
use a 555 timer integrated circuit (IC) to operate an output for a specific amount of time
Success Criteria: I can/have...
construct a working prototype circuit using a 555 IC
Activities:
- insert the 555 into the breadboard, connect the power supply connections
- test for a voltage between the power pins, pin 1 = negative and pin 8 = positive
- when a voltage has been established, disconnect the 9V battery
- look at the Tinkercad circuit diagram, learn the component symbols and where the components are connected to
- insert the components as per the bread board diagram - connection wires must be straight and flat on the board - NO SPAGHETTI WIRES
- the switch will be made from two pieces of hook-up wire
- test it, LED should be on and then off for about 1 second
You may find this website useful: http://www.555-timer-circuits.com/
Construct the steady hand game using 555 timer.
Follow the photos for instructions:


-
Kia ora...
Steady Hand Game Using 555 Timer

Learning Intentions:
use a 555 timer integrated circuit (IC) to operate an output for a specific amount of time
Success Criteria: I can/have...
construct a working prototype circuit using a 555 IC
Activities:
- insert the 555 into the breadboard, connect the power supply connections
- test for a voltage between the power pins, pin 1 = negative and pin 8 = positive
- when a voltage has been established, disconnect the 9V battery
- look at the Tinkercad circuit diagram, learn the component symbols and where the components are connected to
- insert the components as per the bread board diagram - connection wires must be straight and flat on the board - NO SPAGHETTI WIRES
- the switch will be made from two pieces of hook-up wire
- test it, LED should be on and then off for about 1 second
You may find this website useful: http://www.555-timer-circuits.com/
Construct the steady hand game using 555 timer.
Follow the photos for instructions:

-
- Learning Intentions:
use a 555 timer integrated circuit (IC) to operate an output for a specific amount of time
Success Criteria: I can/have...
construct a working prototype circuit using a 555 IC
Activities:
- insert the 555 into the breadboard, connect the power supply connections
- test for a voltage between the power pins, pin 1 = negative and pin 8 = positive
- when a voltage has been established, disconnect the 9V battery
- look at the Tinkercad circuit diagram, learn the component symbols and where the components are connected to
- insert the components as per the bread board diagram - connection wires must be straight and flat on the board - NO SPAGHETTI WIRES
- the switch will be made from two pieces of hook-up wire
- test it, LED should be on and then off for about 1 second
You may find this website useful: http://www.555-timer-circuits.com/
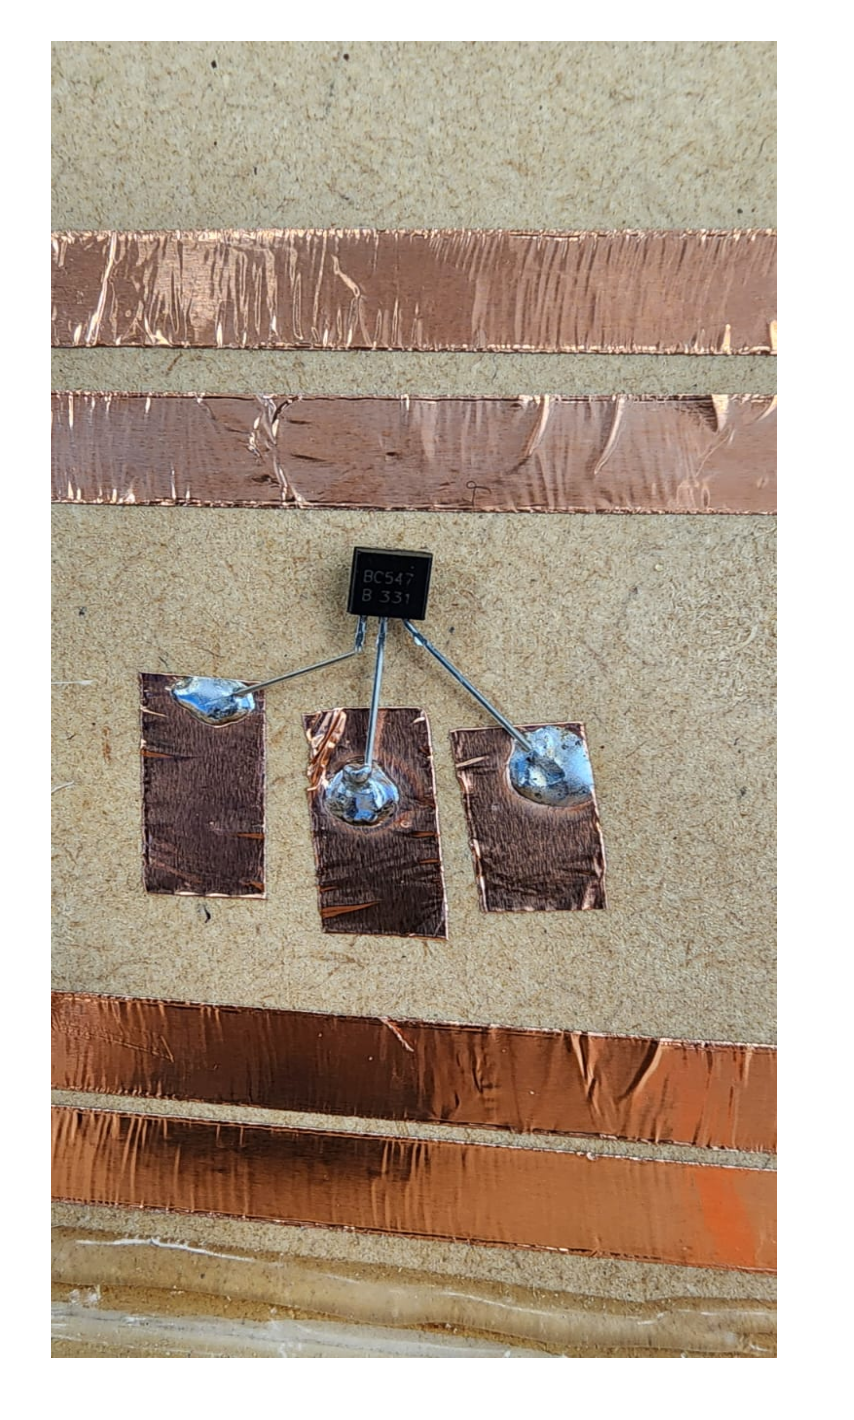
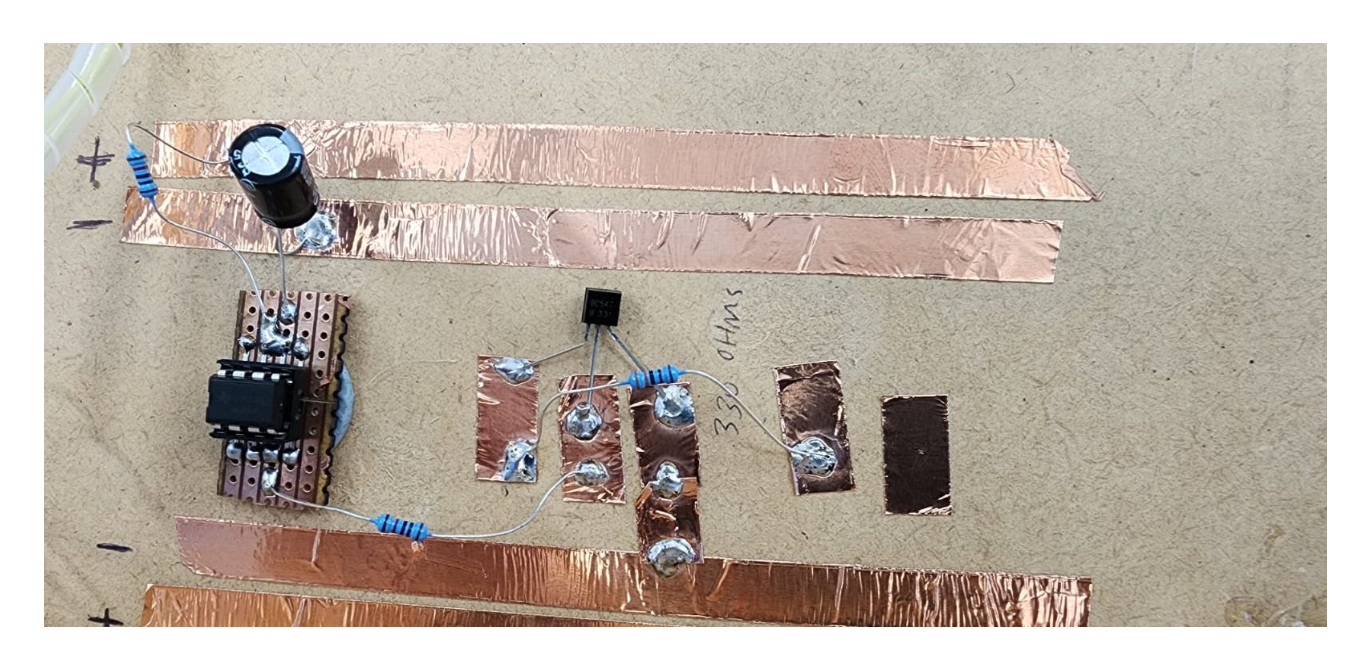
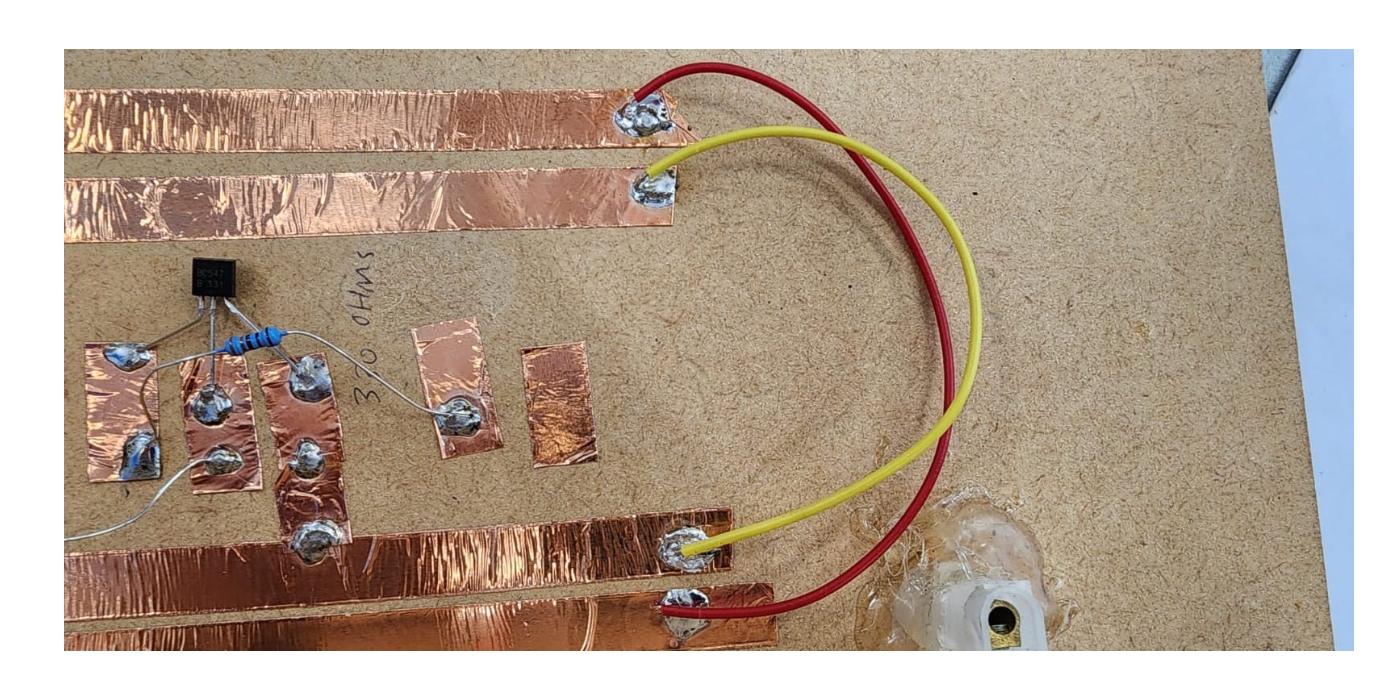
Construct the steady hand game using 555 timer.
Follow the photos for instructions:
-
Learning Intentions:
use a 555 timer integrated circuit (IC) to operate an output for a specific amount of time
Success Criteria: I can/have...
construct a working prototype circuit using a 555 IC
Activities:
- insert the 555 into the breadboard, connect the power supply connections
- test for a voltage between the power pins, pin 1 = negative and pin 8 = positive
- when a voltage has been established, disconnect the 9V battery
- look at the Tinkercad circuit diagram, learn the component symbols and where the components are connected to
- insert the components as per the bread board diagram - connection wires must be straight and flat on the board - NO SPAGHETTI WIRES
- the switch will be made from two pieces of hook-up wire
- test it, LED should be on and then off for about 1 second
You may find this website useful: http://www.555-timer-circuits.com/
Construct the steady hand game using 555 timer.
Follow the photos for instructions:
-
Learning Intentions:
use a 555 timer integrated circuit (IC) to operate an output for a specific amount of time
Success Criteria: I can/have...
construct a working prototype circuit using a 555 IC
Activities:
- insert the 555 into the breadboard, connect the power supply connections
- test for a voltage between the power pins, pin 1 = negative and pin 8 = positive
- when a voltage has been established, disconnect the 9V battery
- look at the Tinkercad circuit diagram, learn the component symbols and where the components are connected to
- insert the components as per the bread board diagram - connection wires must be straight and flat on the board - NO SPAGHETTI WIRES
- the switch will be made from two pieces of hook-up wire
- test it, LED should be on and then off for about 1 second
You may find this website useful: http://www.555-timer-circuits.com/
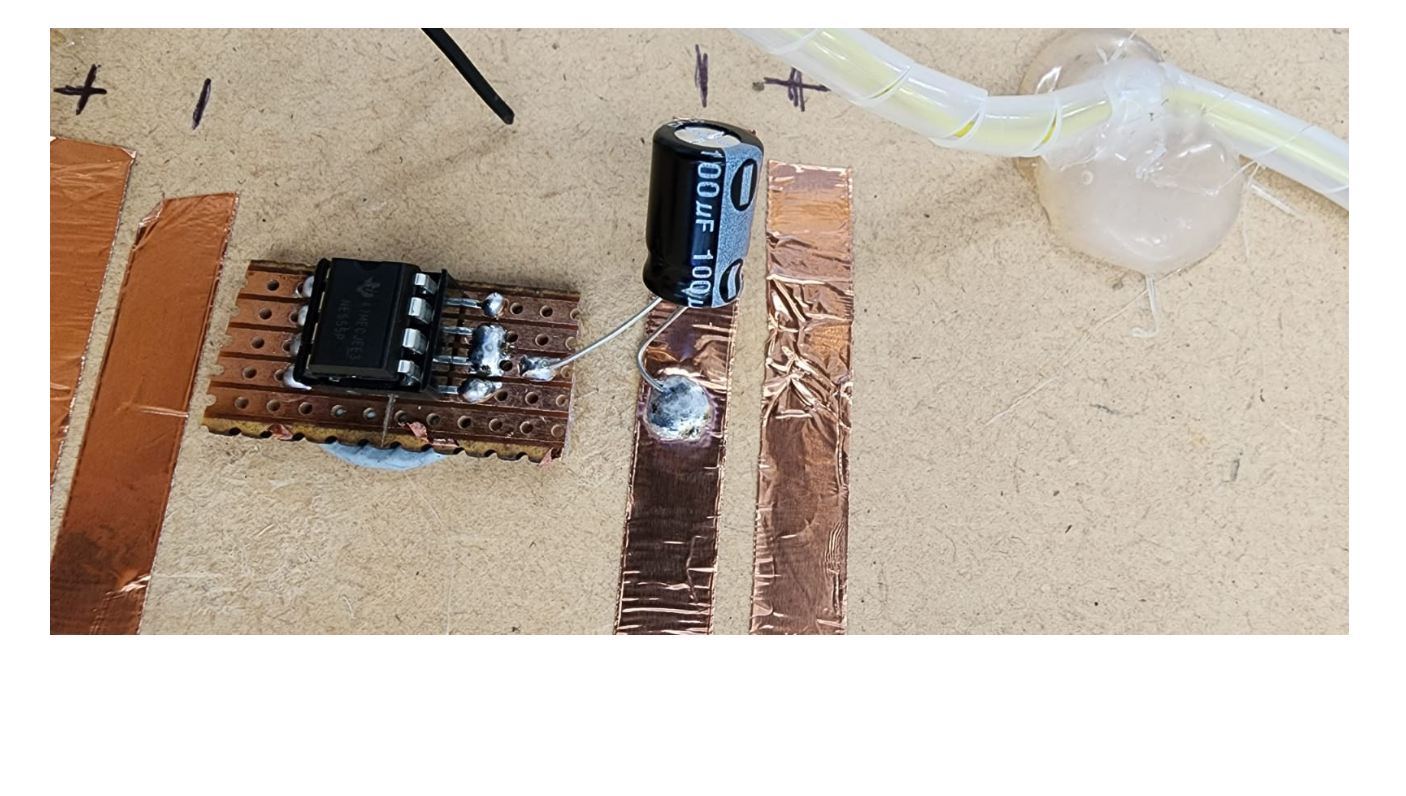
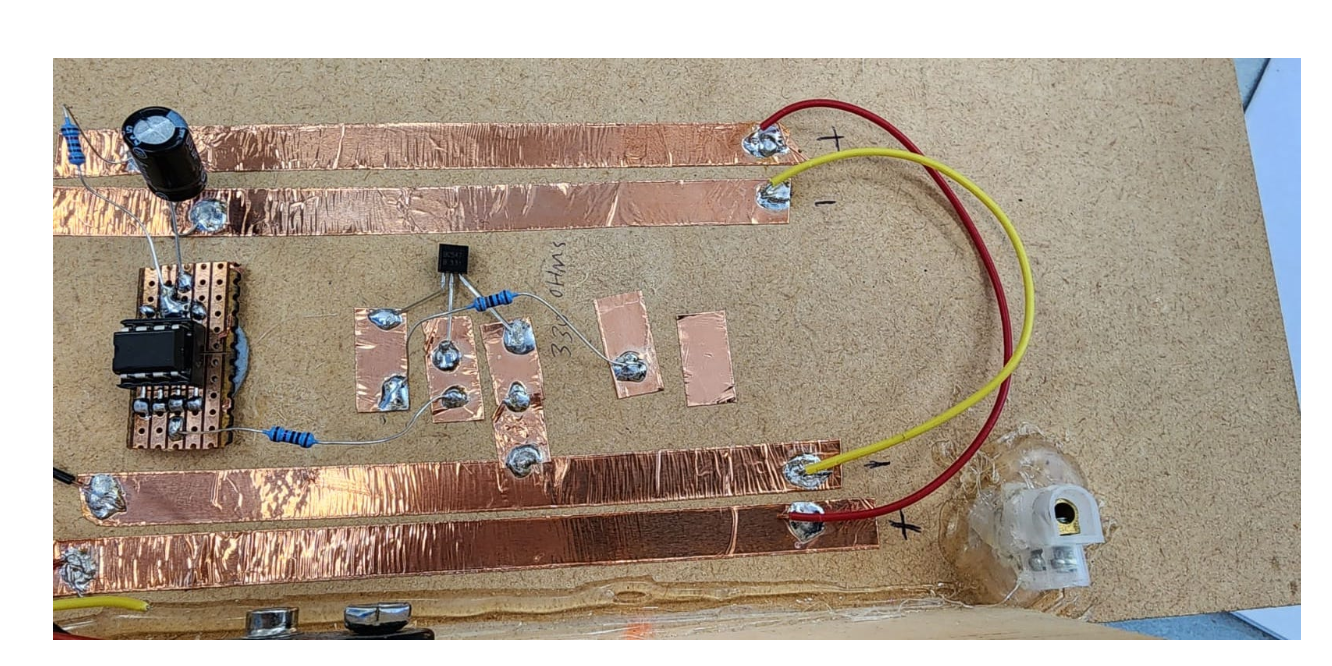
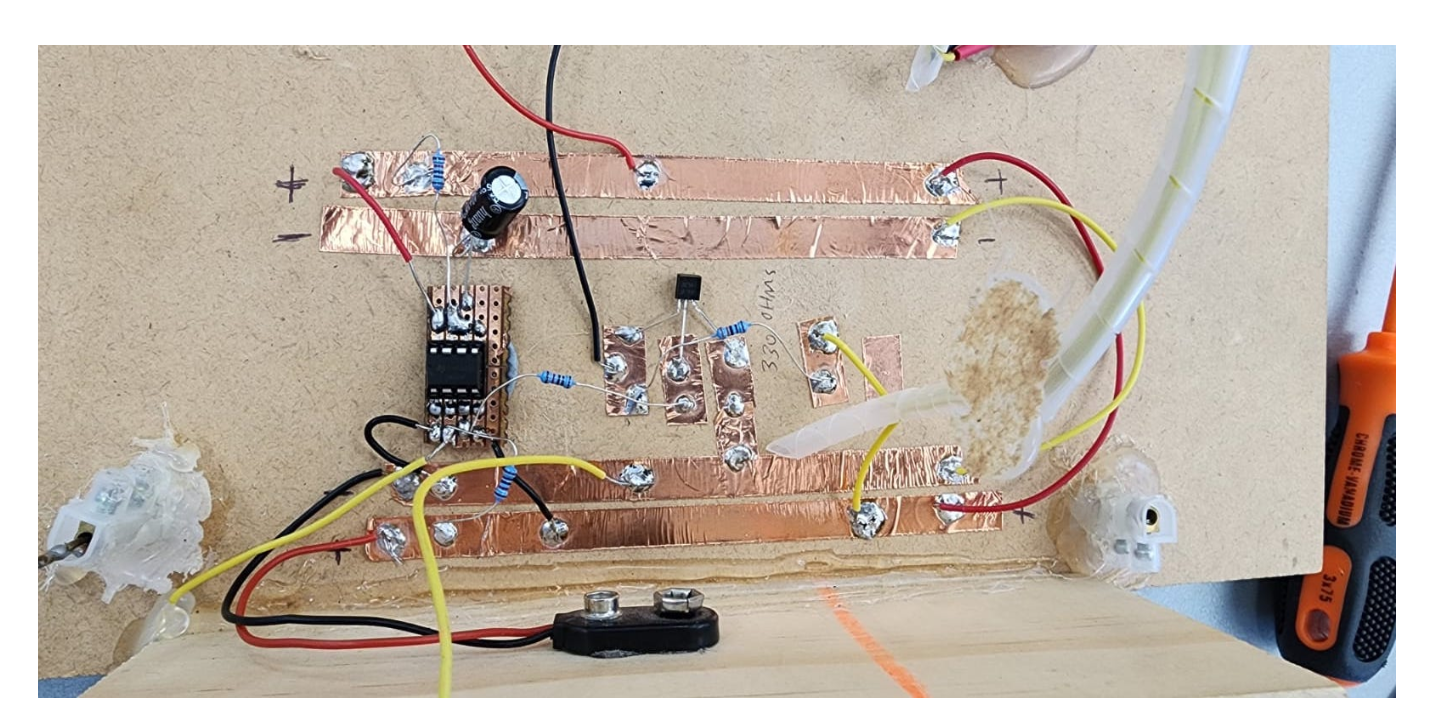
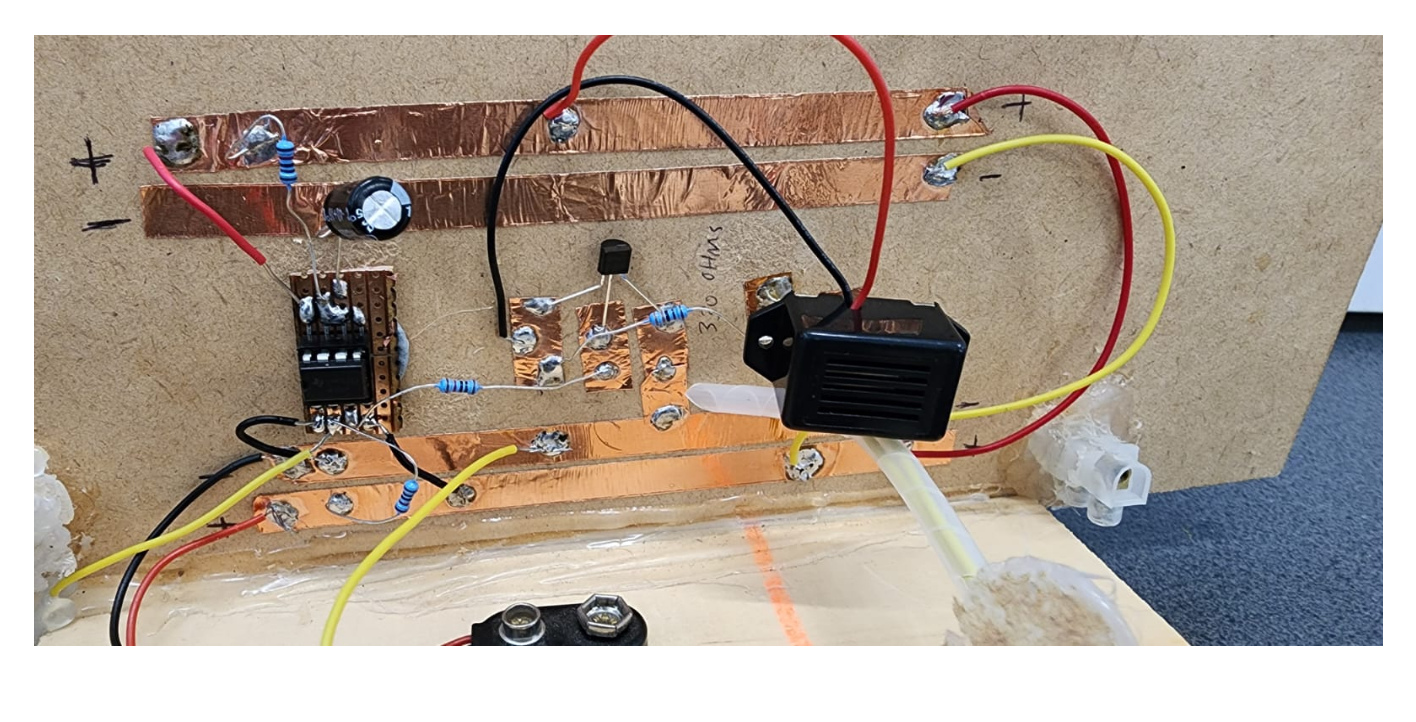
Construct the steady hand game using 555 timer.
Follow the photos for instructions:
-
Learning Intentions:
use a 555 timer integrated circuit (IC) to operate an output for a specific amount of time
Success Criteria: I can/have...
construct a working prototype circuit using a 555 IC
Activities:
- insert the 555 into the breadboard, connect the power supply connections
- test for a voltage between the power pins, pin 1 = negative and pin 8 = positive
- when a voltage has been established, disconnect the 9V battery
- look at the Tinkercad circuit diagram, learn the component symbols and where the components are connected to
- insert the components as per the bread board diagram - connection wires must be straight and flat on the board - NO SPAGHETTI WIRES
- the switch will be made from two pieces of hook-up wire
- test it, LED should be on and then off for about 1 second
You may find this website useful: http://www.555-timer-circuits.com/
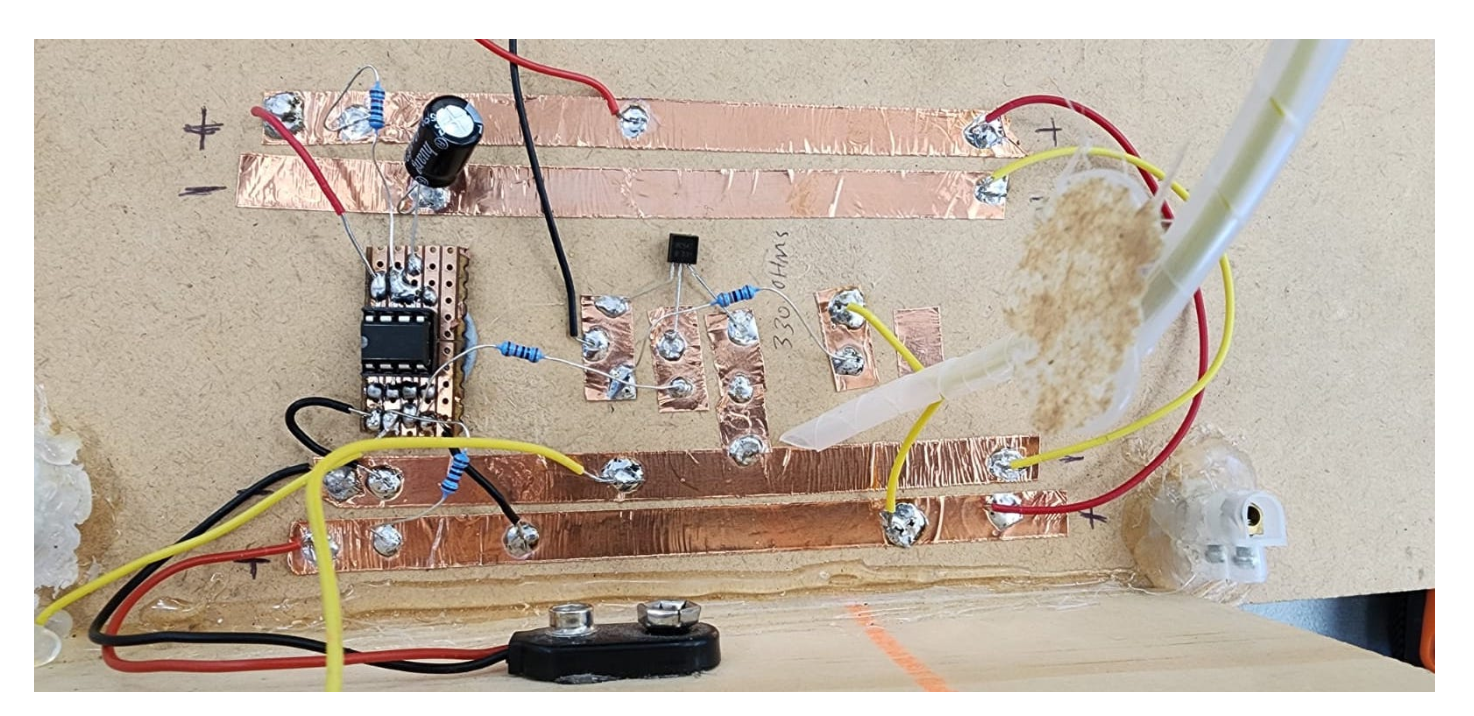
Construct the steady hand game using 555 timer.
Follow the photos for instructions:

-
Learning Intentions:
use a 555 timer integrated circuit (IC) to operate an output for a specific amount of time
Success Criteria: I can/have...
construct a working prototype circuit using a 555 IC
Activities:
- insert the 555 into the breadboard, connect the power supply connections
- test for a voltage between the power pins, pin 1 = negative and pin 8 = positive
- when a voltage has been established, disconnect the 9V battery
- look at the Tinkercad circuit diagram, learn the component symbols and where the components are connected to
- insert the components as per the bread board diagram - connection wires must be straight and flat on the board - NO SPAGHETTI WIRES
- the switch will be made from two pieces of hook-up wire
- test it, LED should be on and then off for about 1 second
You may find this website useful: http://www.555-timer-circuits.com/
Construct the steady hand game using 555 timer.
Follow the photos for instructions:
